


")
")

 and it removes old modem drivers")

Unlike Windows 11, Microsoft’s new minimum system requirement is pretty bad.
Following the announcement of the next-gen operating system, there’s been a lot of excitement and confusion. Users are confused about the minimum hardware requirements for installing Windows 11 and Microsoft has been trying to clarify the situation by updating its documentation.
Microsoft has removed the “soft” and “hard” floor requirement that initially suggested all devices with TPM 1.2 and older PCs will be supported officially. Microsoft has also quietly updated its Windows compatibility support documentation confirming that TPM 2.0 is a minimum hardware requirement alongside newer CPUs.
In addition to documents, Microsoft officials have also independently confirmed a TPM chip version 2.0 is required for installing Windows 11 on existing Windows 10 hardware.
Whether you don’t have version 2.0 of TPM or you don’t have the TPM chip at all, we have a solution. By making changes to Windows Registry or installation media, you can bypass any TPM restrictions and unblock Windows 11, basically allowing anyone to upgrade their existing machine to the new operating system.
In addition to TPM, you can also bypass the SecureBoot restriction.
Bypass the TPM requirement in Windows 11 by editing Registry
On unsupported devices, if you try to install the new OS, a message “This PC can’t run Windows 11” will appear on your screen stating that the computer isn’t compatible.
Thankfully, you can remove the error and bypass the requirement by simply editing Windows Registry during the installation process of the new operating system.
To bypass the TPM 2.0 requirement when installing Windows 11, use these steps:
- Create your own media installation of Windows 11. This can be done by manually creating a disc image (ISO) from the UUP image. Or you can wait for the official ISO release.
- Start the installation process of Windows 11.
- Click the Next button.

- Select region, language and time when asked. You can change these settings later.

- Click the Install now button.
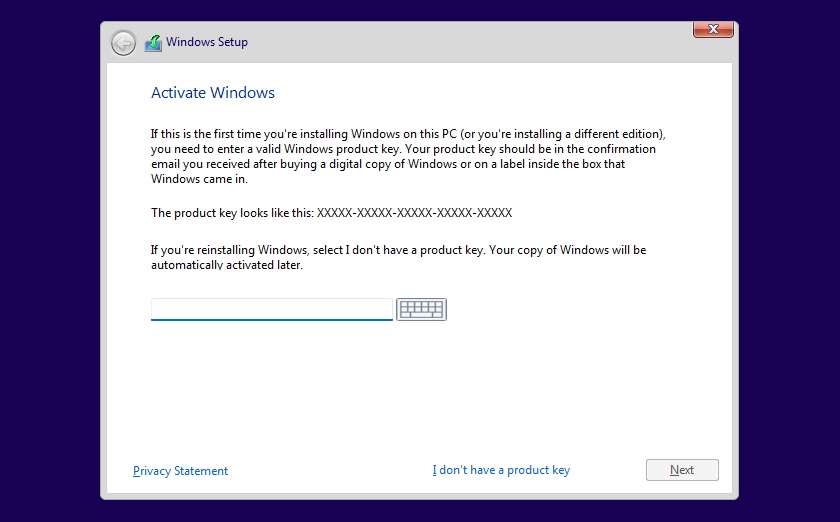
- If your device was already activated, click the I don’t have a product key option to continue.
- Click the Next button.

- Select the edition of Windows. When you’re installing the OS on an existing device, Windows won’t activate if you select the incorrect edition.
- Click the Next button.
- Select the I accept the license terms option and click next.
- Select Custom: Install Windows only (Advanced)
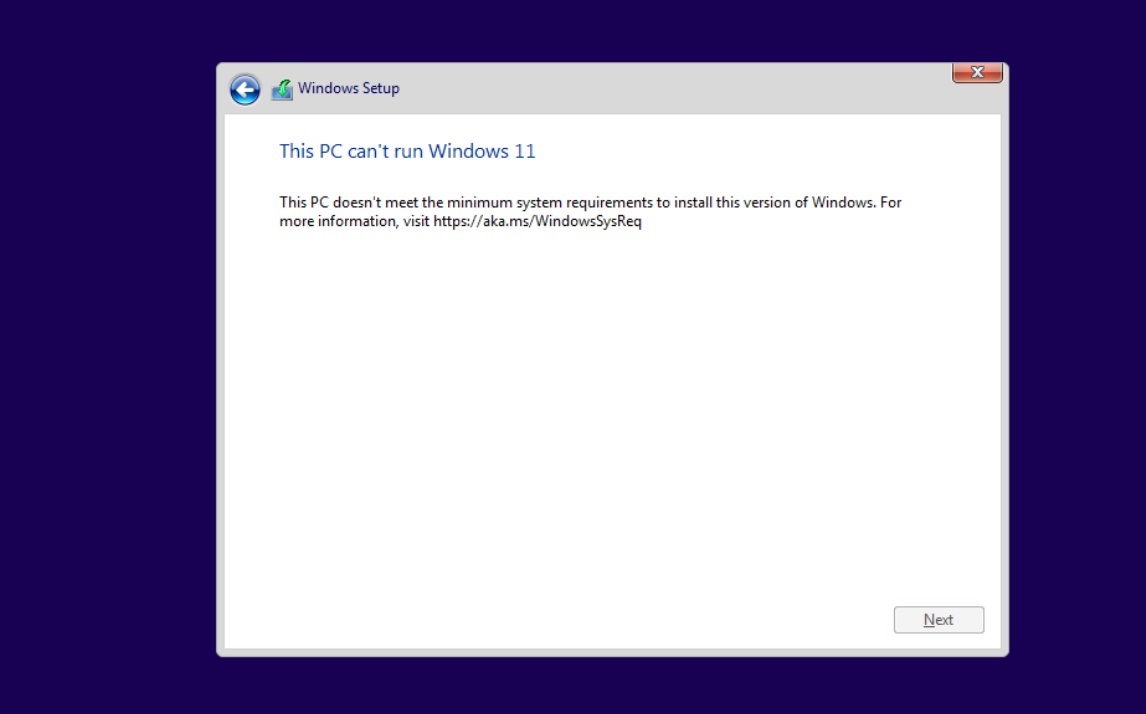
- During the Windows installation screen, you may now see the above message stating that the PC can’t run Windows 11.
- On this screen, press Shift+F10 to open Command Prompt window. Using Command Prompt, launch Registry Editor to modify the registry.
- To launch the editor, type regedit.exe in Command Prompt.
- Create a new key “LabConfig” under HKEY_LOCAL_MACHINE\SYSTEM\Setup.
- To do this, right-click on the Setup key and select New > Key.
- Type LabConfig and press enter.
- Right-click on the LabConfig key.
- Select New > DWORD (32-bit) value.
- Create two values: BypassTPMCheck and BypassSecureBootCheck. Set their DWORD32 value to 1.
- Press enter.
- Close the Registry Editor.
- Type exit in the Command Prompt or close its window.
- Press the back button in the Windows installation setup when if it still says “This PC can’t run Windows 11”.

- Accept the terms & conditions.
- Select Custom: Install Windows only (Advanced) option and configure the partition with the current installation.
- Click the Next button.
Once you complete these steps, Windows 11 will be installed on the computer and everything will work except these security features: Device encryption, vTPM in Hyper-V, and all TPM-related services.
If you don’t want to make edits to the registry manually, you can also create a .reg file with the following line of code:
Windows Registry Editor Version 5.00 [HKEY_LOCAL_MACHINE\SYSTEM\Setup\LabConfig] “BypassTPMCheck”=dword:00000001 “BypassSecureBootCheck”=dword:00000001
Save this (.reg) file in a USB drive and perform a clean installation of Windows 11. During the installation process, press Shift + F10 and type notepad and hit enter.
In Notepad, open the file menu and locate and apply the reg file. This will bypass the TPM+SecureBoot requirements.
Bypass the TPM in Windows 11 by modifying the installation media
The second method involves modifying the ISO file. If you want to upgrade the operating system by running the setup.exe directly from Windows 11 media image, there’s another simple workaround.
To install Windows 11 without TPM 2.0, use these steps:
- Replace the appraiserres.dll in the sources folder on your installation media with the version of that file from a Windows 10 ISO.
- Recreate the ISO image using a third-party tool like Rufus, UltraISO or AnyBurn.
- Run the setup file again.
If you want to deploy the new OS on multiple machines for a clean installation, you can always use Windows ADK to automate the process and create your own ISO.
It’s worth noting that these workarounds have been tested with the preview build of Windows and they may or may not work when the OS is released later this year or early next year. For now, it looks like it would be possible to bypass these restrictions by making changes to the default installation process.
It’s also pretty obvious that TPM is not something that is fundamentally needed for Windows 11.


")
")

 and it removes old modem drivers")
