")


 update on more PCs, requires a reboot to install")

")

 and it removes old modem drivers")


Yes, you can still bypass Windows 11 requirements TPM 2.0, 4GB of RAM and SecureBoot. After bypassing, you can install Windows 11 25H2 on unsupported PCs that ship with Windows 10. We tested it with the most recent version of Windows 11 25H2, and all known bypasses still work.
Windows 10 has officially reached its end-of-life on October 14, 2025, which is more than ten years launch since its launch. And as such, the aging OS ran pretty smoothly on older hardware. But if your PC doesn’t support Windows 11’s minimum requirements, you can bypass these to install the newer OS.
One of the biggest criticisms that Windows 11 faced when it launched on October 5, 2021, was the “unreasonable” requirements that Microsoft had put forth for Windows 10 PCs to get upgraded to the newer, more feature-rich, and more secure OS.
What are the Windows 11 25H2 requirements?
Windows 11 25H2 needs only a 1GHz dual-core CPU as a minimum, that CPU should also support TPM 2.0, and your system should have at least 4GB of RAM as well. While the latter is a simple and cheap upgrade, changing to a CPU or motherboard with TPM 2.0 is pretty much like buying a new computer.
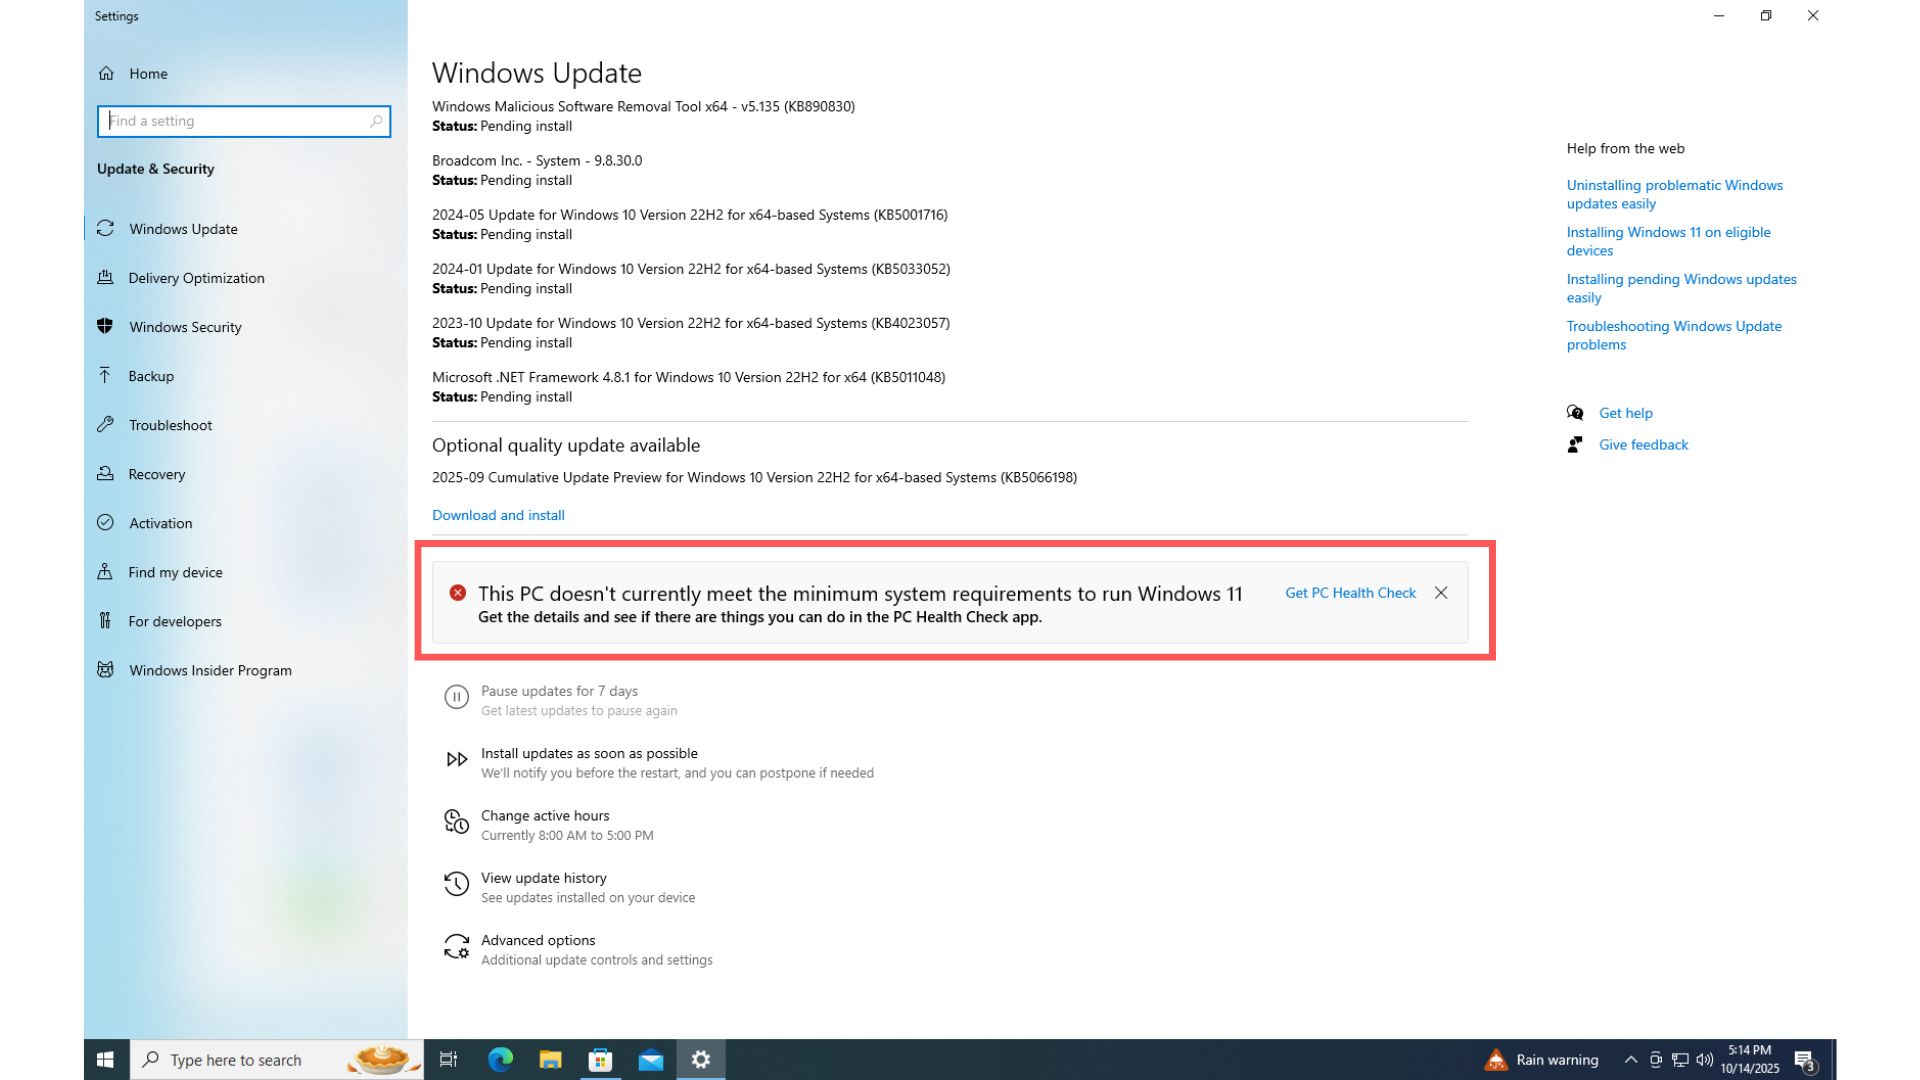
I have a Windows 10 PC here, which runs very well on just 2GB of RAM. However, the Windows Update page shows that my PC doesn’t meet the minimum requirements.
How to check if my PC supports Windows 11 requirements?
To check whether your Windows 10 PC supports Windows 11, go to Settings > Update & Security. If yes, you’ll get a prompt to download and install Windows 11; else, you’ll get a screen like I did or a button that asks you to Enroll now to Windows 10 Extended Security Updates.
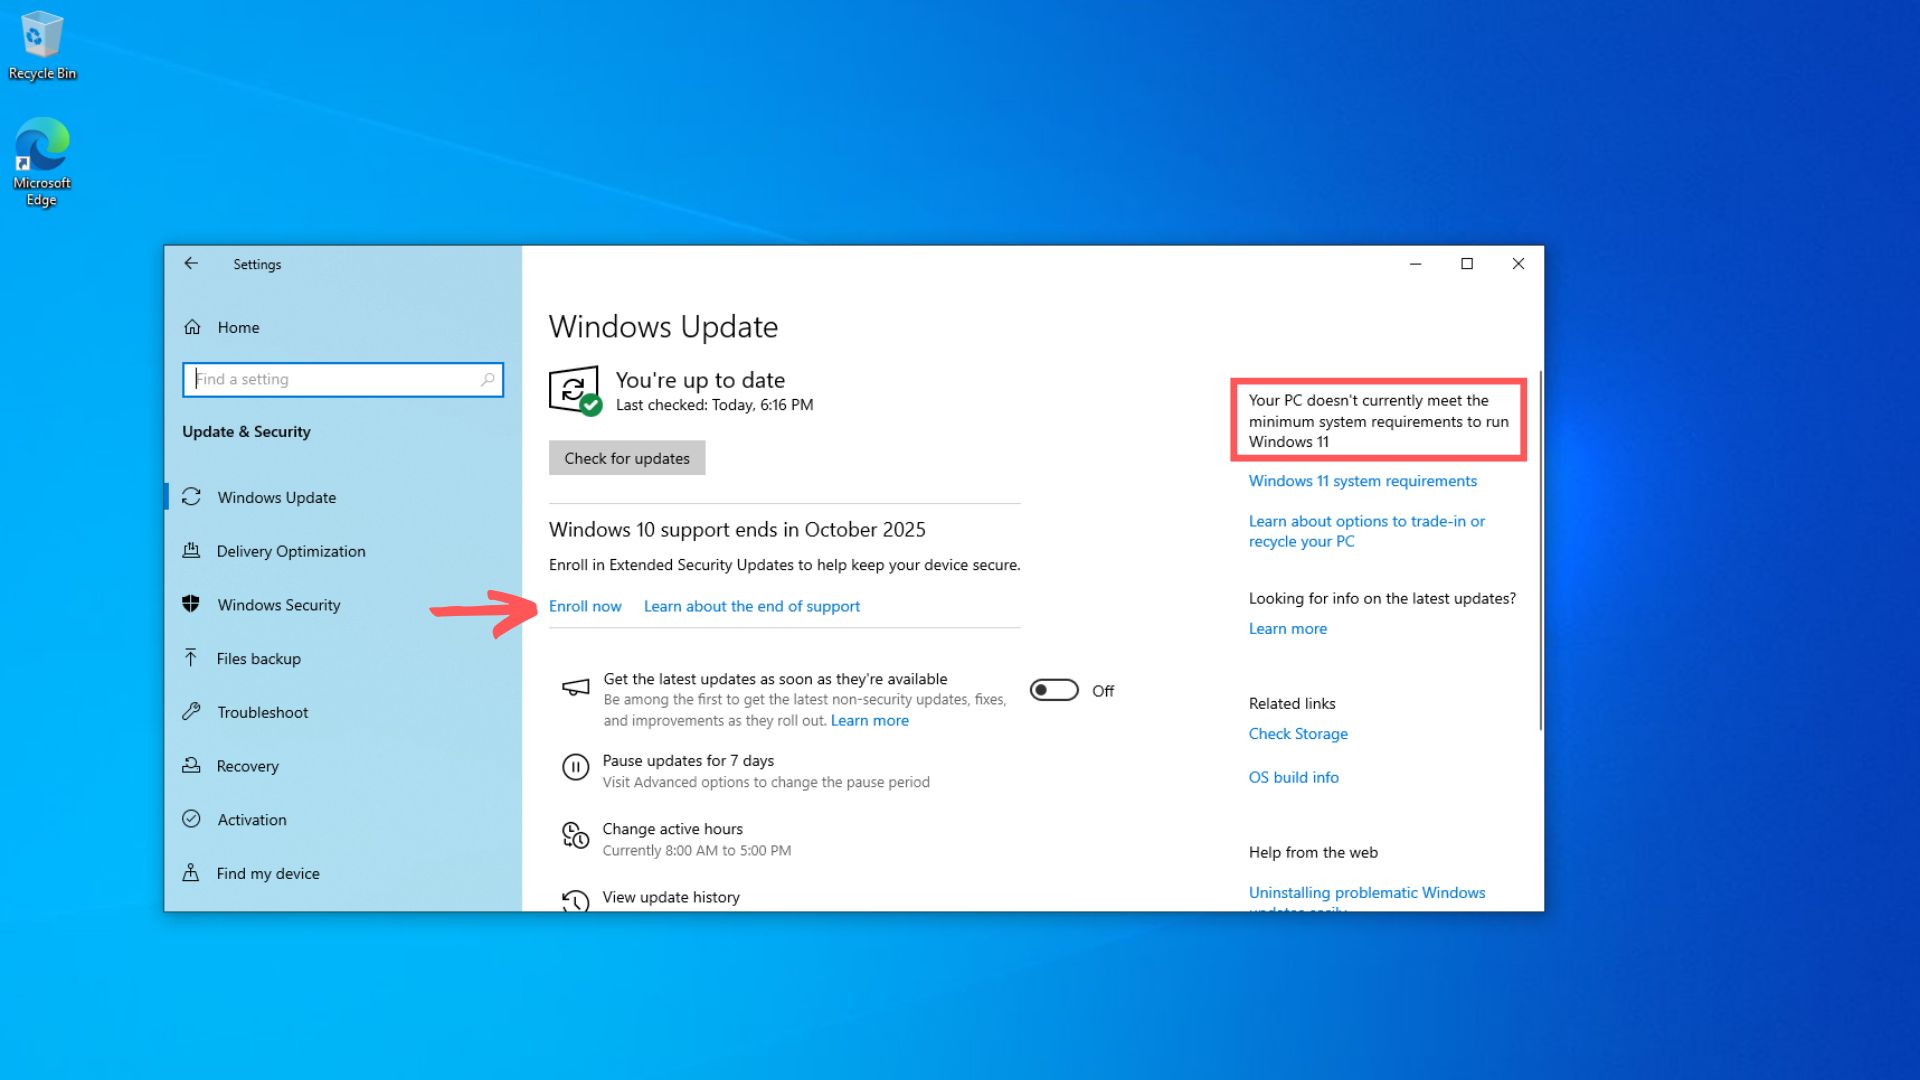
Click the button if you want to continue using Windows 10, with one more year of security updates.
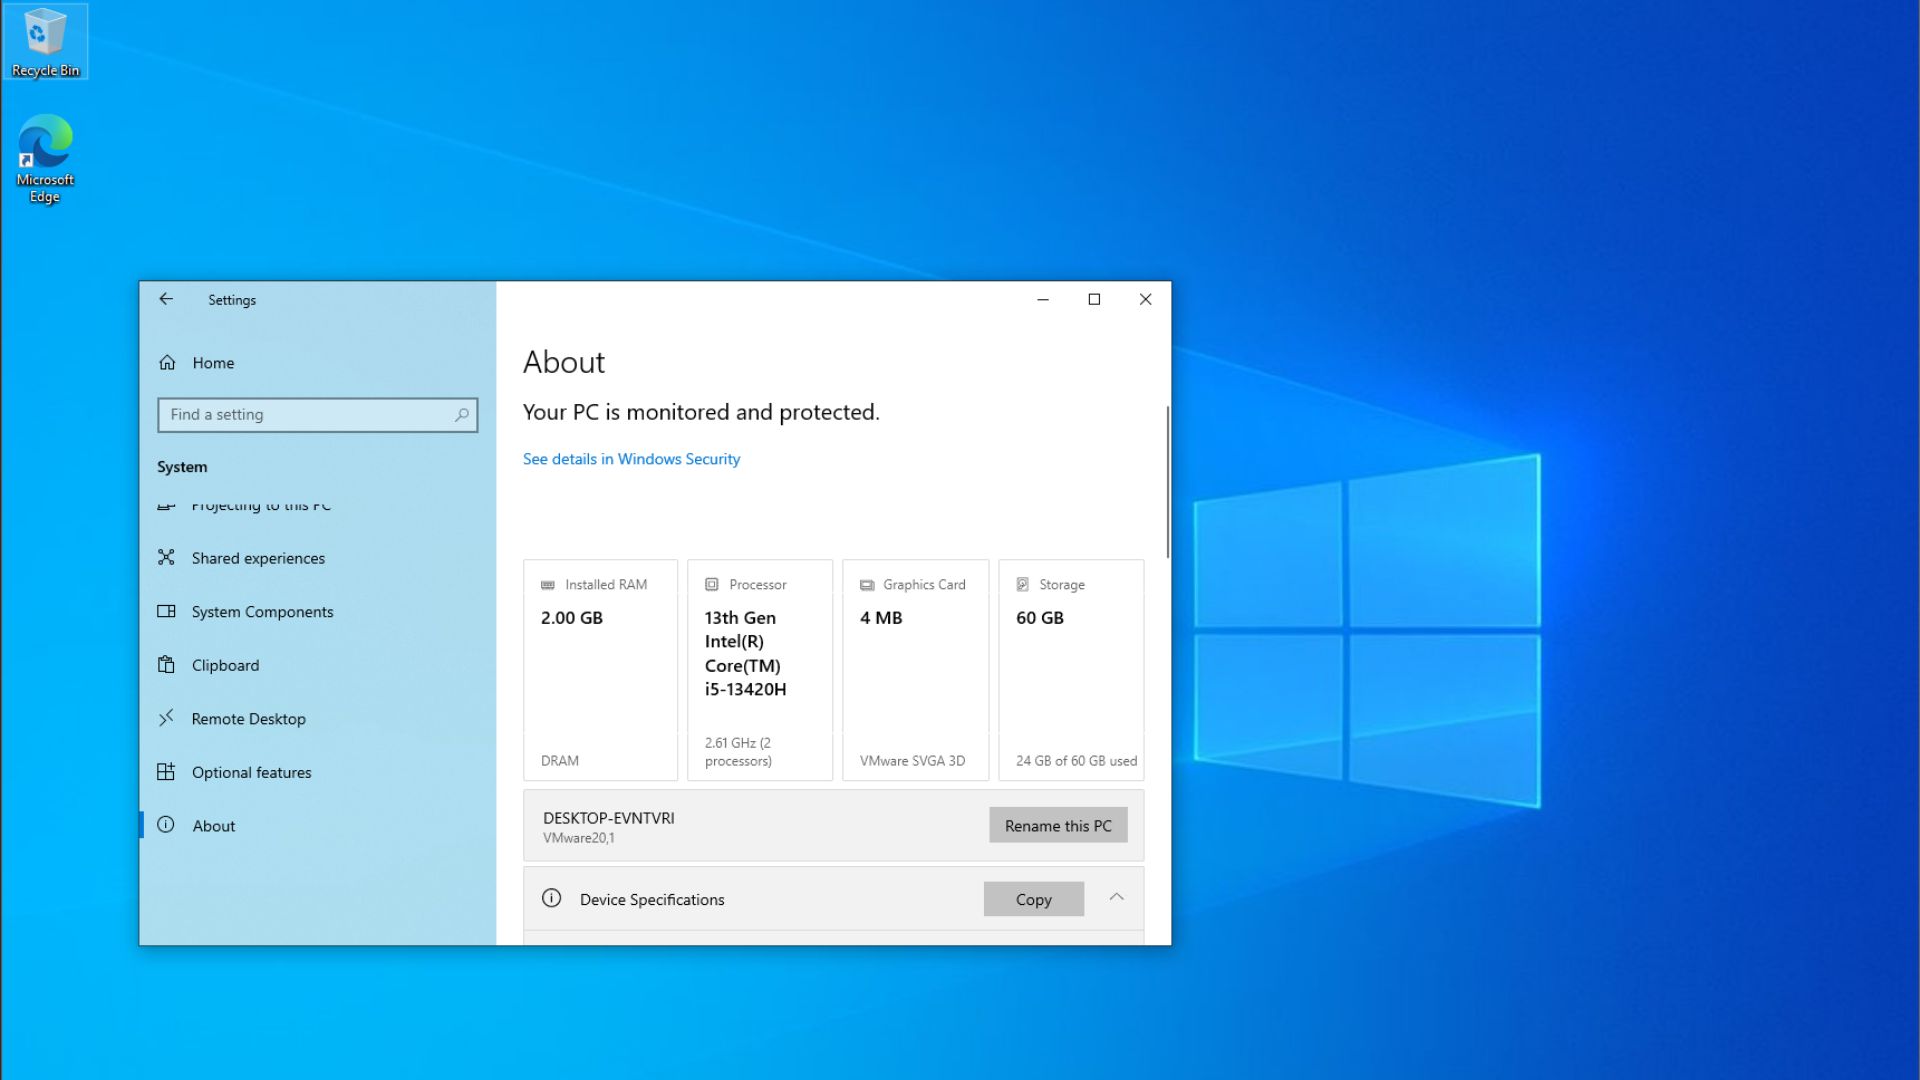
The system I’m using here has just 2GB of RAM and doesn’t support TPM 2.0, both of which are essential to get updated to Windows 11. Go to Settings > System > About, to see the amount of RAM in your PC.
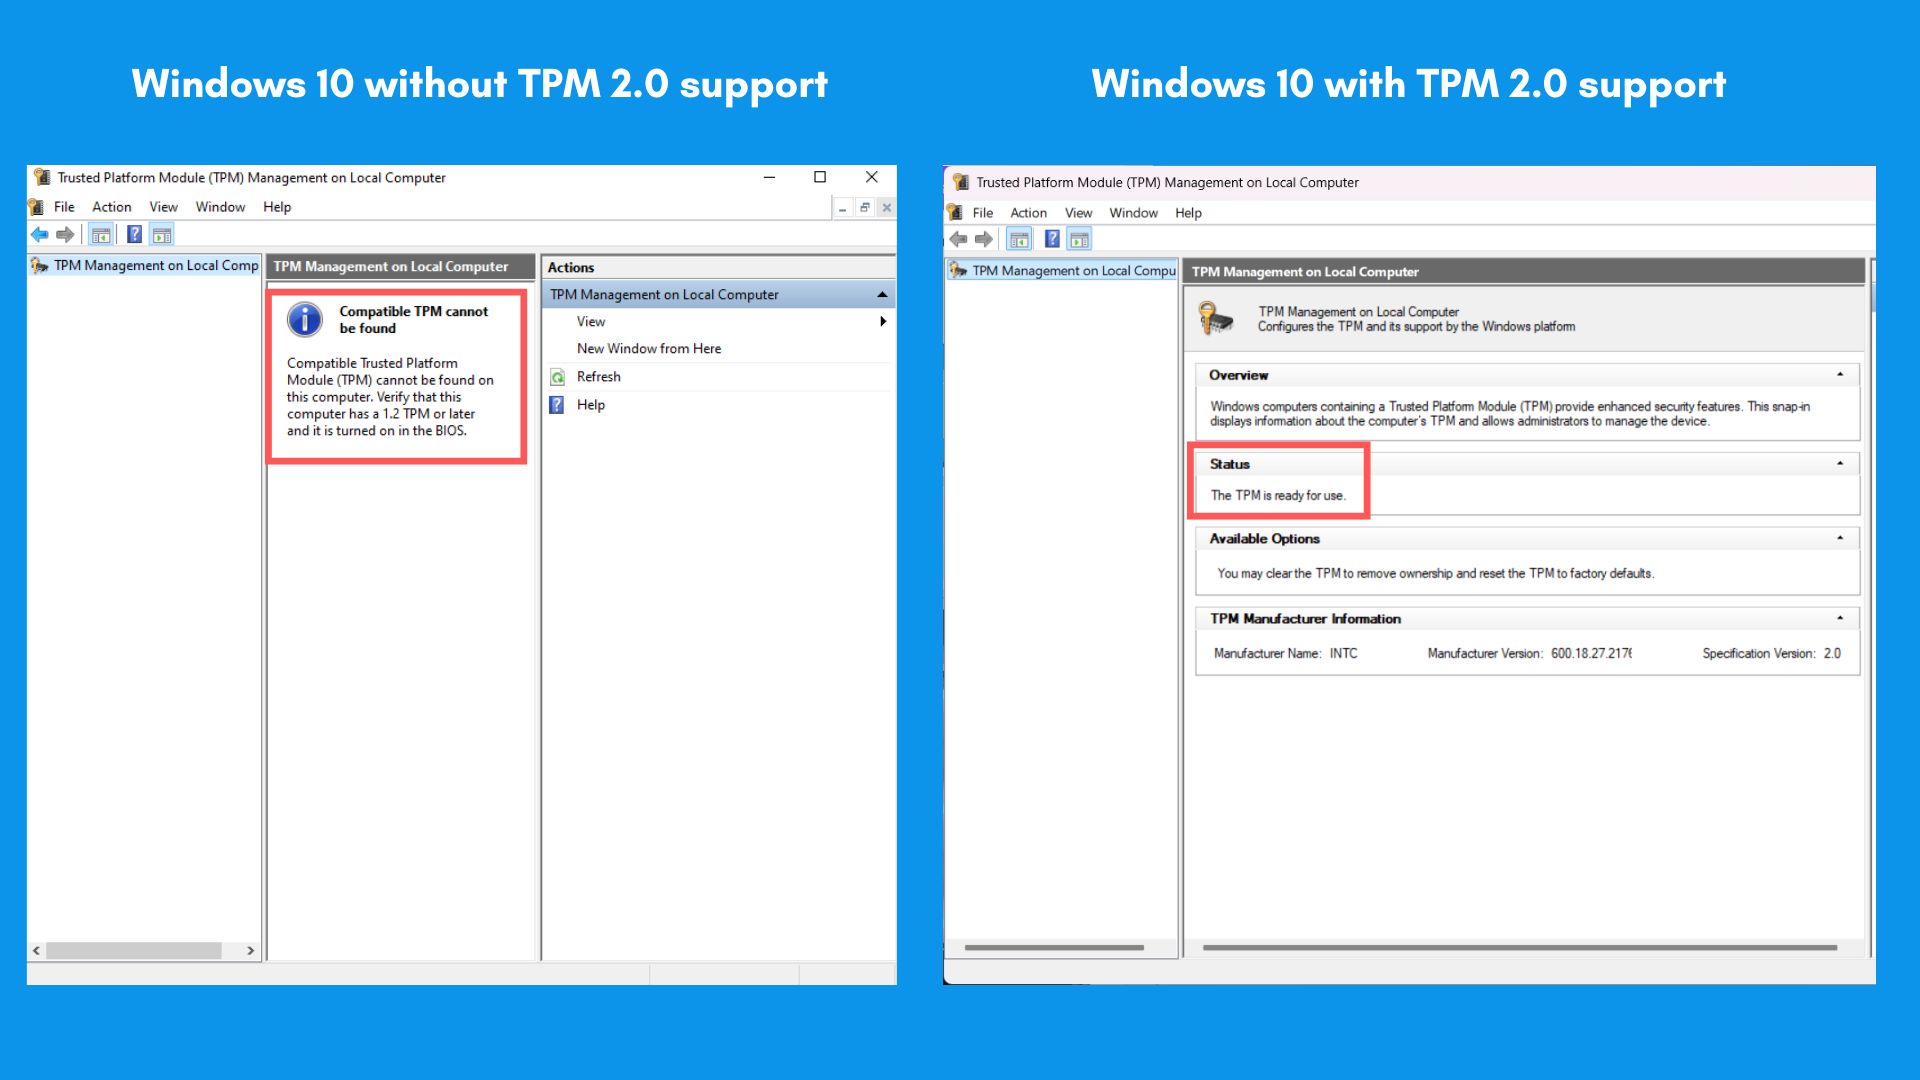
To check if your PC supports TPM 2.0, press the Windows key and R together to open Run. Then type tpm.msc and hit Enter.
If your PC doesn’t have TPM 2.0, the TPM management window will show the message “Compatible TPM cannot be found”. If it does support TPM, the window will show “The TPM is ready for use” under the Status section.
If your PC doesn’t have TPM 2.0 or 4GB RAM, but you still want to upgrade to Windows 11, which Microsoft says they are designing for the AI era, you’ll need to bypass the system requirements, and this is possible only using third-party tools.
How to bypass Windows 11 requirements and install it on unsupported PCs?
Windows Latest tested three of the most reliable methods to install Windows 11 on unsupported hardware. We used our Windows 10 PC with 2GB RAM, which doesn’t have TPM 2.0 support.
The first, and the easiest method to bypass Windows 11 minimum requirements makes use of a command line instruction. It can be used to have an in-place upgrade from Windows 10 to 11, without you having to delete any files or applications.
The other two methods require you to have a USB device with at least 16GB storage. All data in the USB will be wiped off. So, remember to backup, if necessary.
The second method to bypass Windows 11 requirements involves using Rufus, an open-source bootable media creation tool. It can be used to either get an in-place upgrade or a clean install.
Finally, the last method to skip Windows 11 hardware checks is done through Registry edits during Windows 11 Setup while booting from a USB drive. It supports only a clean install.
Of course, doing any of these comes with their inherent risks. The main risk is stability and compatibility issues that could come from unsupported Drivers, lower performance, or app crashes.
Not to mention, doing so will void your warranty on the device you’re using. Then there might be some inherent security risks from firmware attacks due to the absence of Secure Boot and TPM 2.0, which was the whole point of why Microsoft decided to stick with these requirements.
Download the Official ISO file
Before downloading the Windows 11 ISO file, you need to first check the language in your Windows 10 installation. To do that, open Settings > Time & Language > Language. In our PC, it is English (United States). 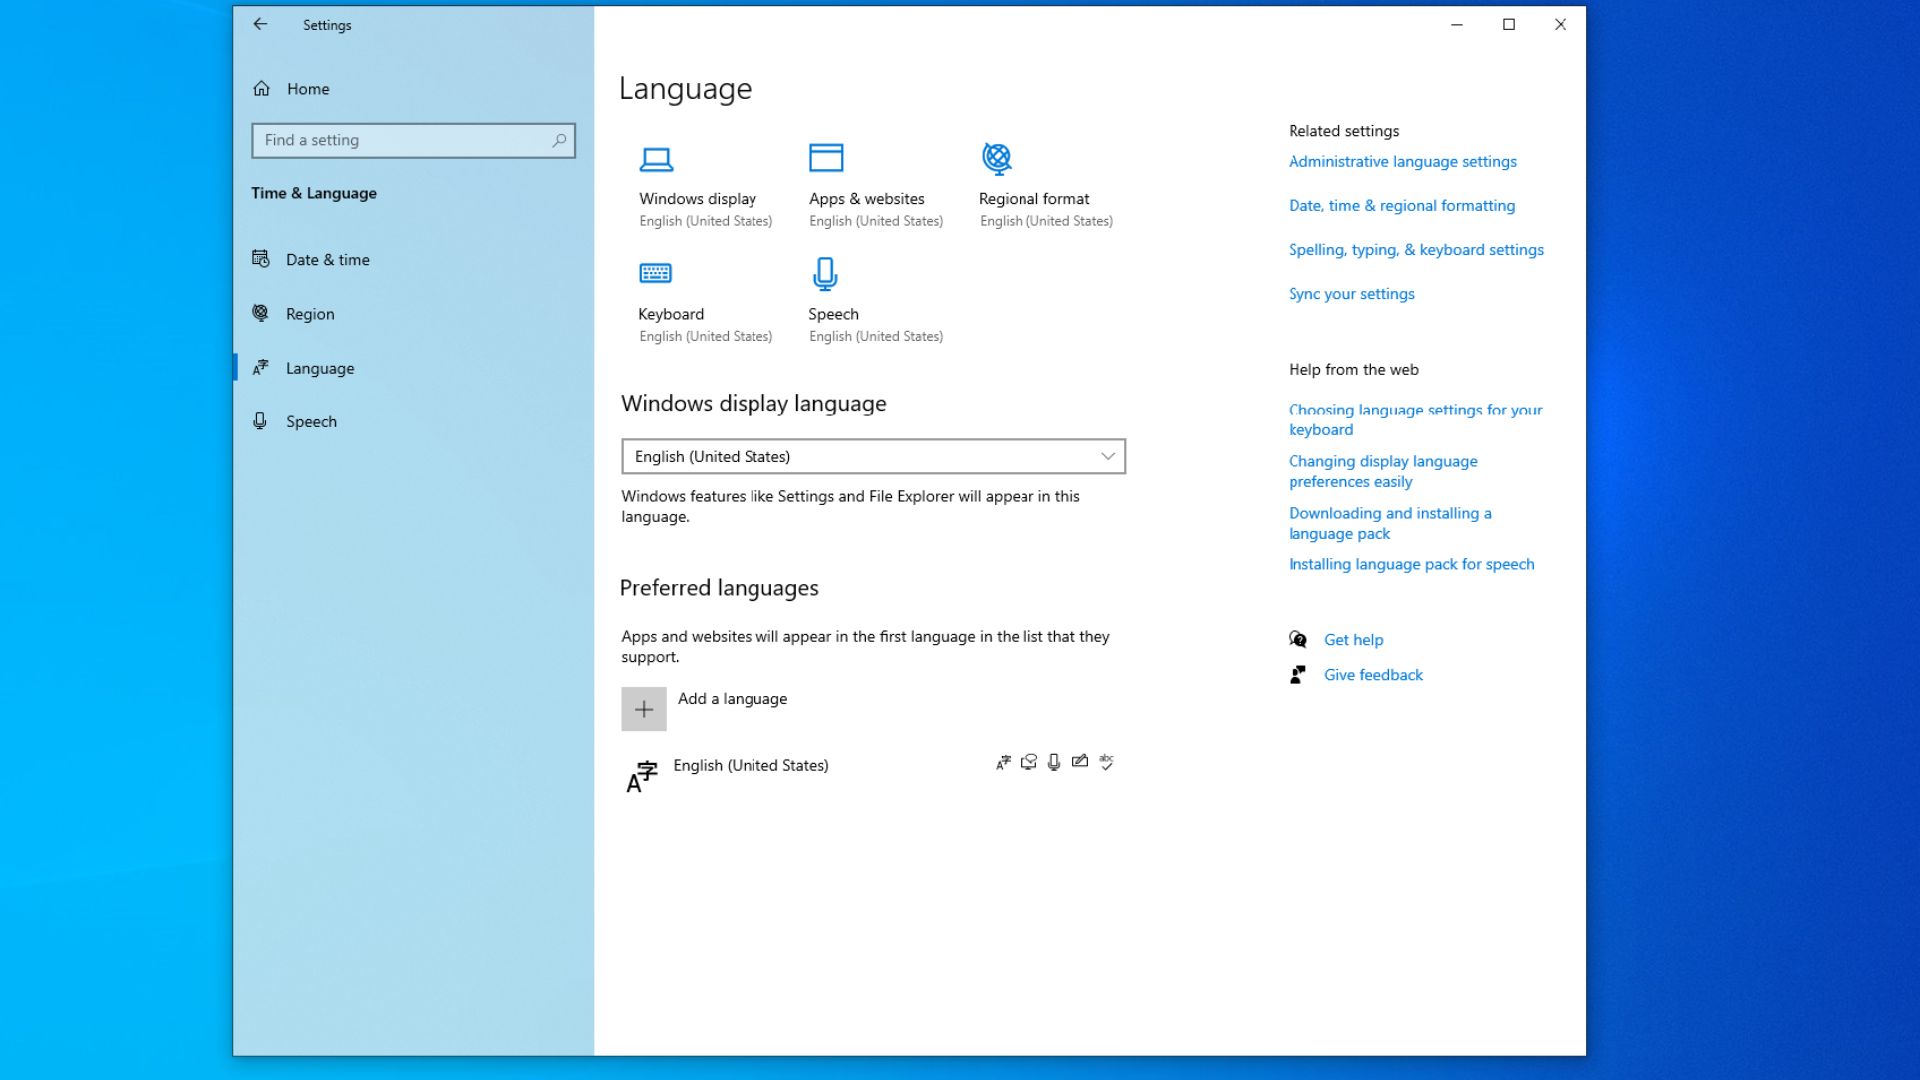
- Go to Microsoft’s official Windows 11 download page.
- Scroll down to “Download Windows 11 Disk Image (ISO) for x64 devices”
- Select Windows 11 (multi-edition ISO for x64 devices) and choose the same language as your Windows 10 PC.
- Click Download Now.
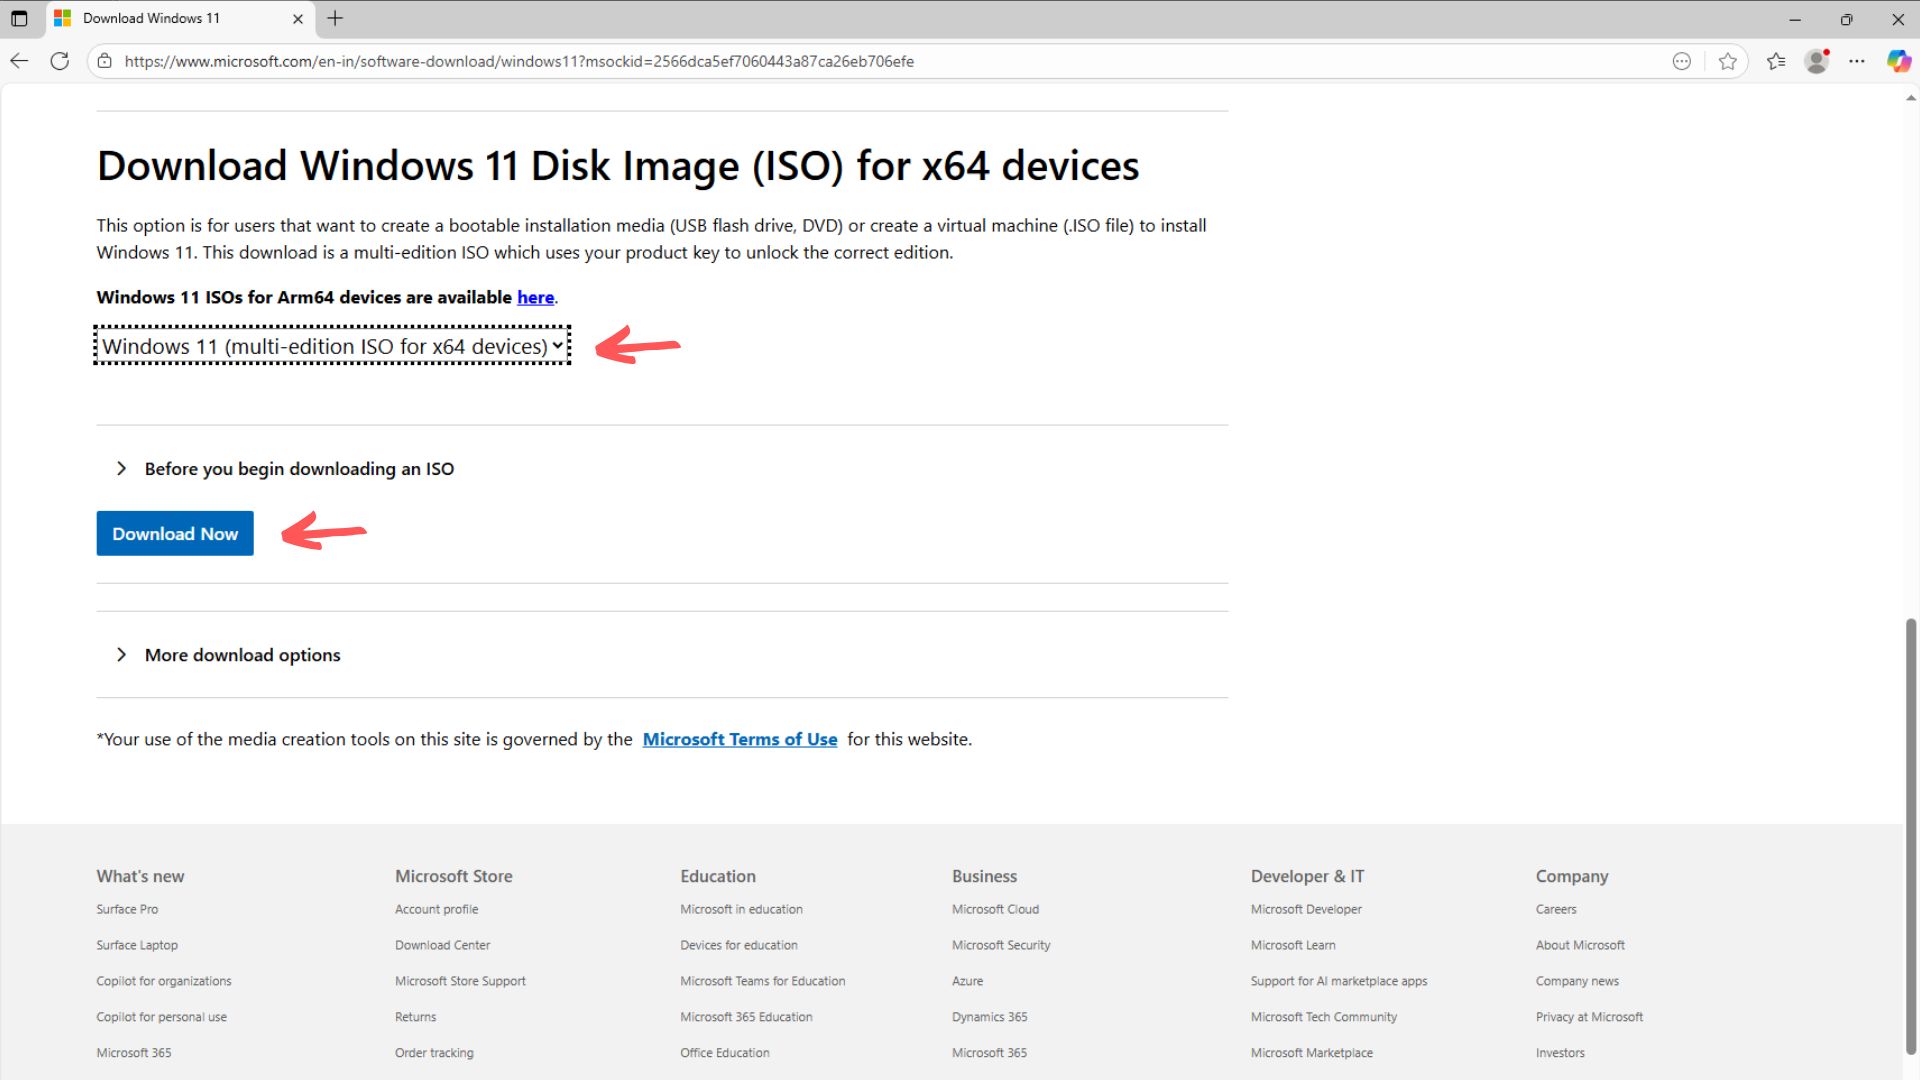
Microsoft will take a few seconds to validate your request, and then the download will begin. The file size is 7.20 GB for the Windows 11 25H2 ISO file. For any of the following methods to bypass Windows 11 requirements, you must have this ISO file downloaded.
Install Windows 11 on unsupported hardware using Command Prompt
By far the easiest method for an in-place upgrade from Windows 10 to Windows 11, without having the minimum hardware requirements, is through a semi-official loophole that upgrades your PC, as if it were a Windows Server.
Windows Server SKUs are usually more lenient when it comes to hardware requirements, unlike client SKUs, like the ones we use. So, running the command “setup.exe /product server” from a mounted Windows 11 ISO, inside a Windows 10 PC, will invoke the setup engine intended to upgrade Windows Server editions.
However, even though you are upgrading through server SKU, you’ll still be installing the client version of Windows 11. And after installing the OS, you will not notice any change in usability or settings when compared to a regular Windows 11 client installation.
That being said, this method still has all the issues that come with Windows 11 running on unsupported hardware, so proceed with caution:
- Right-click on the Windows 11 ISO file that you downloaded, and click Mount.
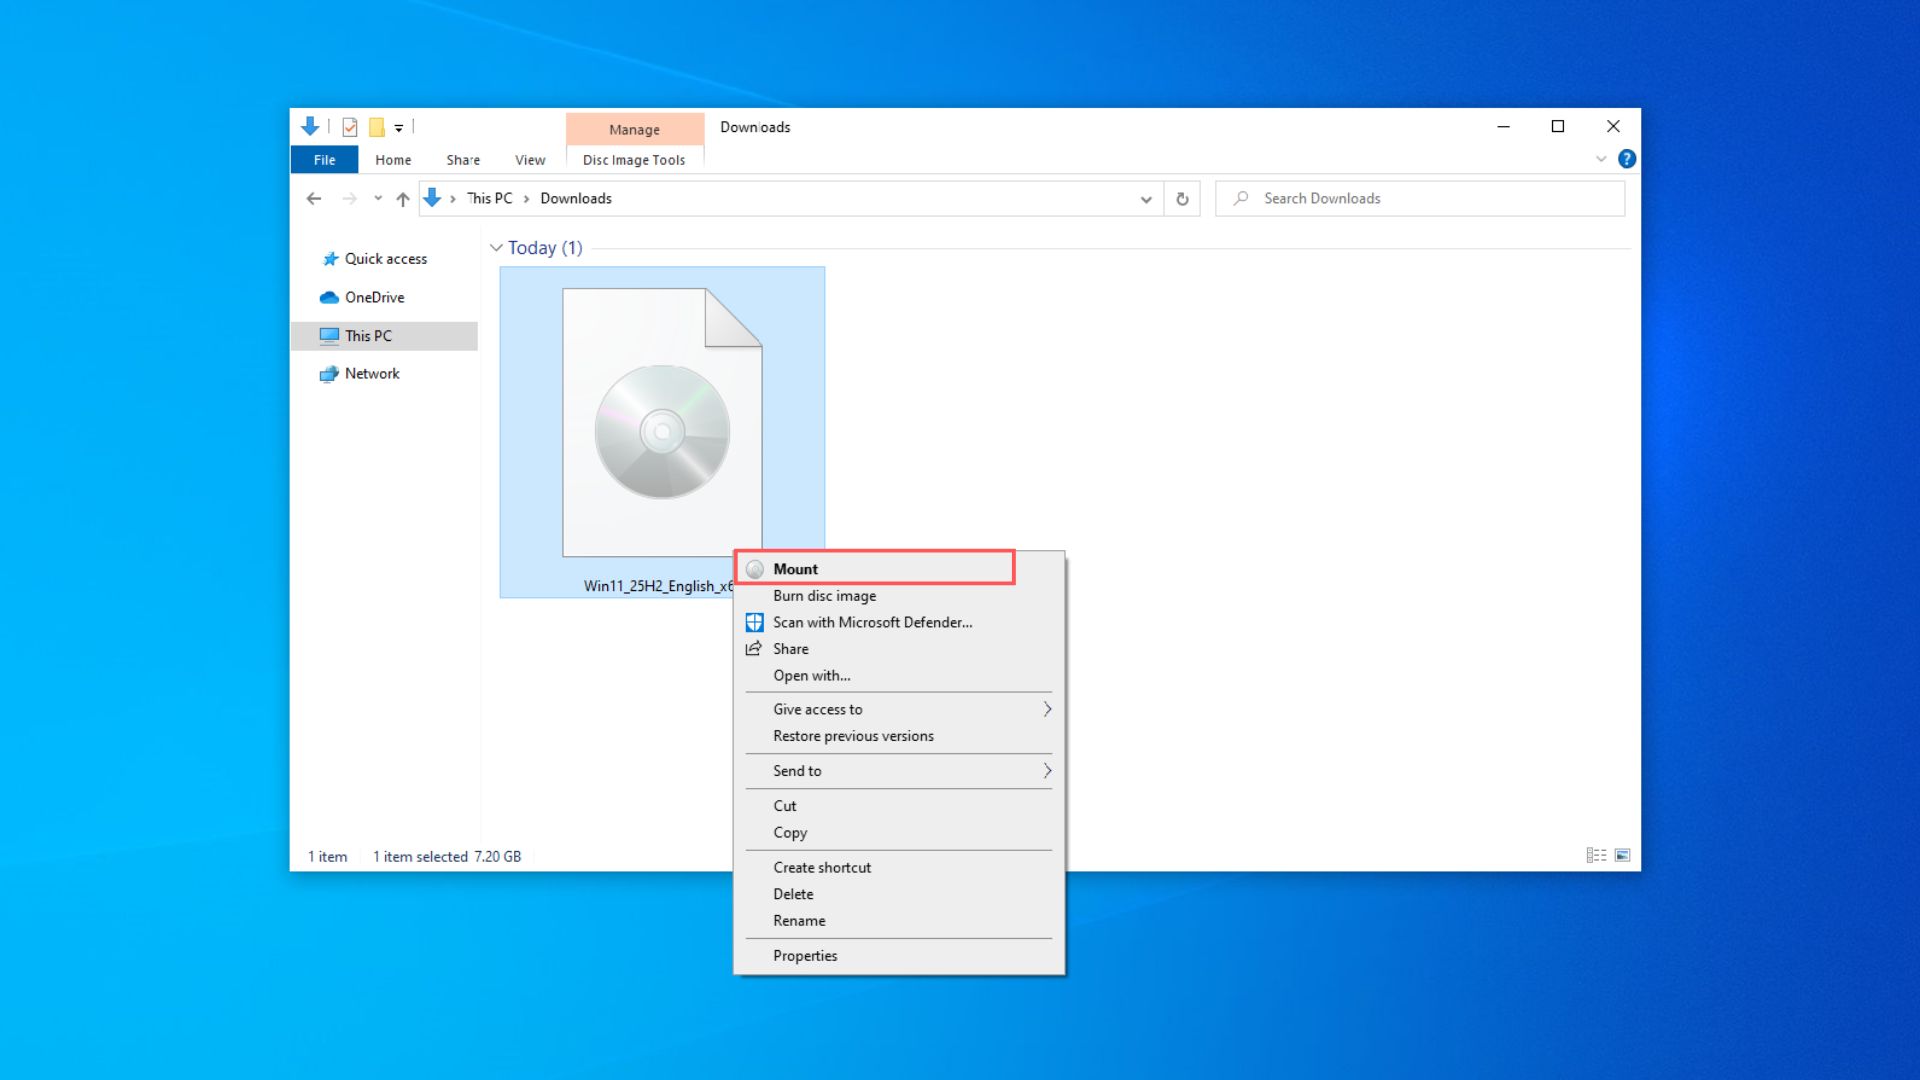
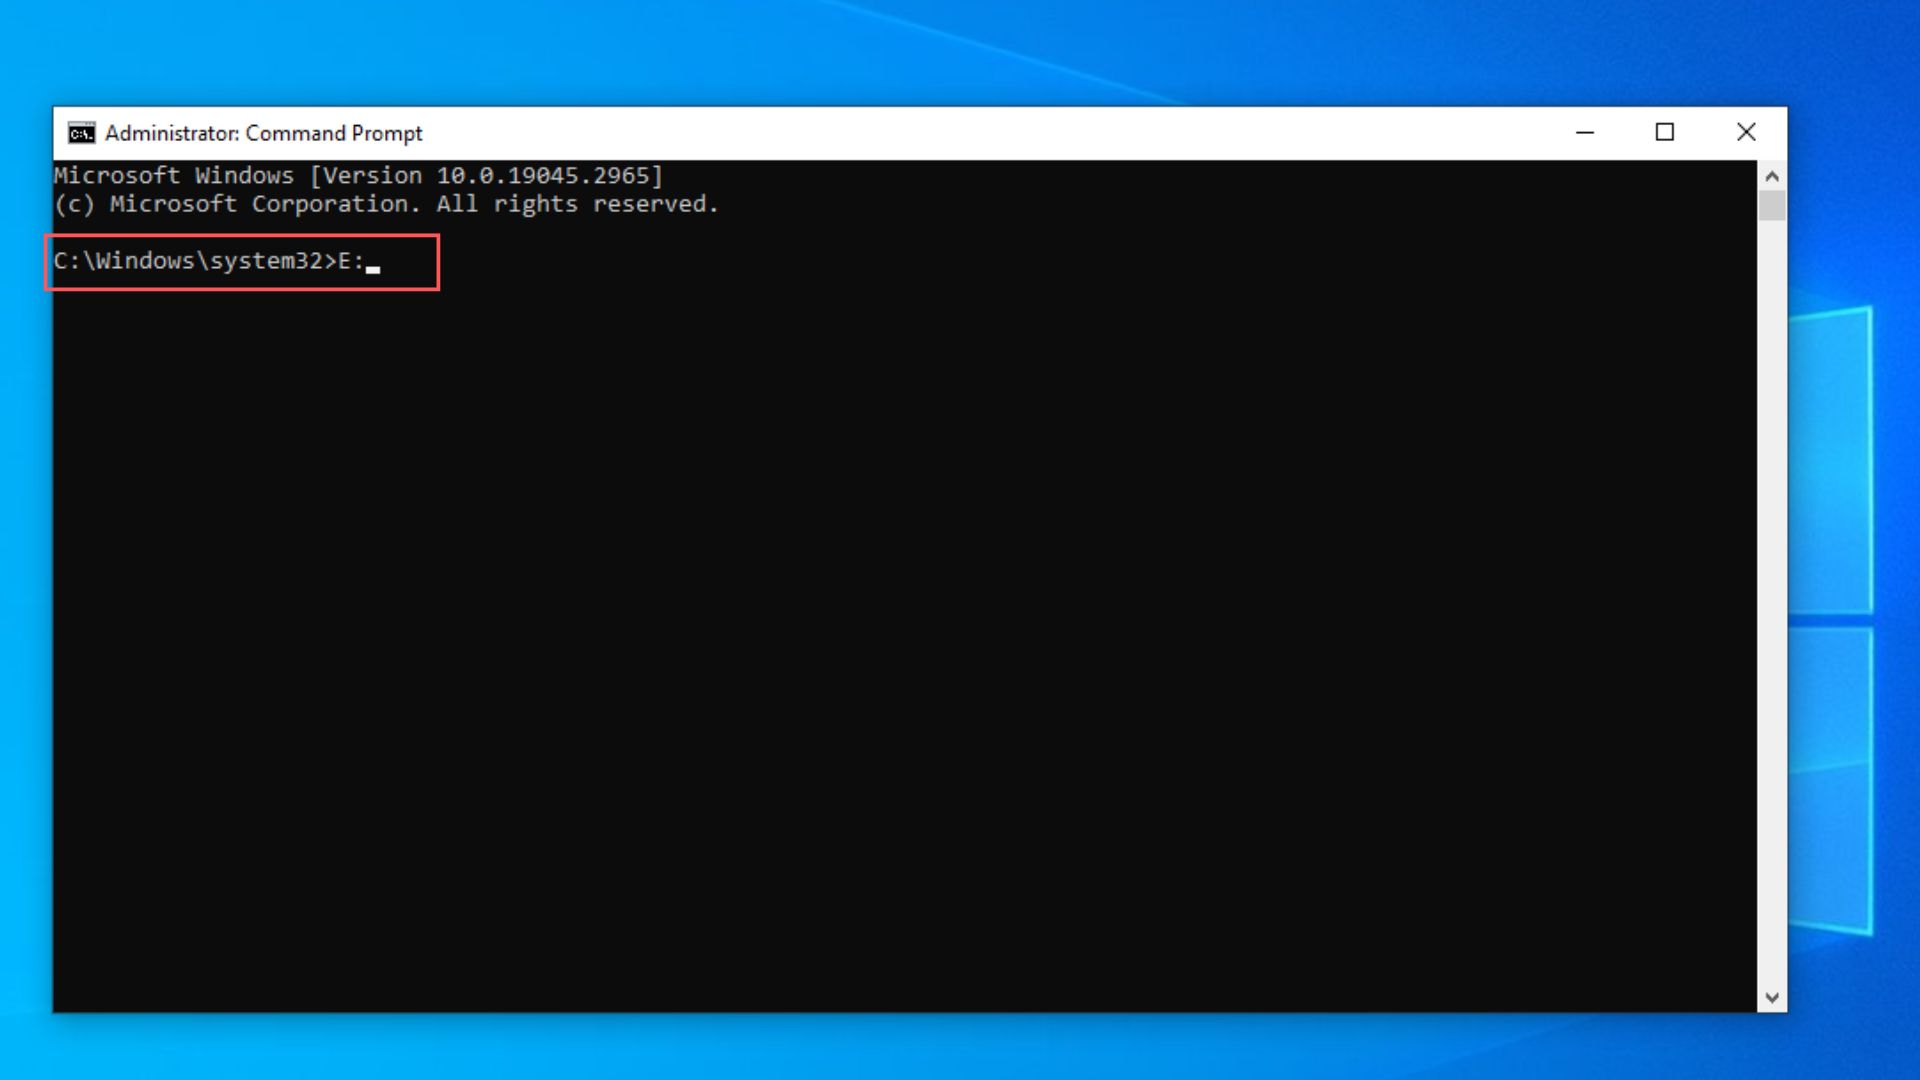
- Check the Drive letter from the Address Bar in which the virtual DVD is mounted. In our case, it is “E:”.
- Now, click Search on the Taskbar, type “cmd”, and when Command Prompt shows up, click the “Run as administrator” option.
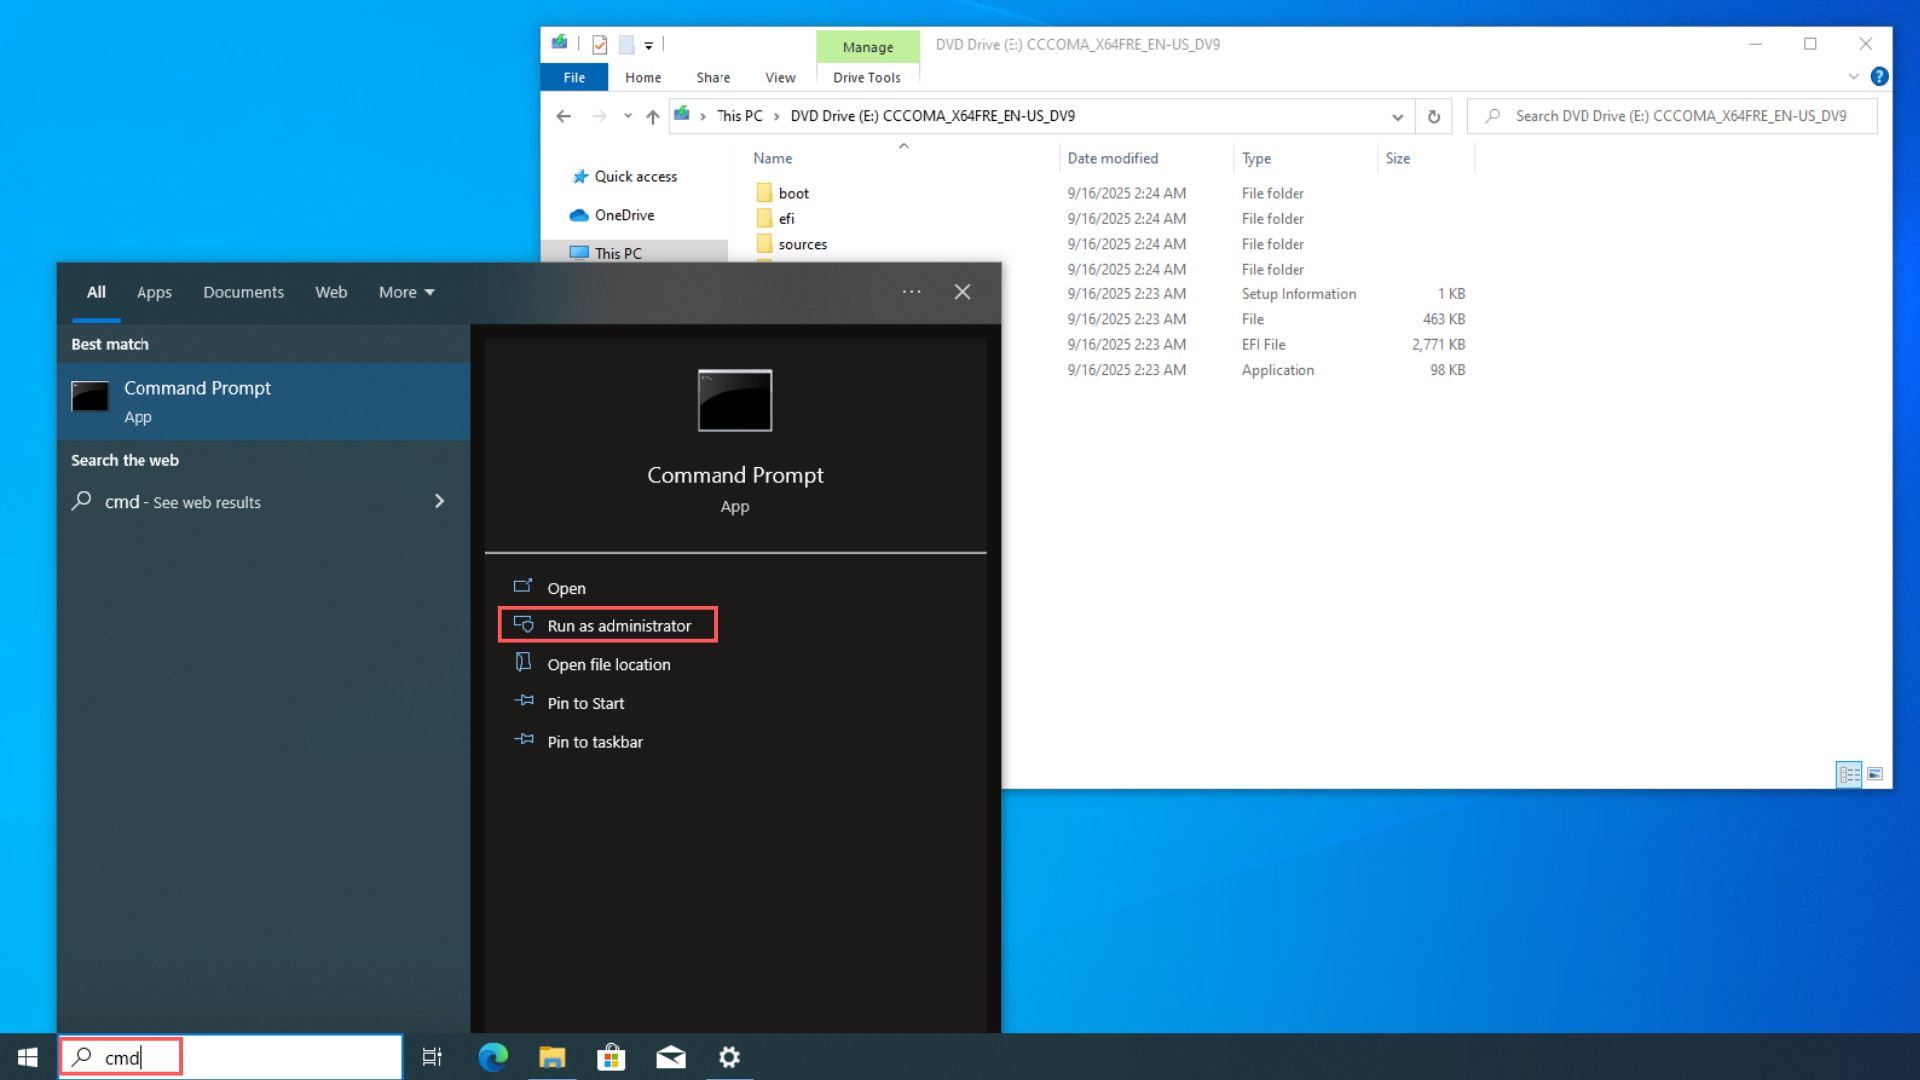
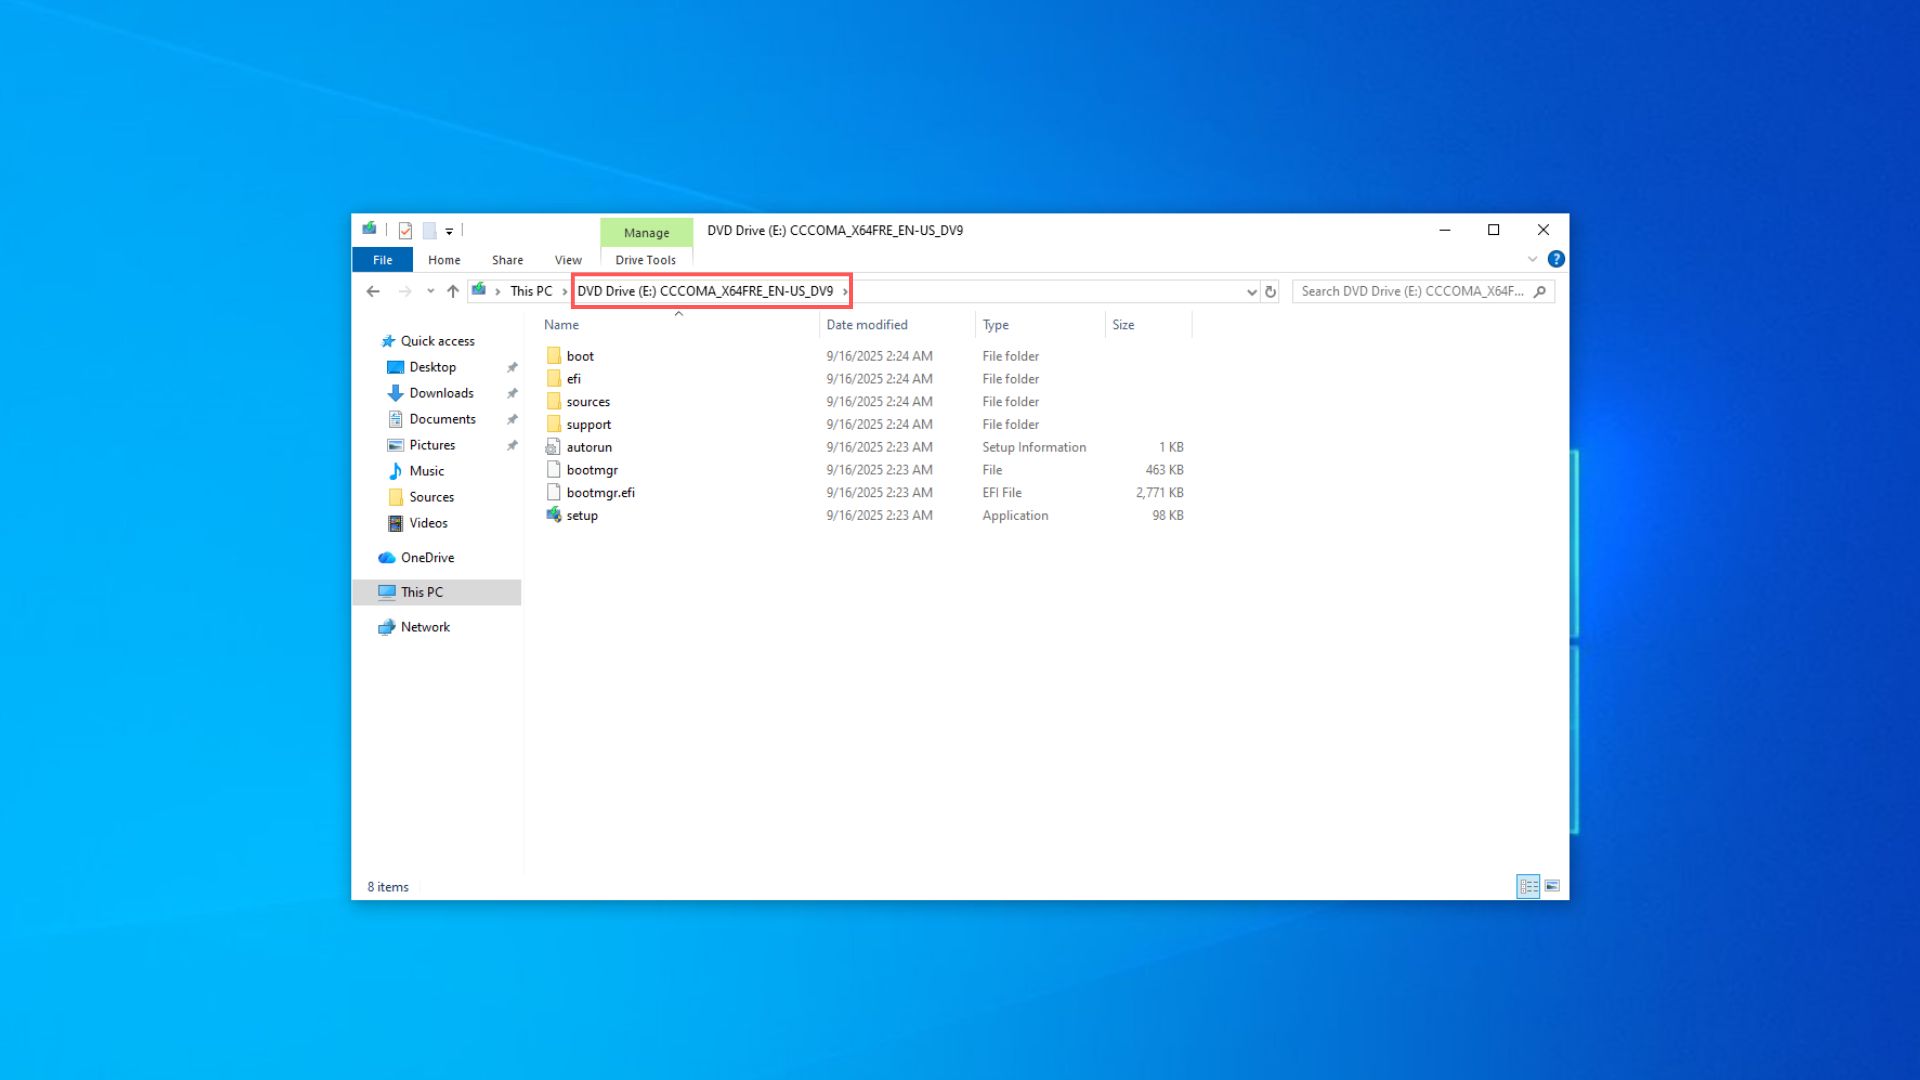
- Type the Drive Letter as a command in Command Prompt. In our case, it is “E:”. Press Enter. This will open the file location with Windows 11 installation files.
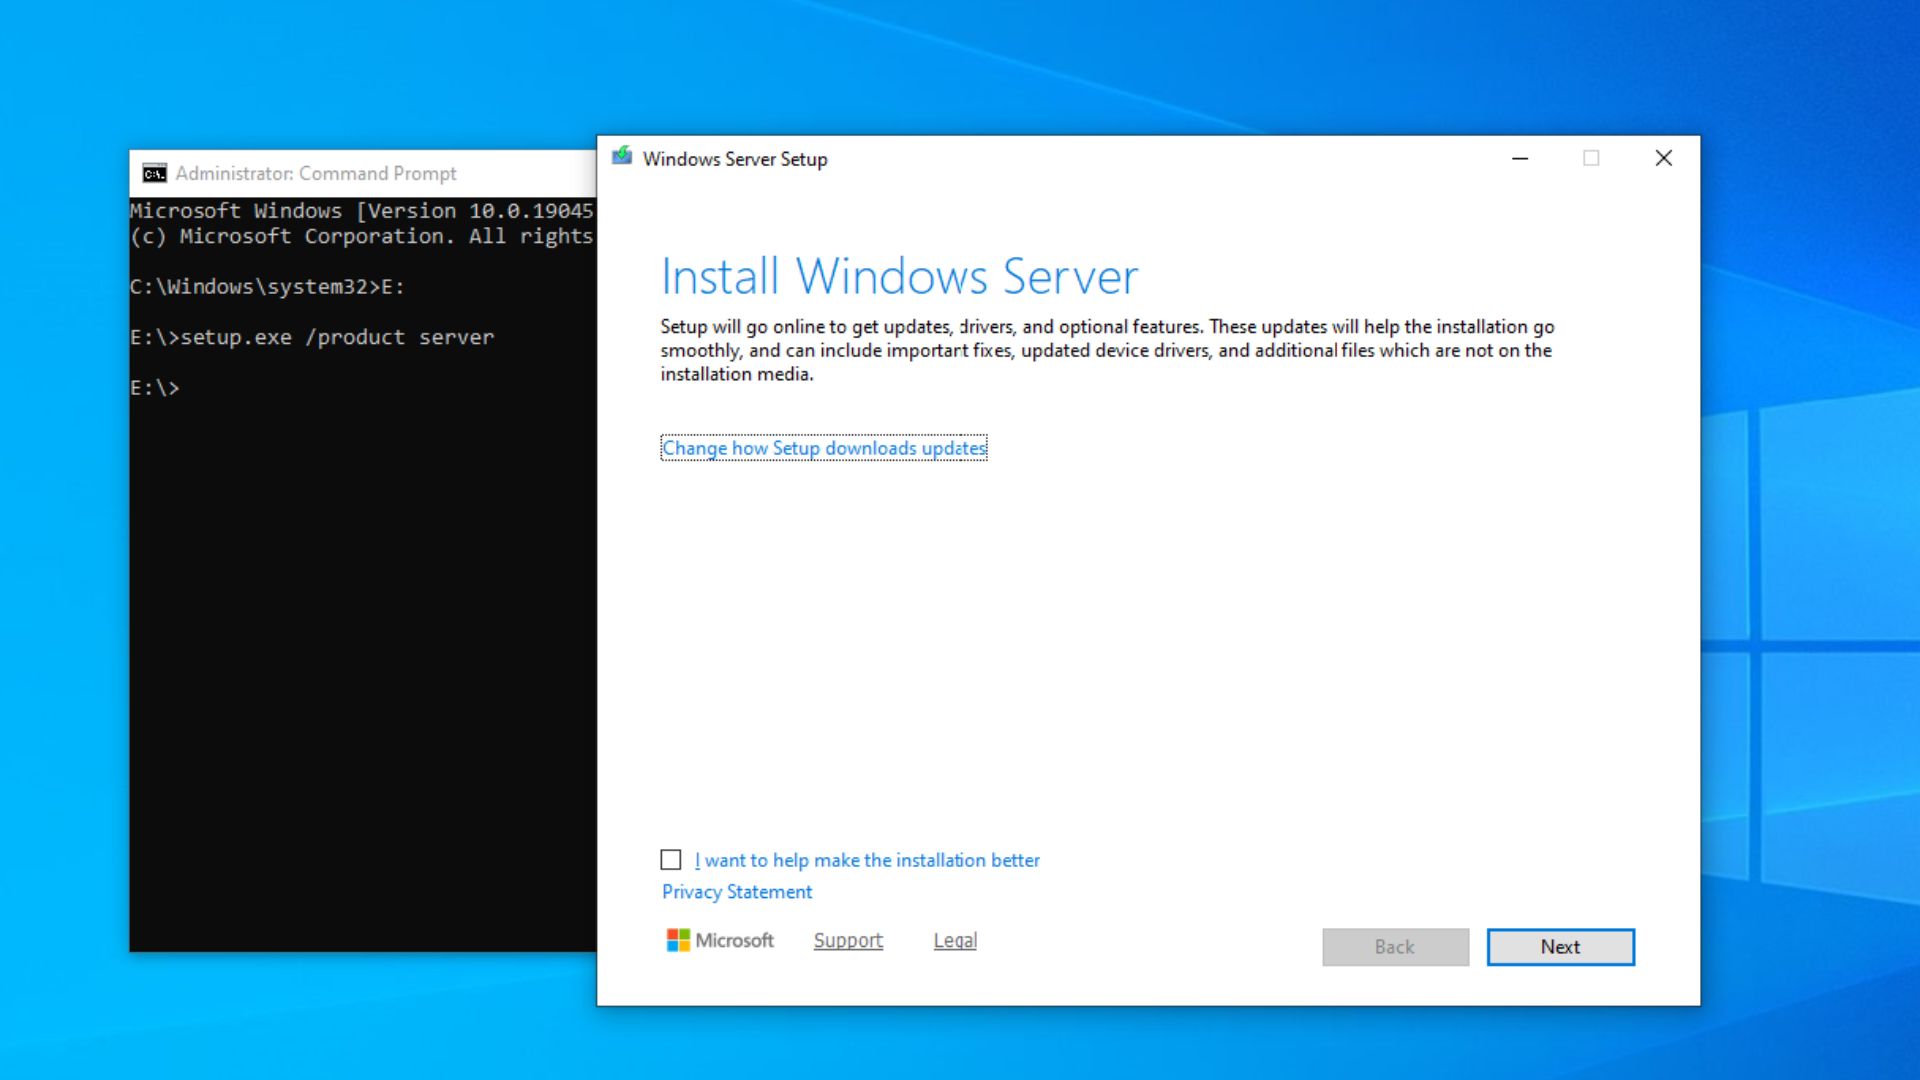
- Type the command “setup.exe /product server” and press Enter. This will run the Windows 11 setup as if it were a Windows Server, thereby skipping the hardware checks.

- Wait a few seconds, and you’ll see the Windows logo. Then a Windows Server Setup window will open.
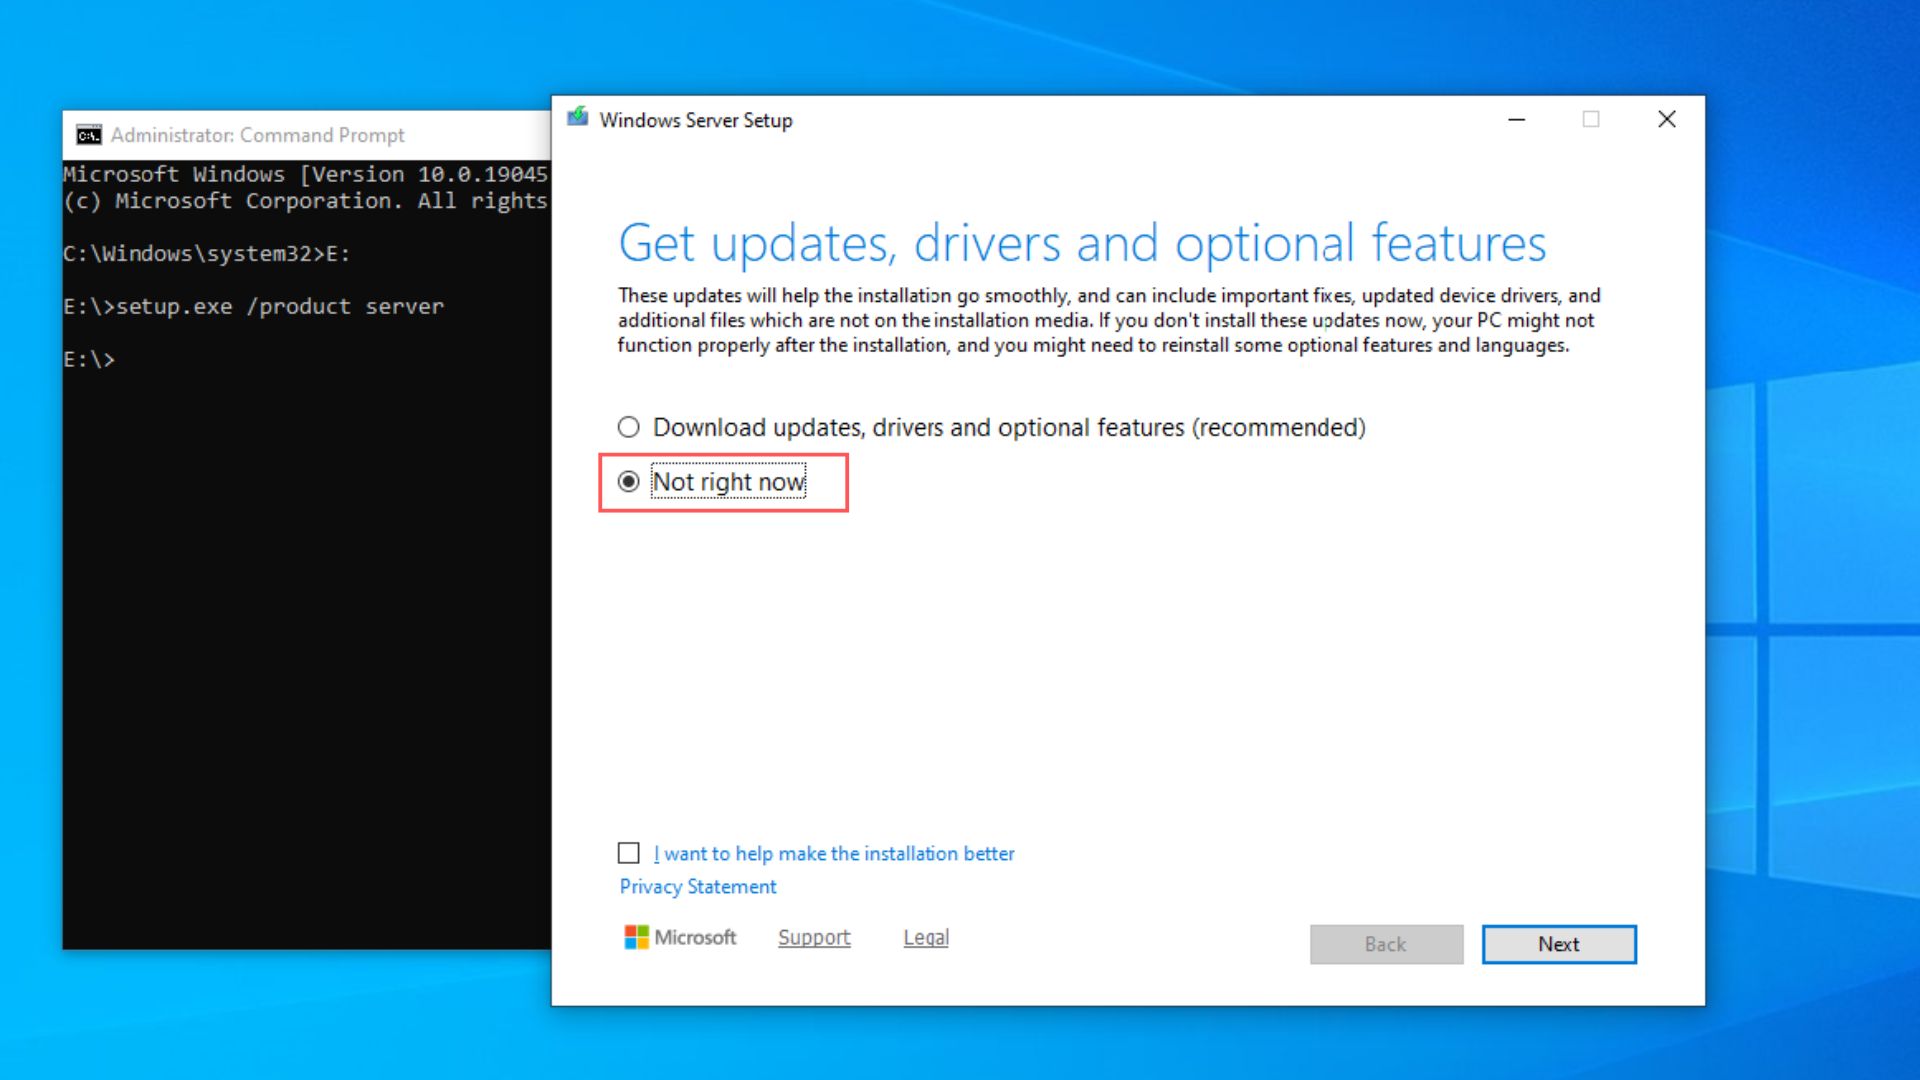
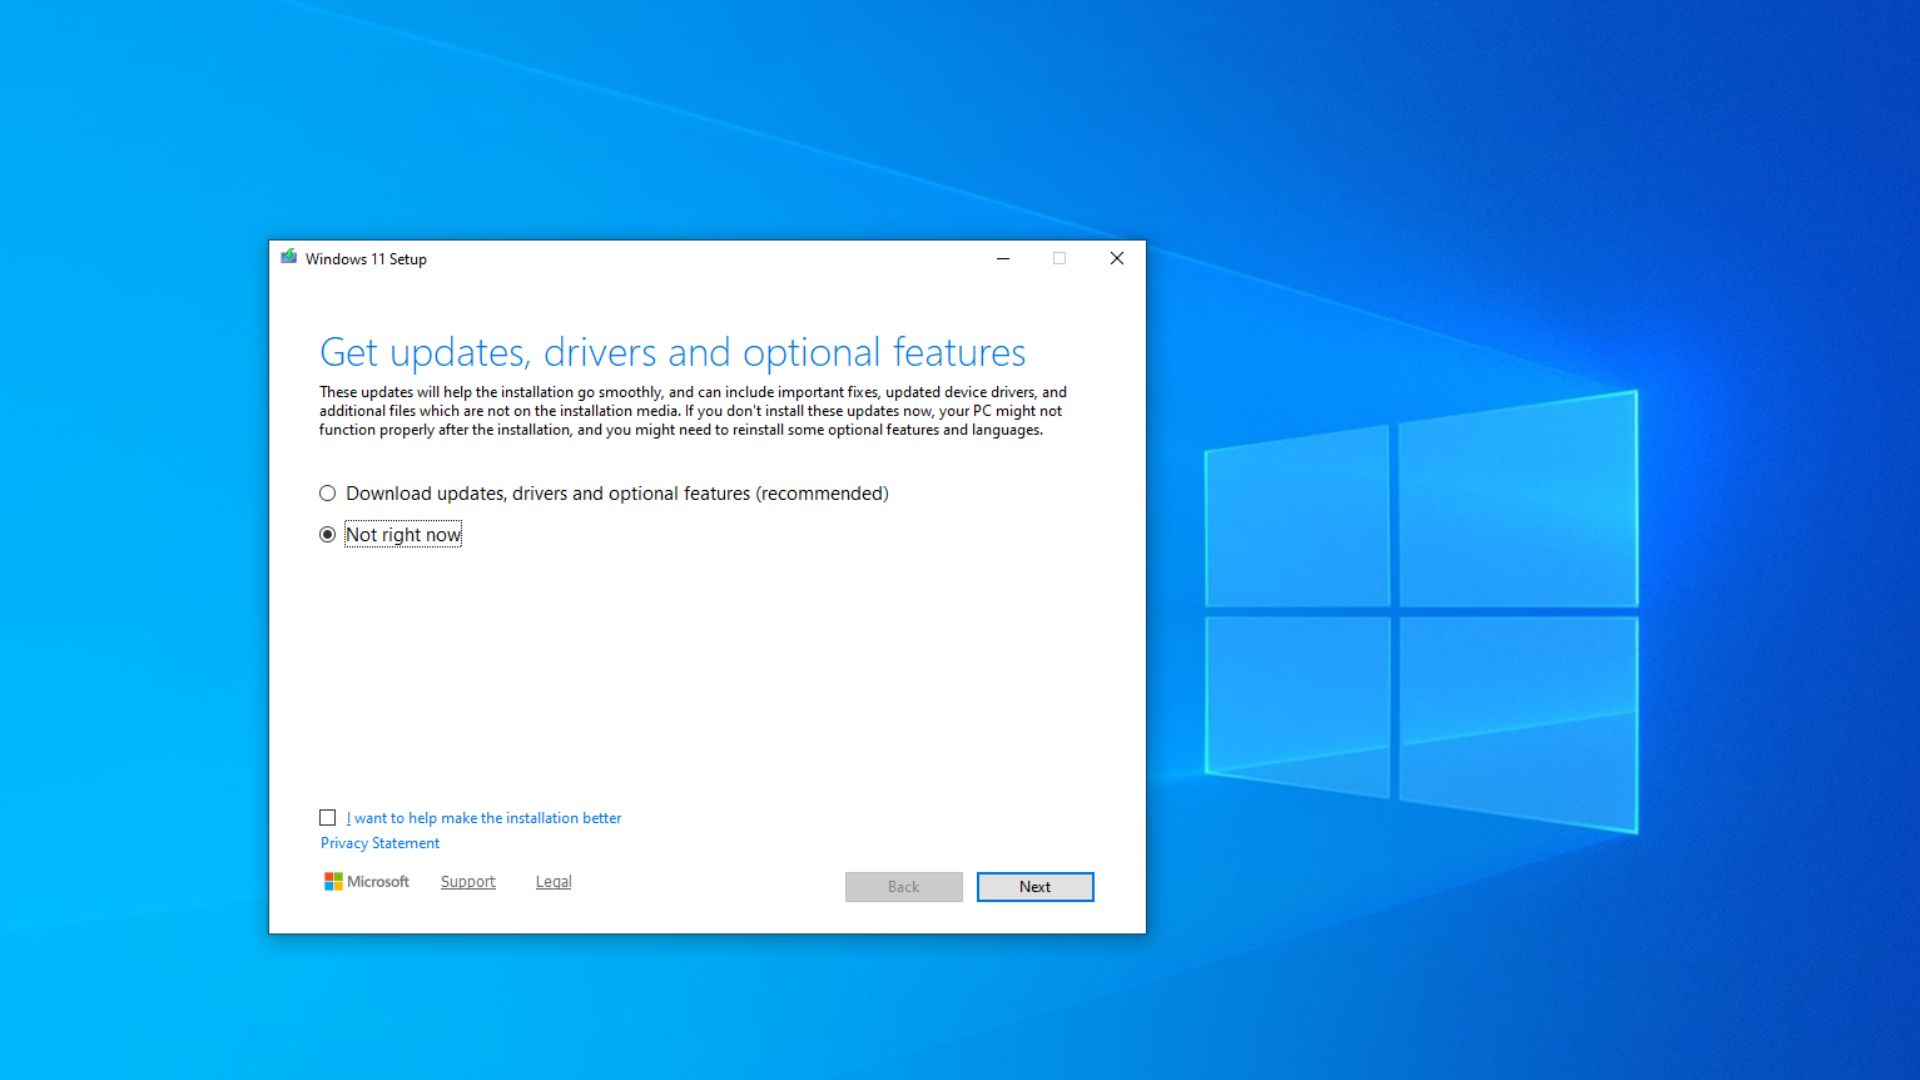
- Since we’re upgrading unofficially, it’s a good idea to click “Change how Setup downloads updates” option. And from the next window, select “Not right now” option. This will skip checking for driver updates and optional features, and expedite the installation process. These will be automatically done after installation, it’s fine to skip for now.
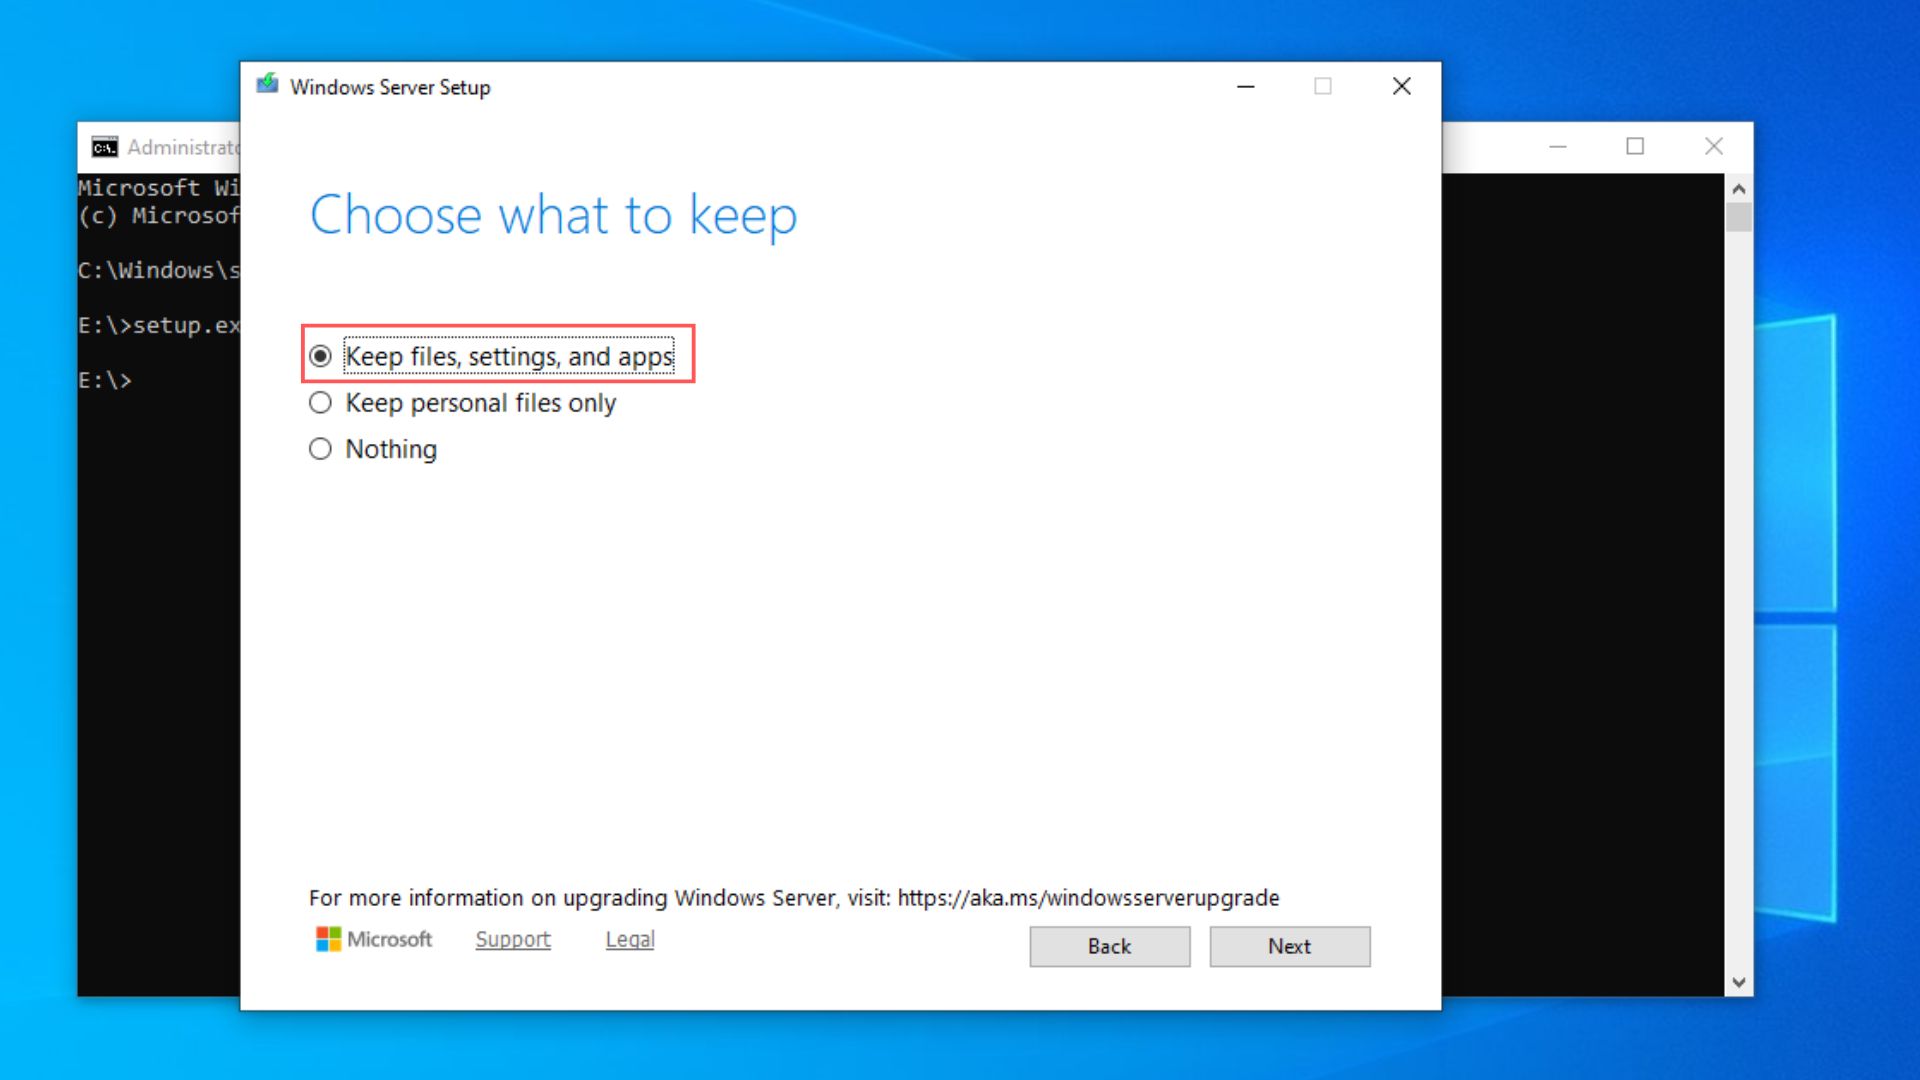
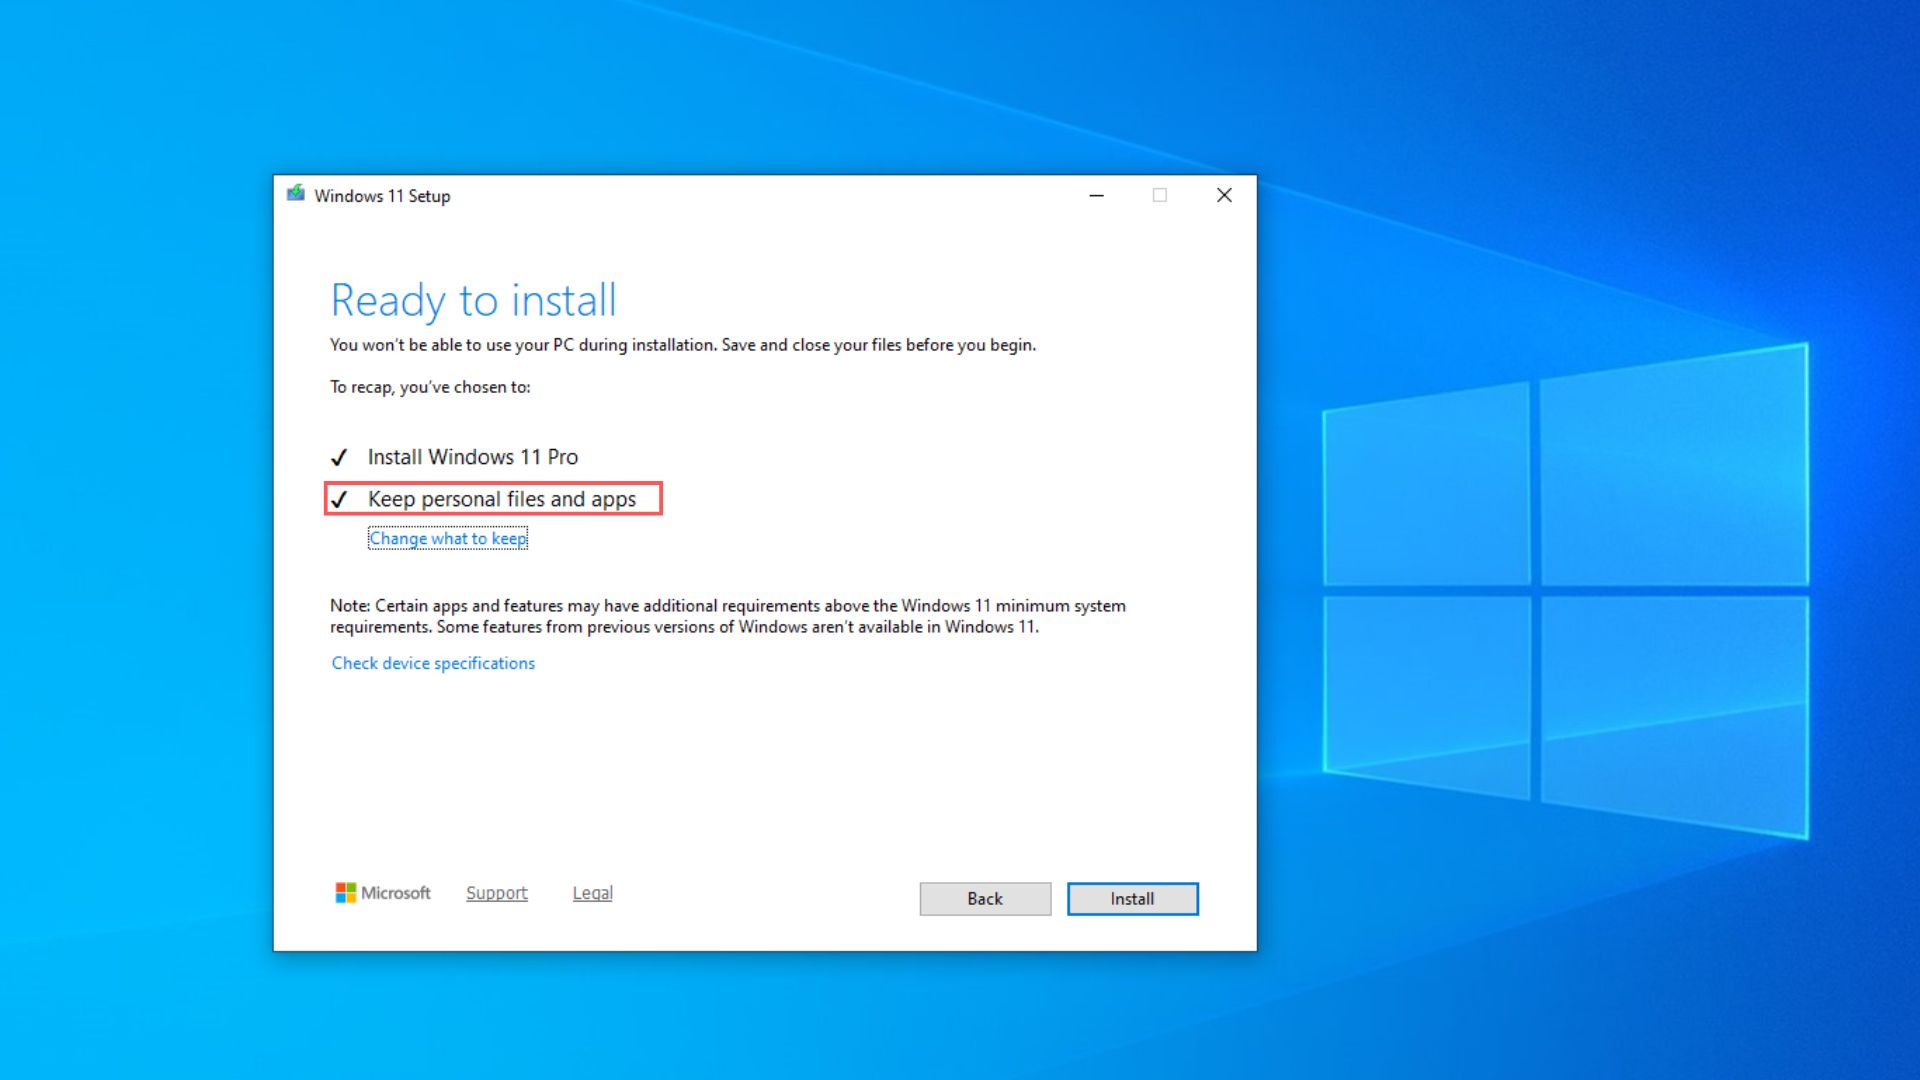
- Click the Next button. Accept the terms and conditions. In the next window, select the “Keep files, settings, and apps” option to avoid a clean install of Windows 11. You can choose the “Nothing” option for a clean install.
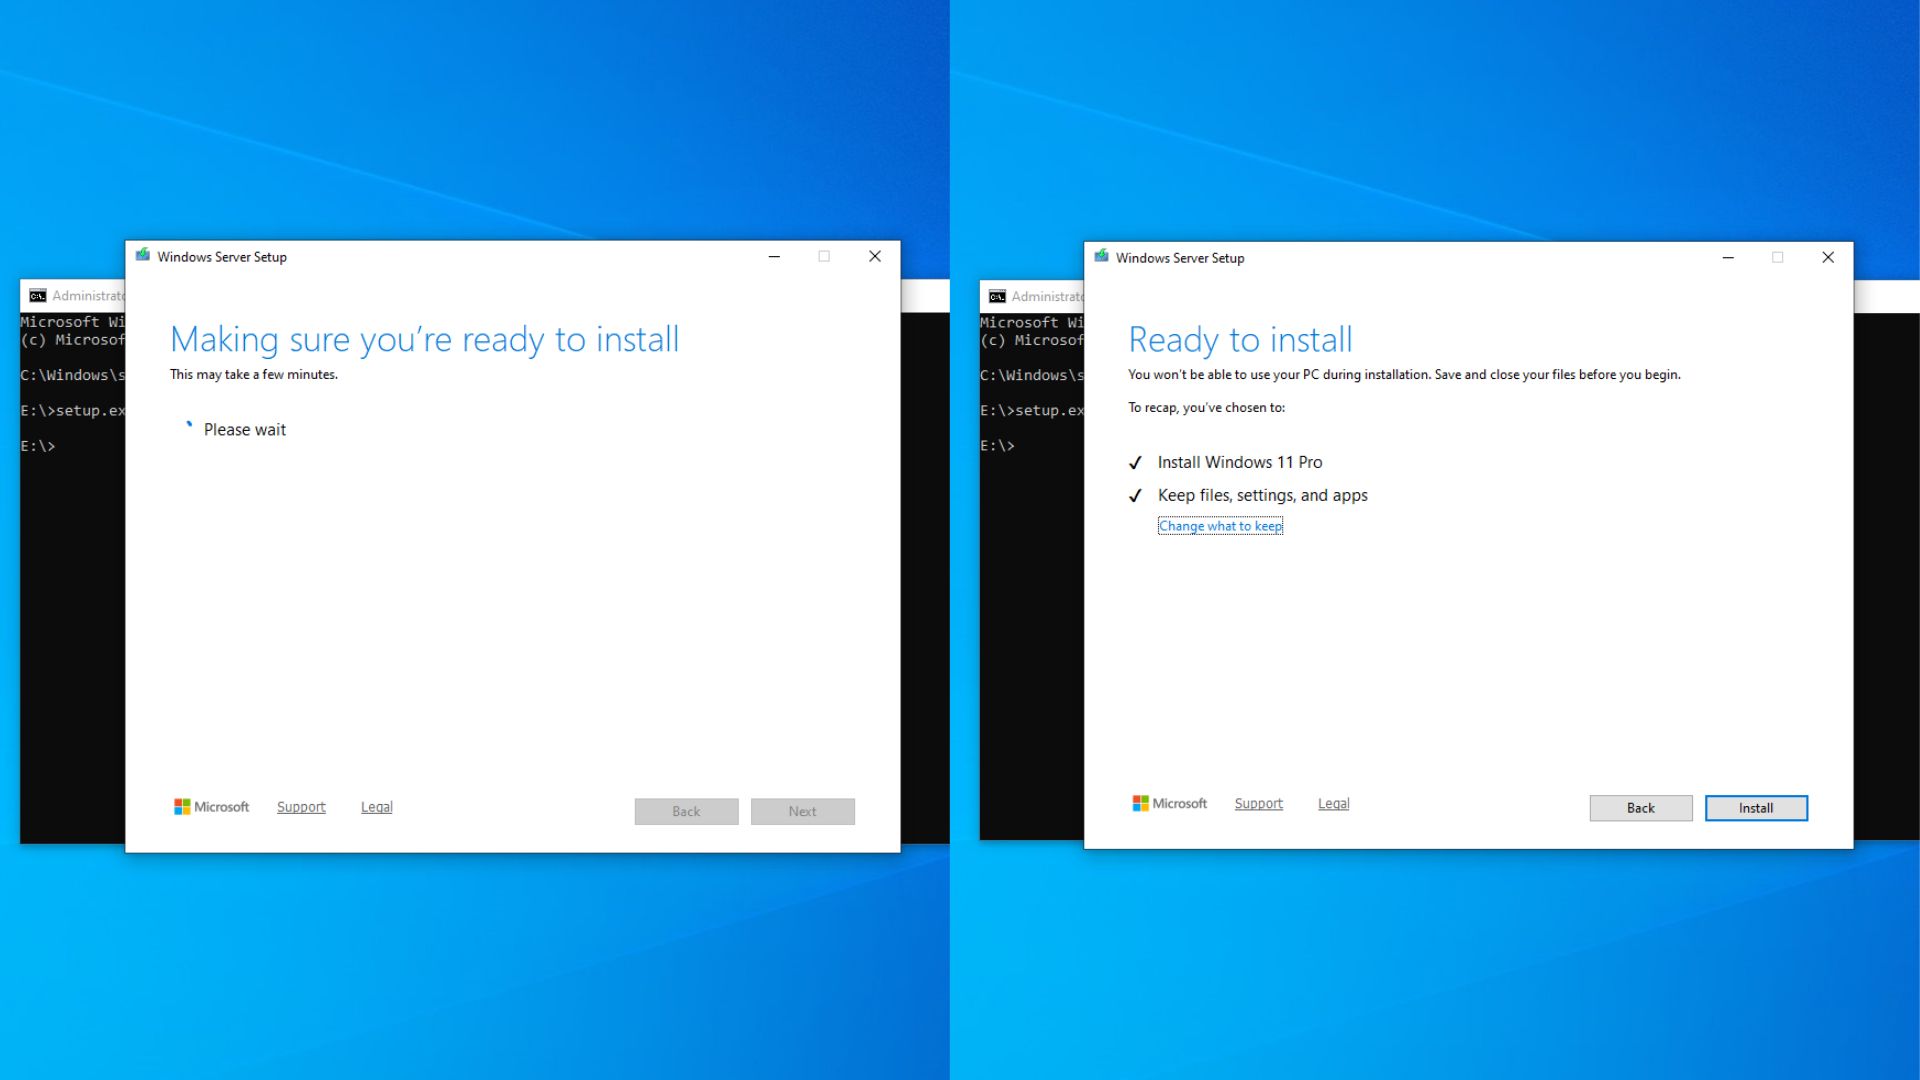
- Wait a few seconds for the Windows Server Setup to initialize the Windows 11 installation. You’ll see the final window that asks if you are ready to install Windows 11. Click “Install”.
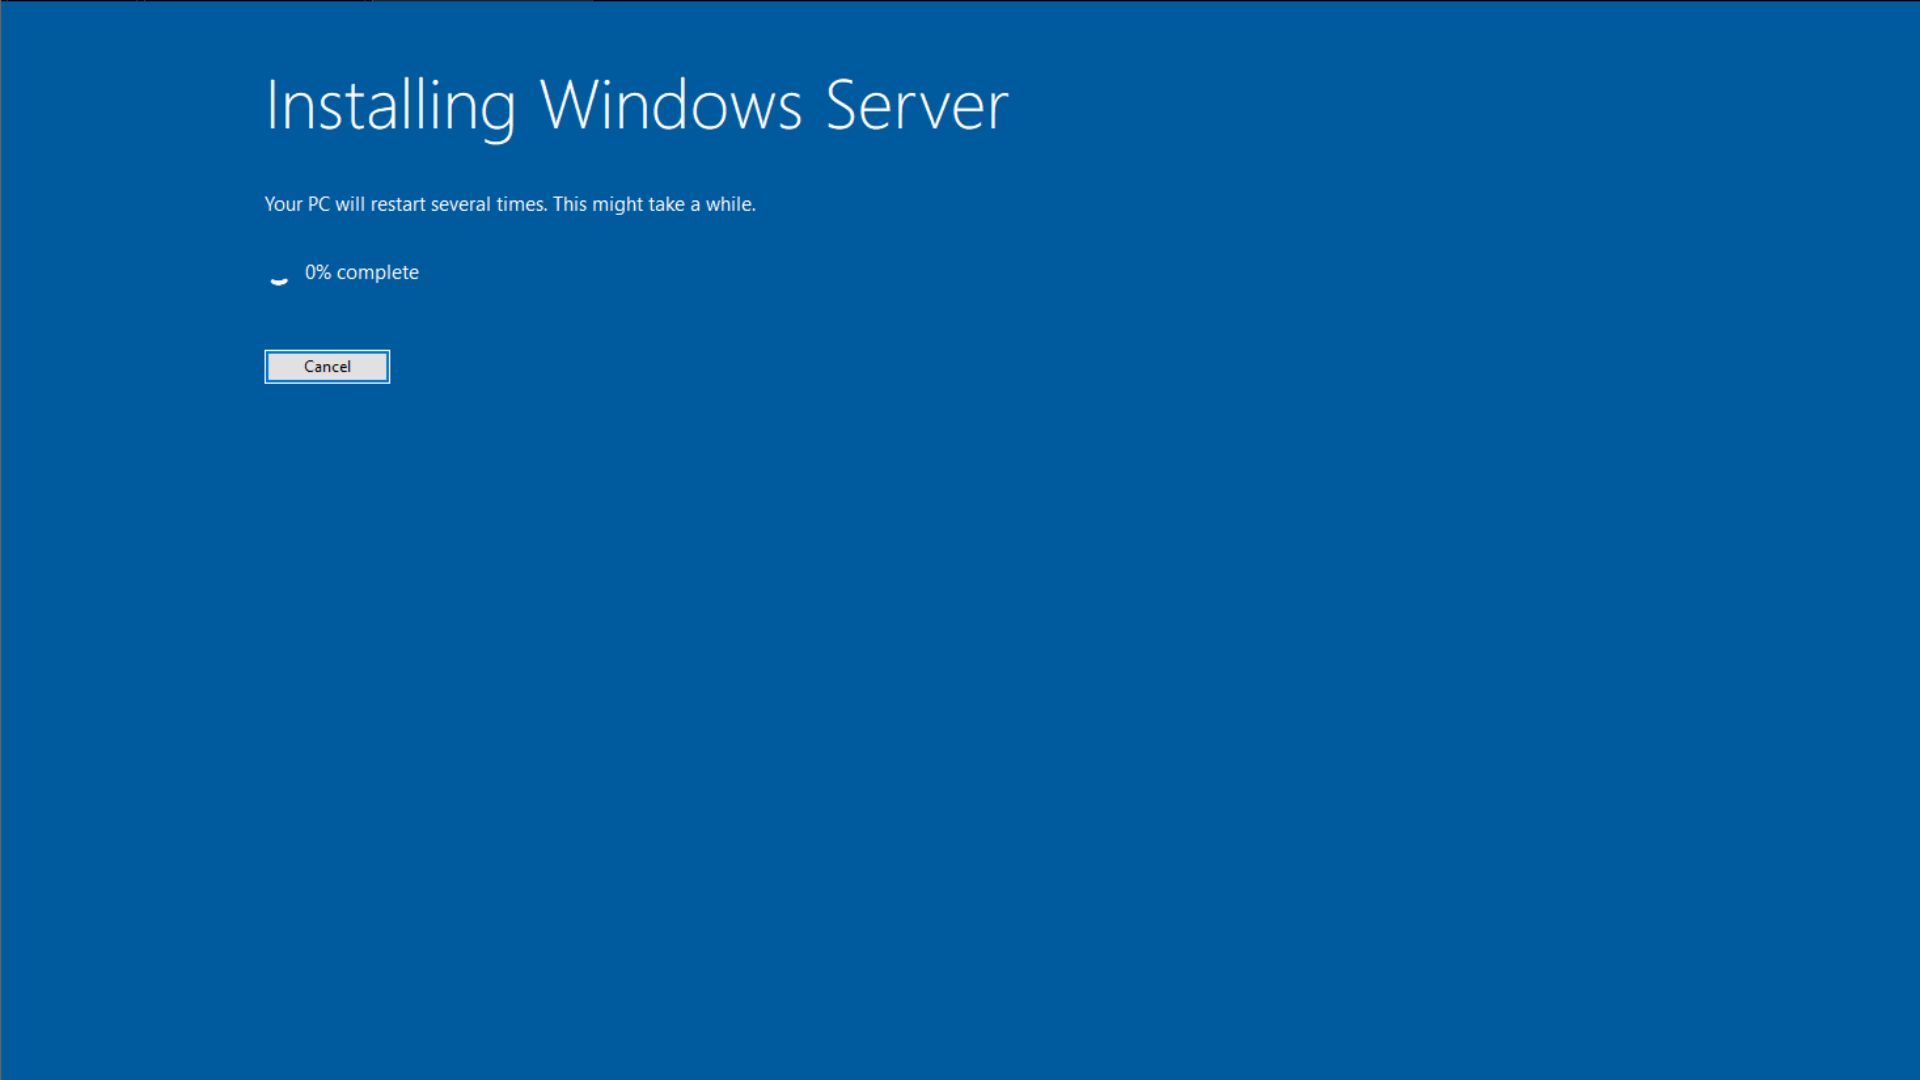
- You’ll see a blue screen that shows the Windows Server installation screen. When it completes, you’ll see the regular Windows 11 bootup screen, which skips the Out-of-box Experience (OOBE).
In our tests, Windows Latest observed that this method works flawlessly and has installed Windows 11 on two of our Windows 10 PCs, each having 2GB RAM, and no TMP 2.0 support.
But if the Windows Server update method is not working for you at first, try the command a few more times, and make sure the Windows 11 file you downloaded is of the same language as your Windows 10 installation. If it’s still not working, you’ll need to use any of the following methods.
Install Windows 11 on unsupported hardware using Rufus
Rufus is a free, open-source, lightweight tool for Windows that helps you create bootable USB drives from ISO files. Rufus has built-in bypasses for Windows 11 hardware restrictions. It is not an installer by itself, but it modifies the installation media to avoid the Windows Setup from blocking an upgrade due to missing TPM 2.0, Secure Boot, or minimum RAM requirements.
Fortunately, Rufus allows you to do both clean installs and in-place upgrades for Windows 10 to Windows 11. So, if you have a USB drive with at least 16GB of storage, this is likely the second-best method for an in-place upgrade to Windows 11, bypassing its requirements.
- Download Rufus and install it on your PC. We recommend you install the latest version.
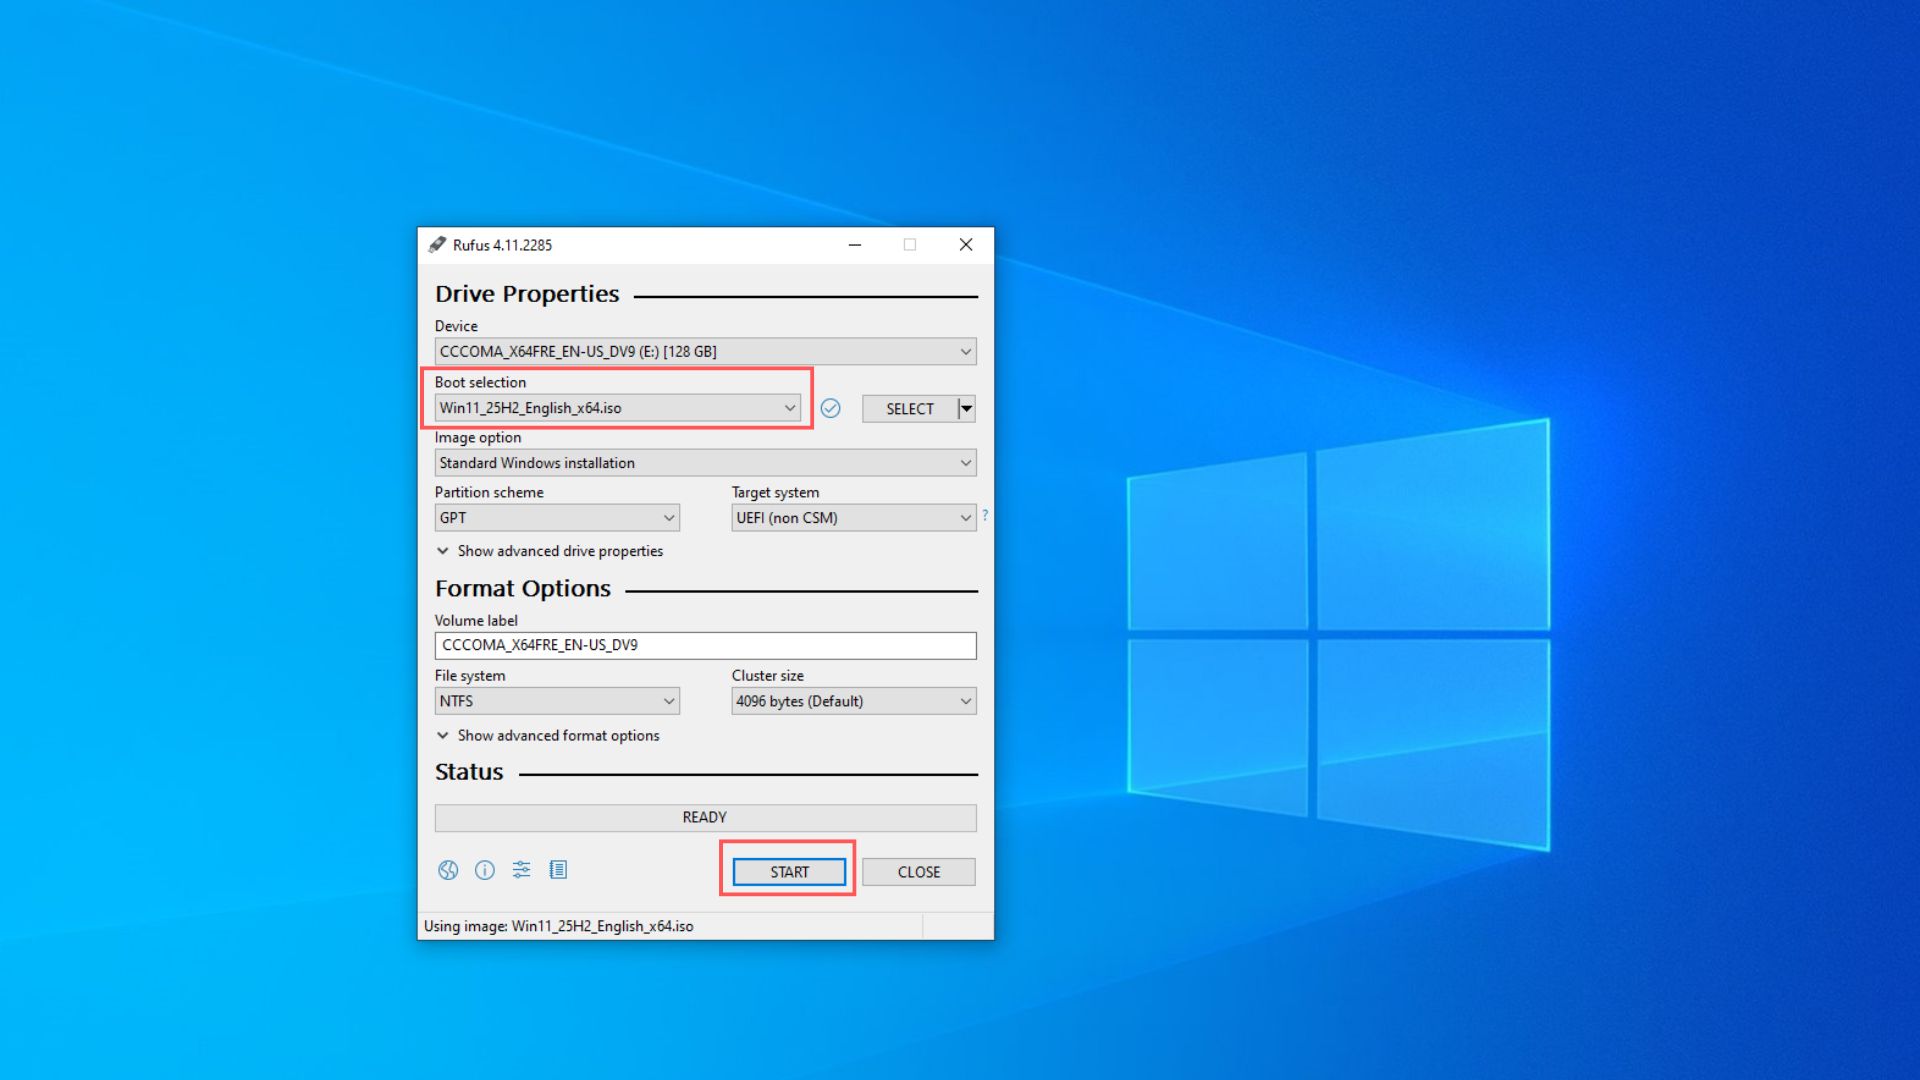
- Insert a USB Drive with at least 16GB of storage on your PC, and then double-click Rufus, which you have just downloaded. From the Device section in Rufus, select your USB drive.
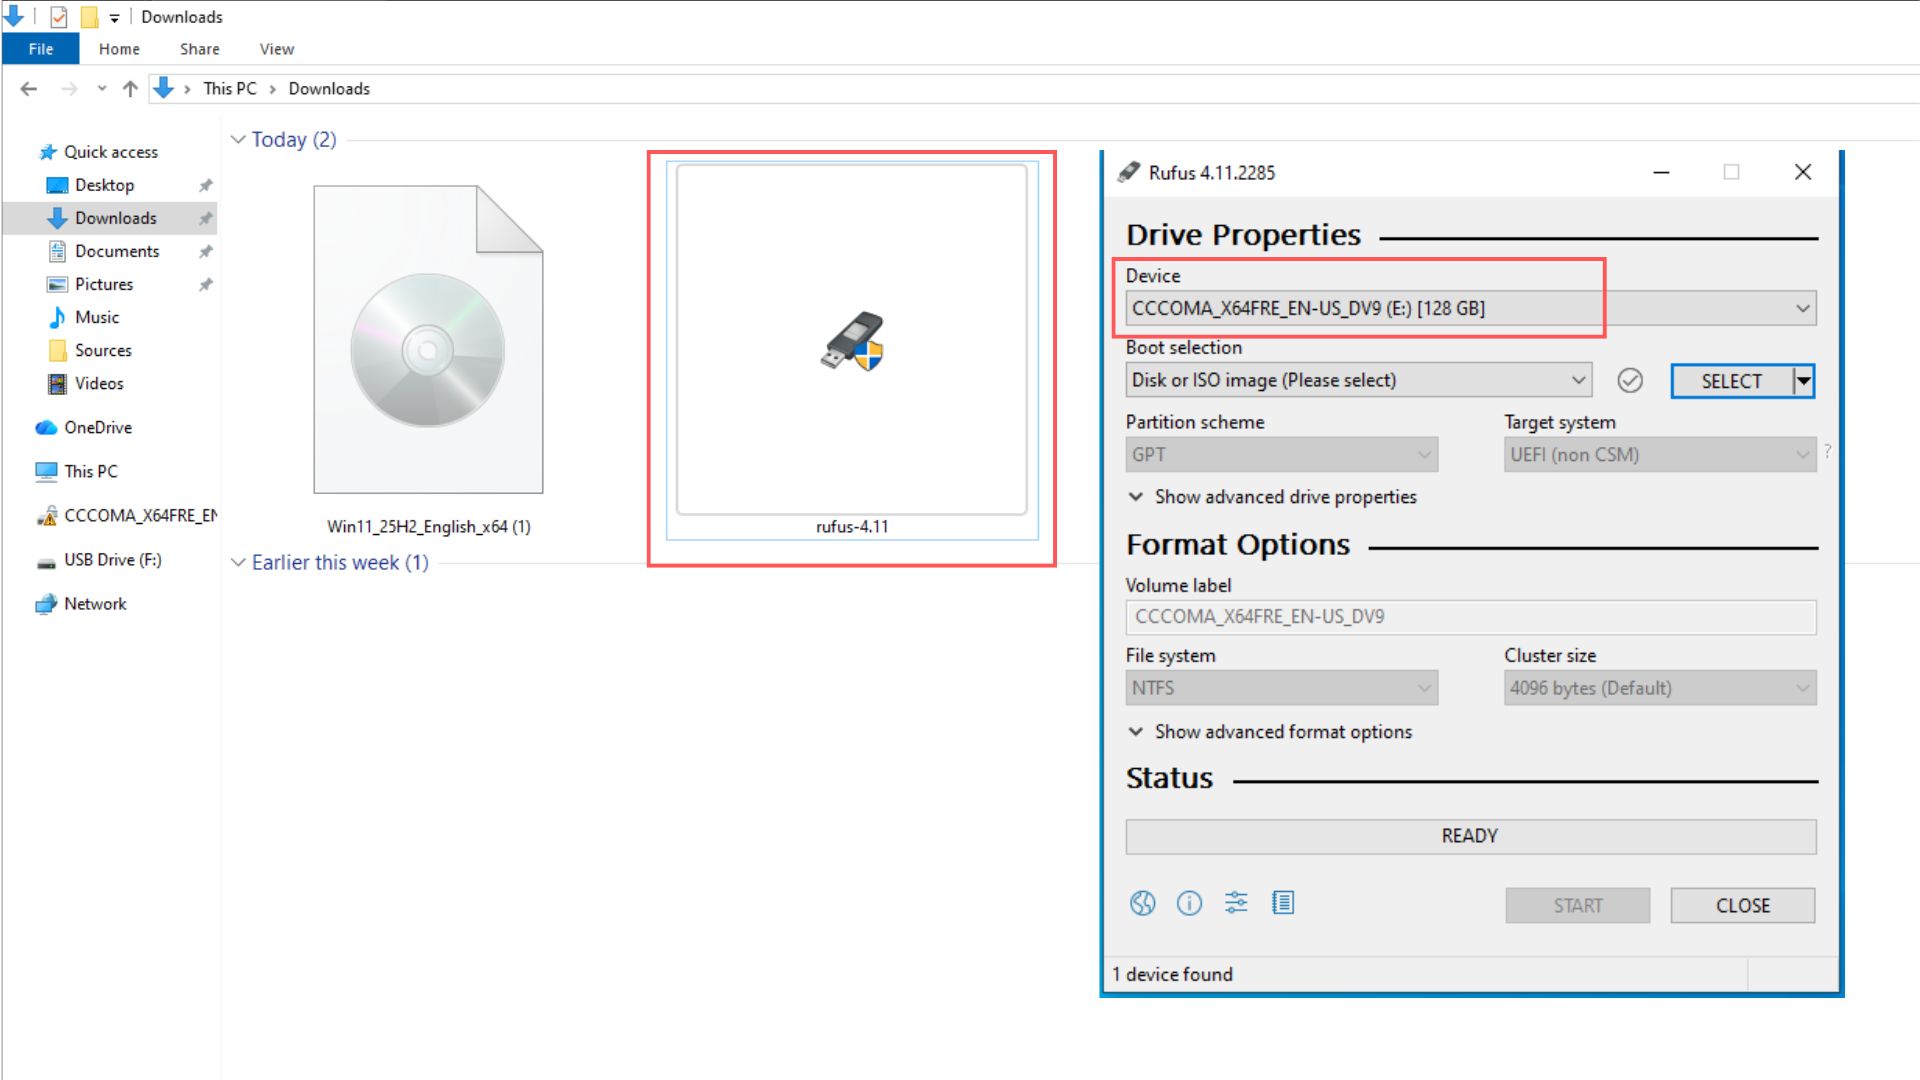
- In the Boot Selection section, make sure “Disk or ISO image” is selected. Then click the SELECT button. Choose the Windows 11 ISO file that you have downloaded. Now, click START.
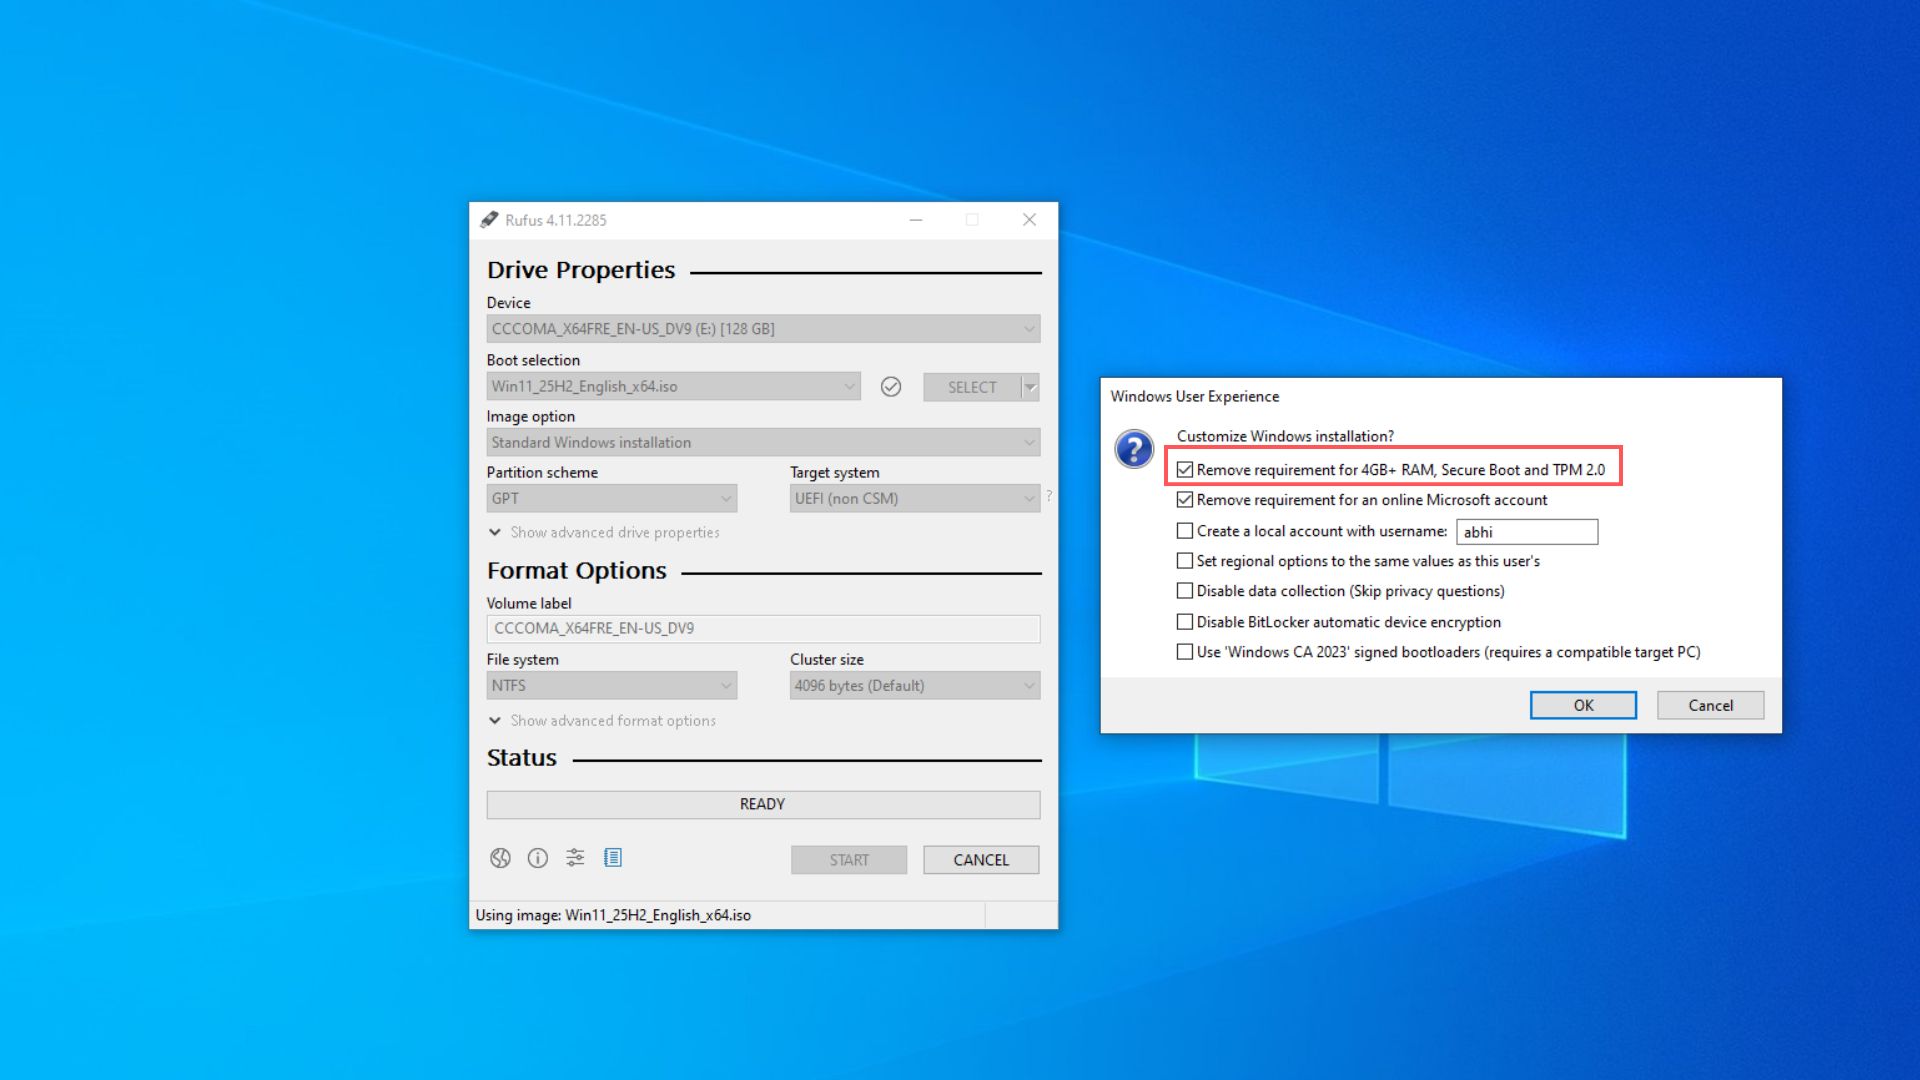
- From the pop-up window, select the option to “Remove requirement for 4GB+ RAM, Secure Boot, and TPM 2.0”. Then press OK. Continuing will delete all data from your USB drive.
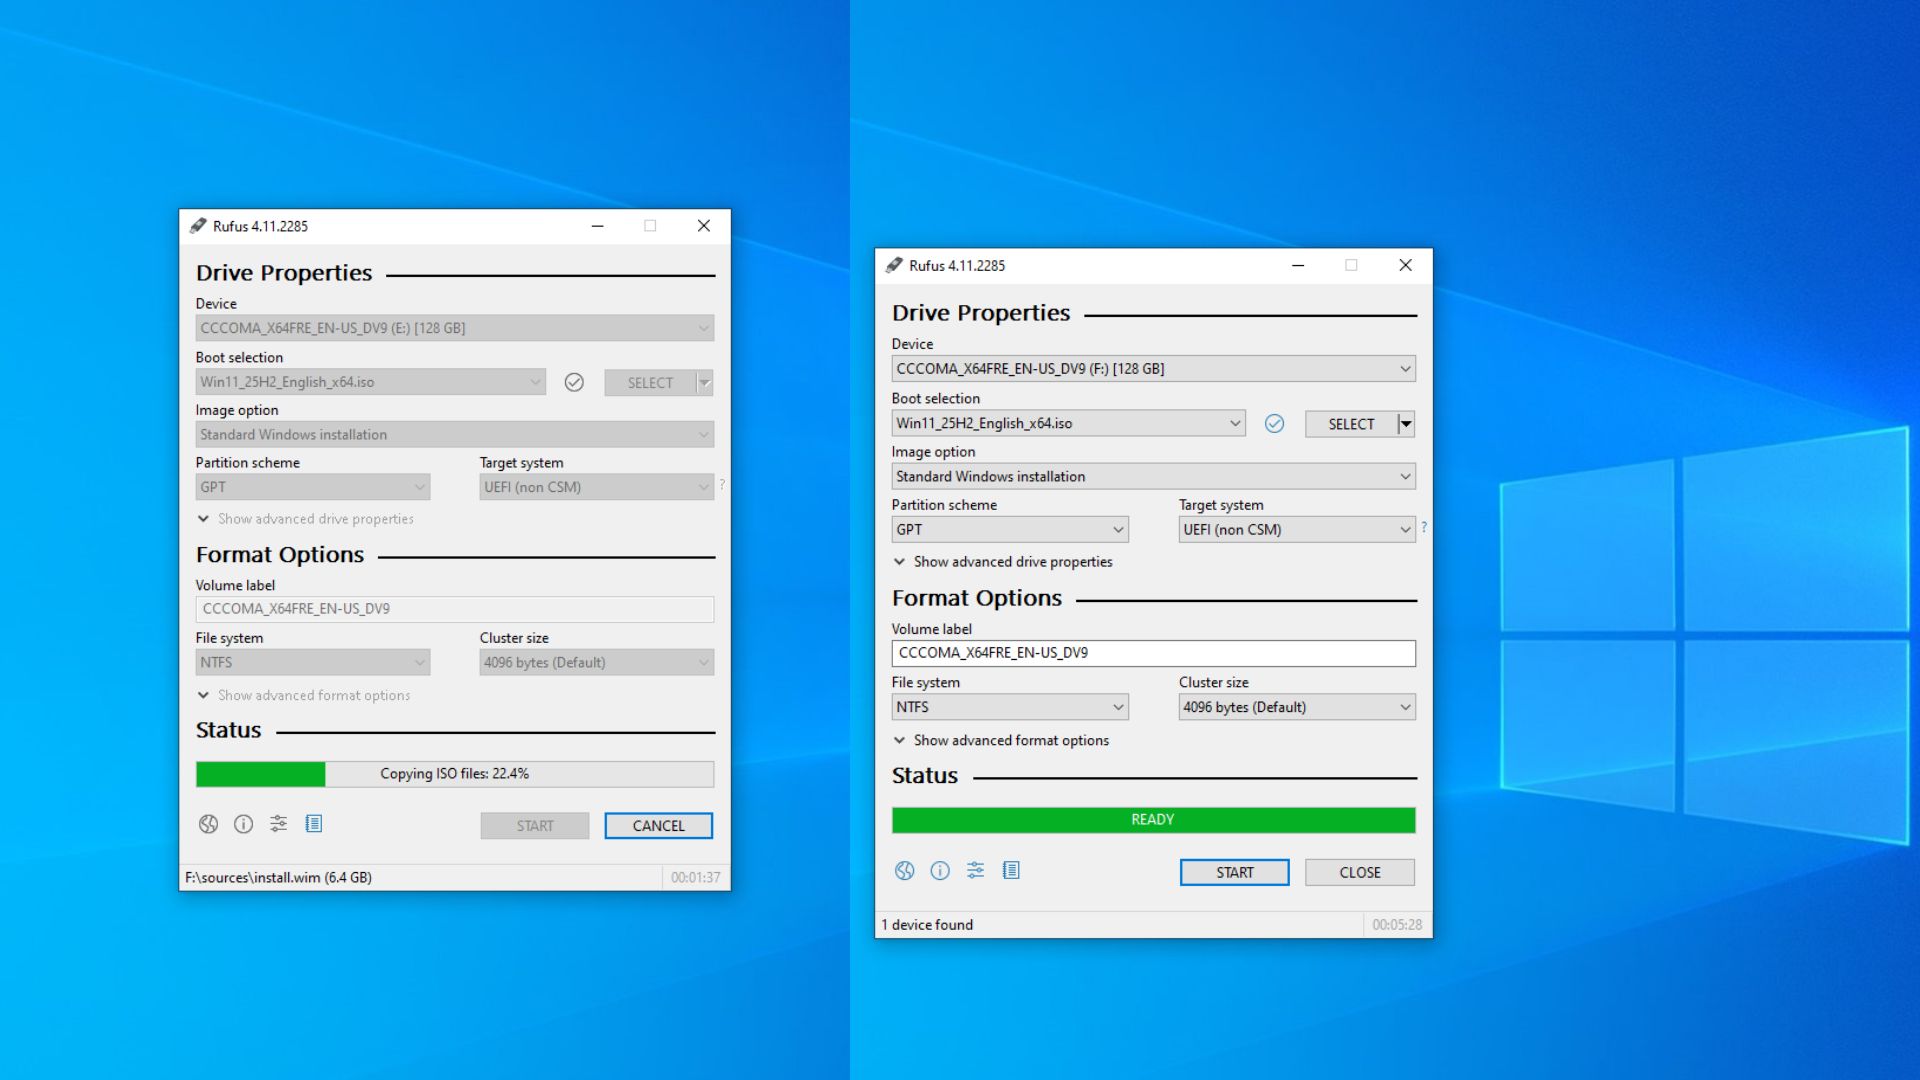
- Rufus will now copy the ISO files to the USB drive while modifying them to bypass Windows 11’s minimum requirements. The process will take some time. Once it is finished, it will show Ready in green highlight. Press the CLOSE button.
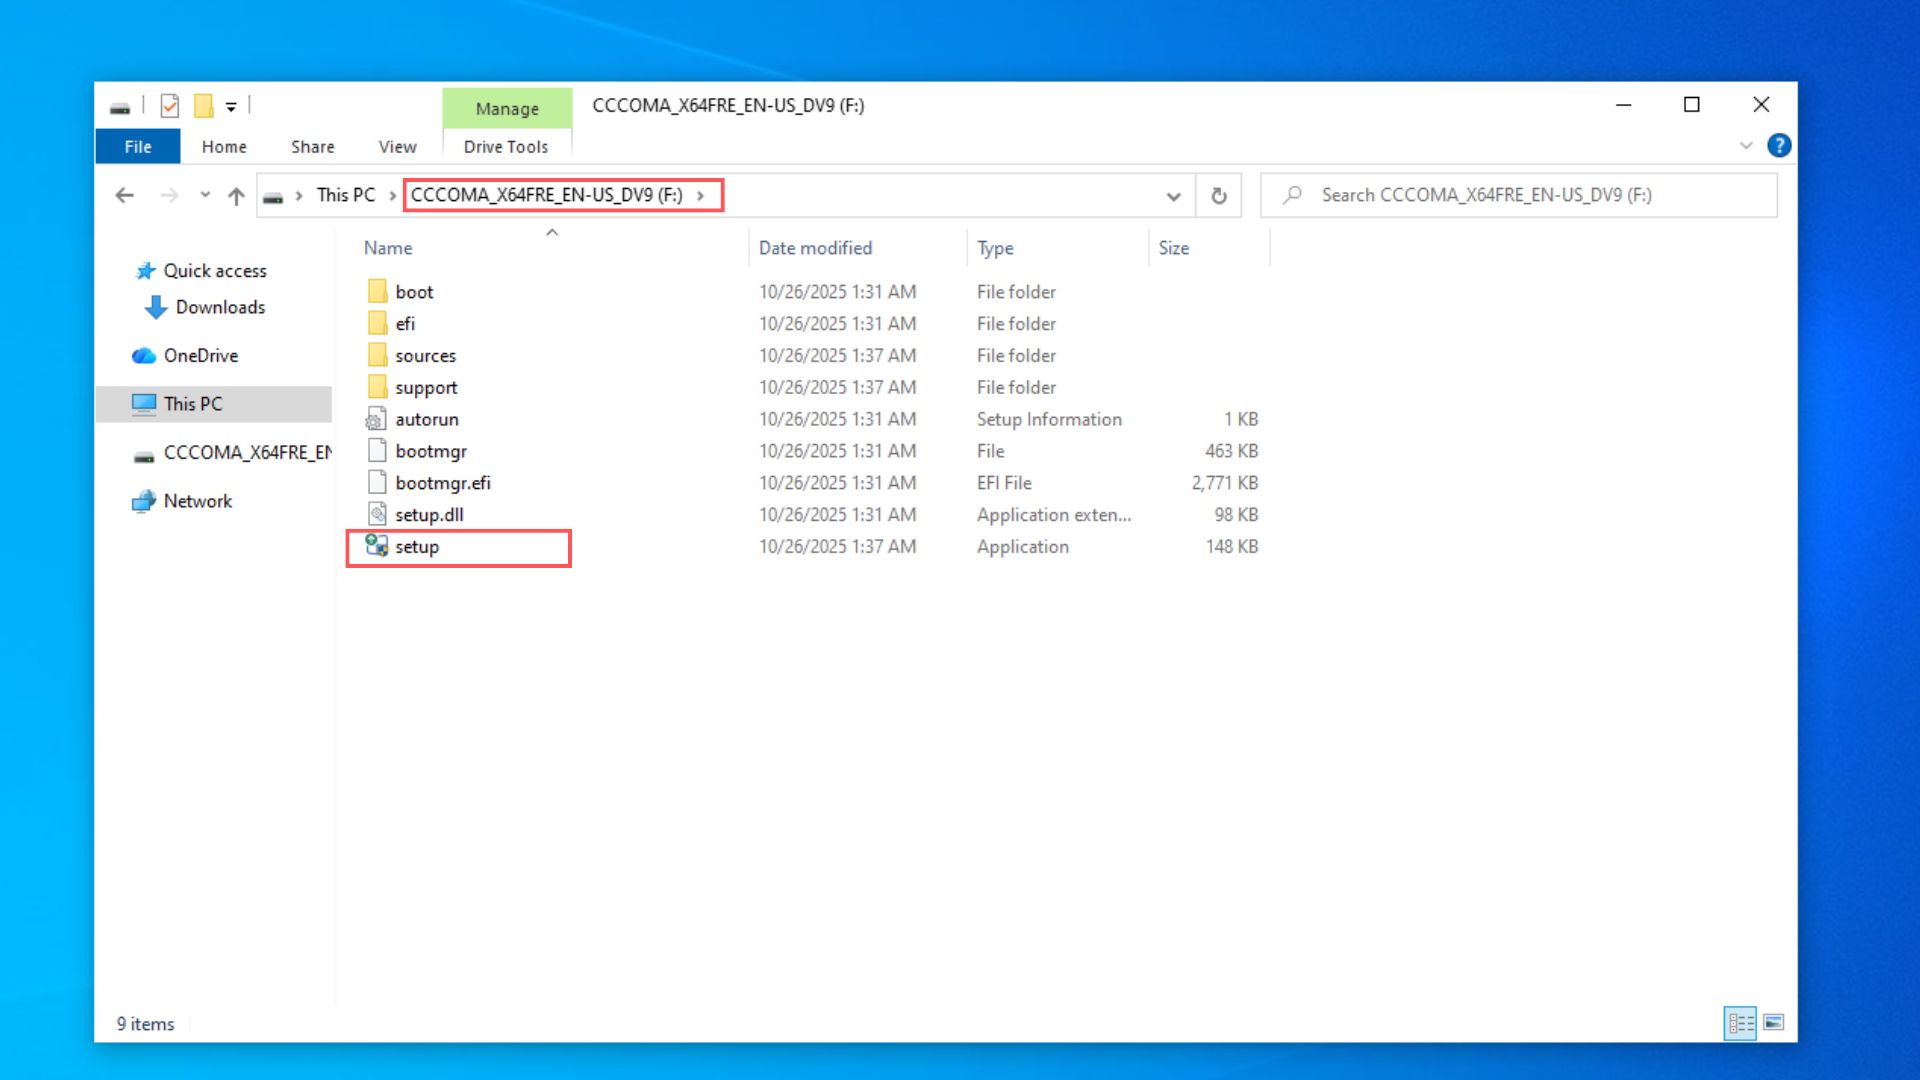
- If you want an in-place upgrade, which doesn’t delete your existing files or apps, or settings, open the USB drive from the File Explorer. You’ll see the Windows 11 installation files. Double-click the “setup” Application file.
- The Windows 11 Setup window will open. Click the “Change how Setup downloads updates” option and select “Not right now” to skip checking for updates. Now click Next.
- Accept the license terms. You’ll see a Ready to install window that shows a check mark on “Keep personal files and apps”, which means that you’ll proceed with an in-place upgrade. Click Install, and Windows 11 will continue to install.

If you want a clean install, with all your files deleted and a fresh start with Windows 11, you can restart your Windows 10 PC, while the USB is still connected, and then immediately continue pressing the Esc key to open BIOS. Then, select the USB drive and boot from it.
Install Windows 11 on unsupported hardware using Regedit (Registry editor)
If you already have a USB drive, and you want to do a clean install of Windows 11 on unsupported hardware, but you do not want to use third-party tools like Rufus, your best bet is to bypass Windows 11 hardware requirements through Registry Edit.
For this, first you’d need to create a bootable USB using Microsoft’s Media Creation Tool.
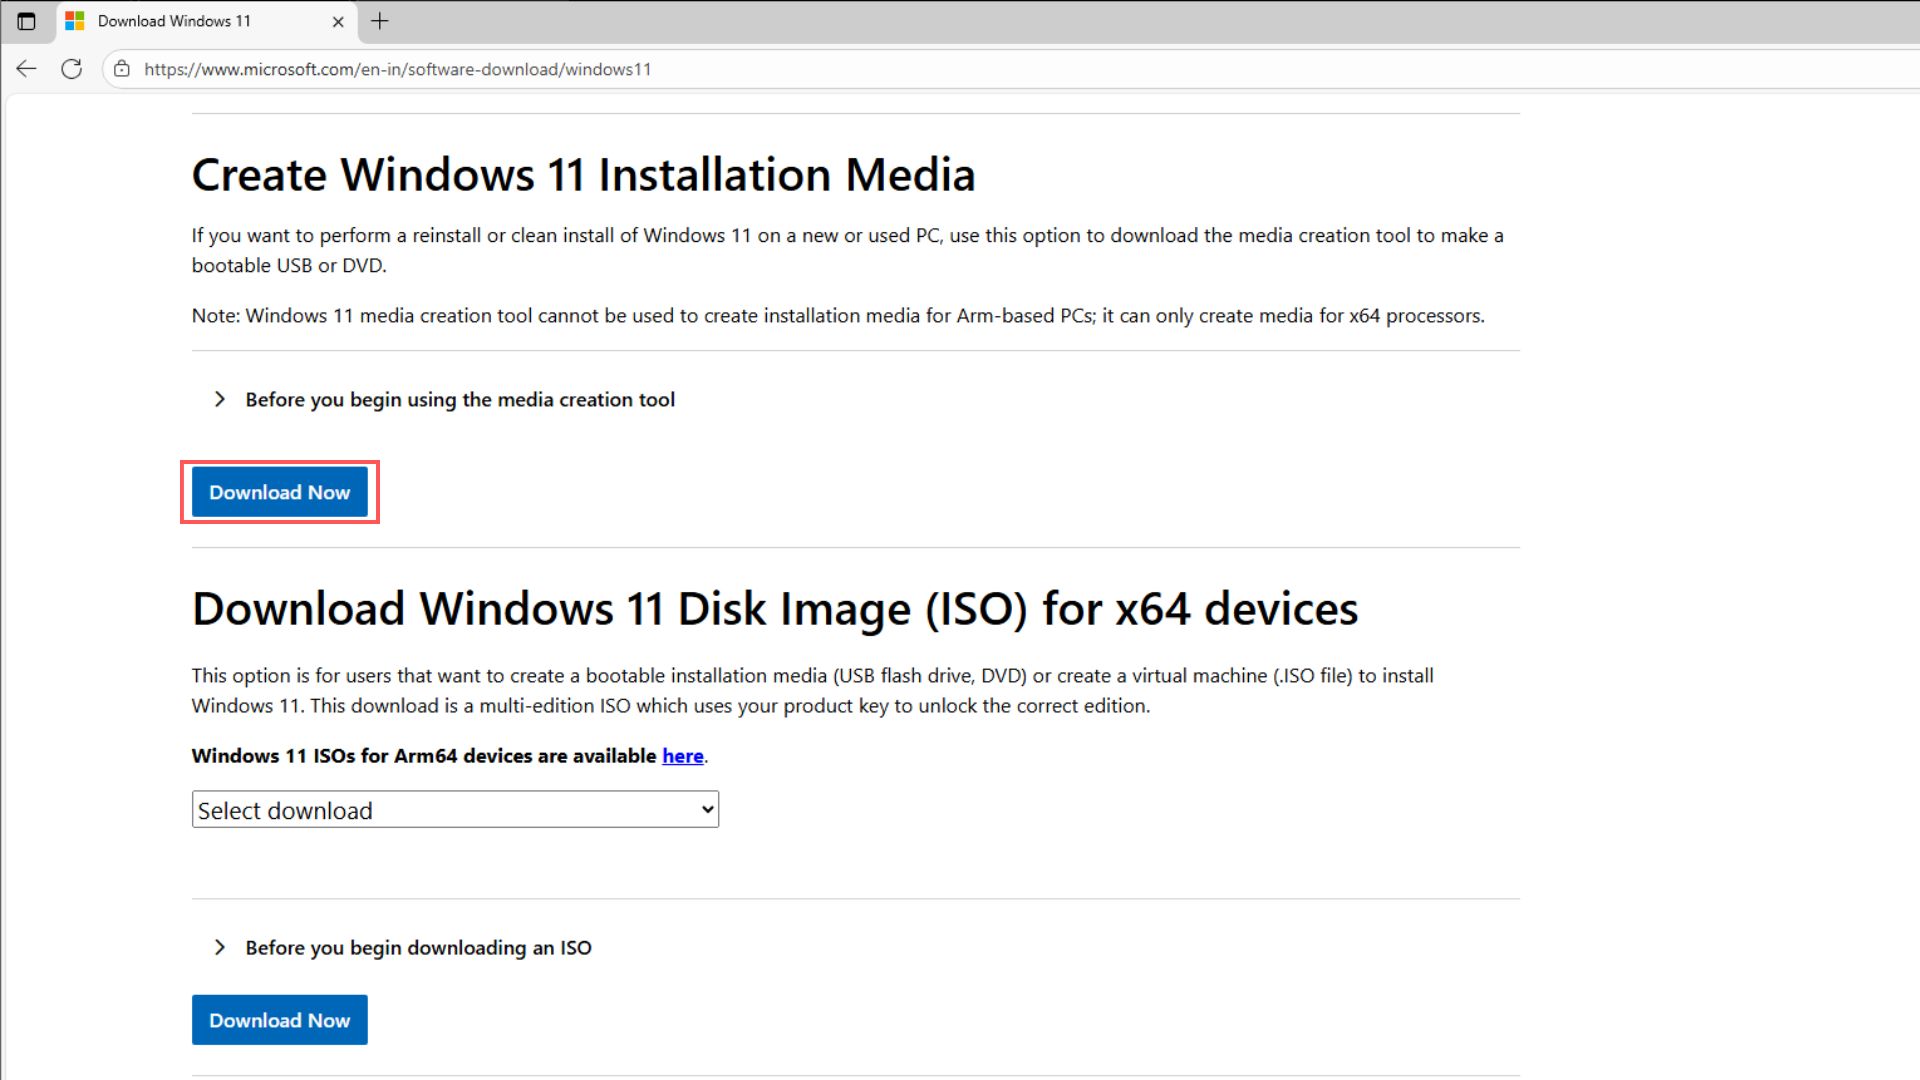
Go to the official Microsoft download page. Scroll down and click the Download Now button under “Create Windows 11 Installation Media”. It will download a 20 MB executable file.
Insert your USB drive into your PC, and then open the Media Creation Tool. Here, you’ll be able to select the Language and Edition of Windows 11 that you need.
Choose the media type as USB flash drive. Click Next and select your USB drive. Again, click Next, and the download process will begin. Once done, you will have a bootable Windows 11 drive.
Note that Microsoft has recently broken the Media Creation Tool, as reported and tested by Windows Latest. So, if it’s not working for you, you might need to resort to Rufus to create a bootable USB drive.
Either way, the registry edit hack to bypass Windows 11 minimum requirements needs a bootable USB drive:
- You need to boot off your PC from this USB drive by repeatedly pressing the Esc key or F12 (for some PCs) to go into the boot device selection screen. Select the USB drive. It may show as “UEFI: [USB name]”. Press Enter.
- The Windows Setup screen will show up. Press Shift + F10 to open the Command prompt.
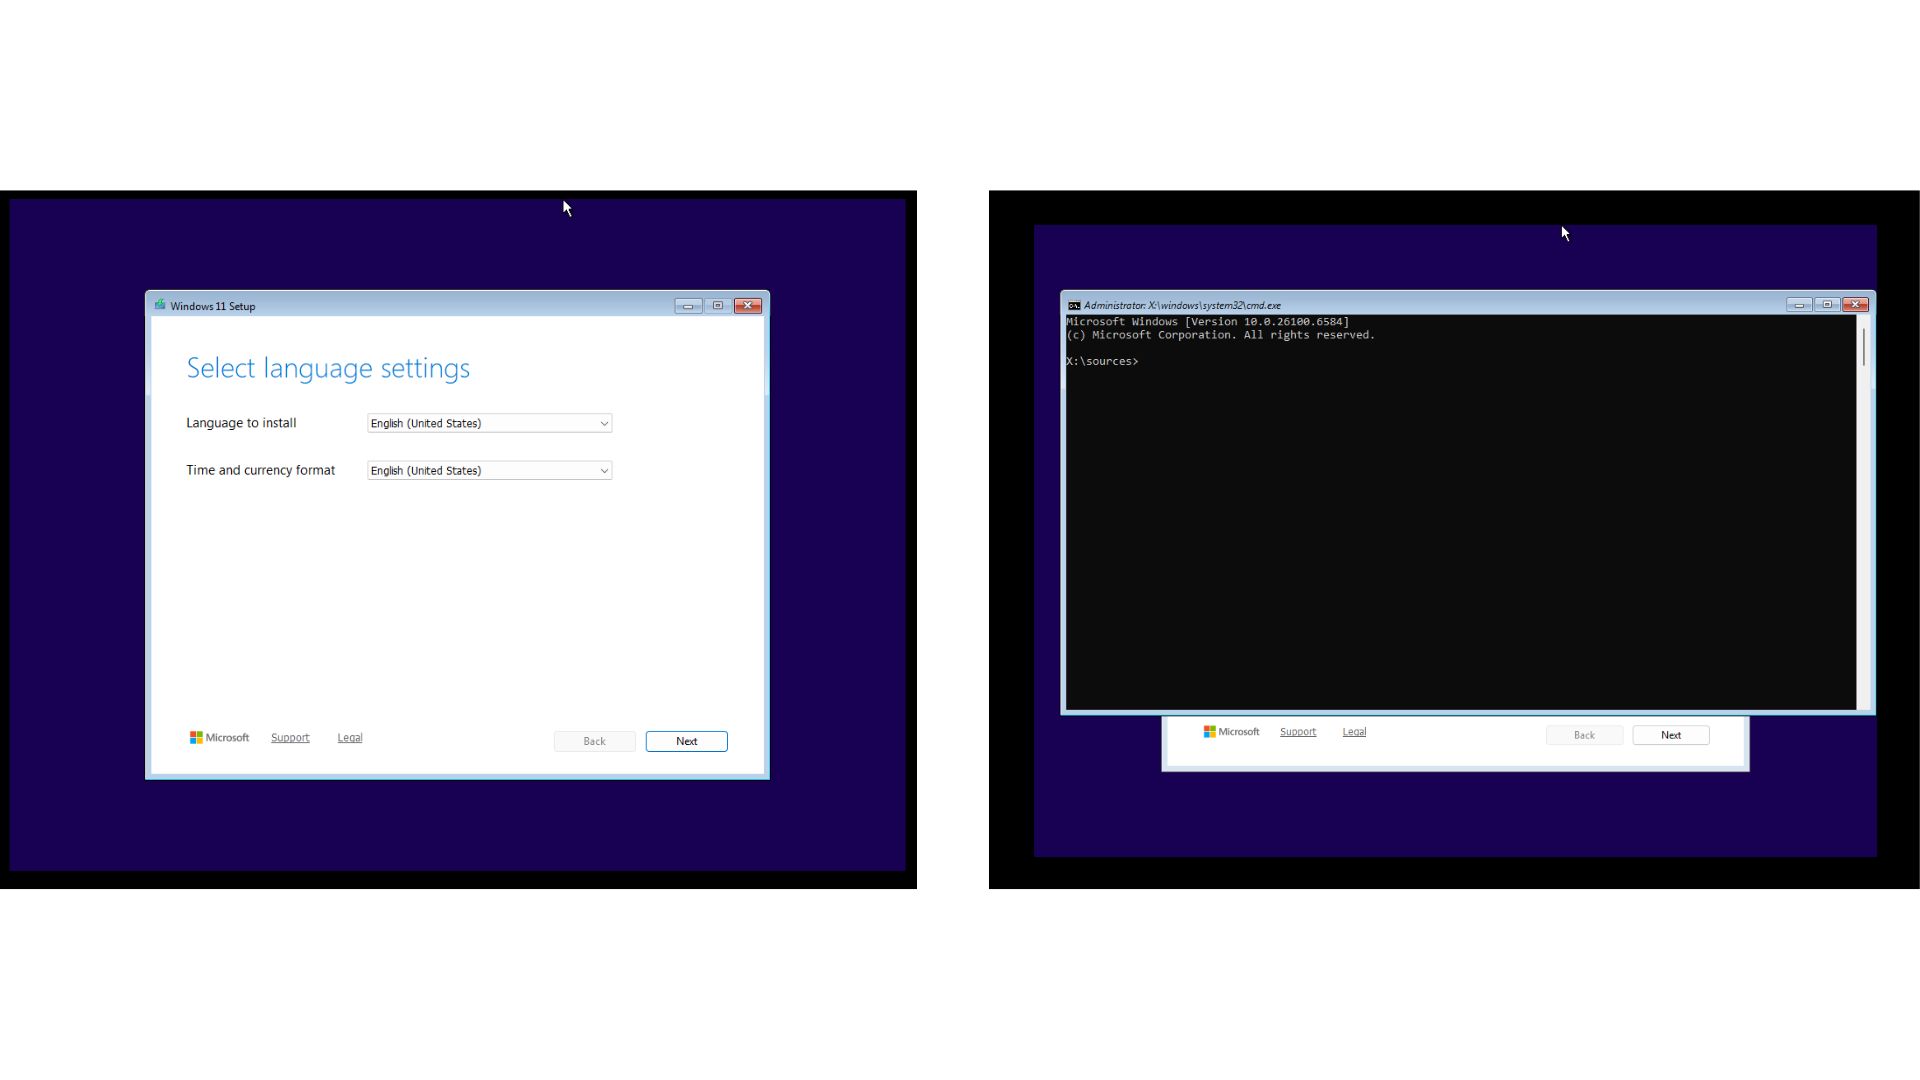
- Type “regedit” in the command window and press Enter. This will open the Registry Editor.
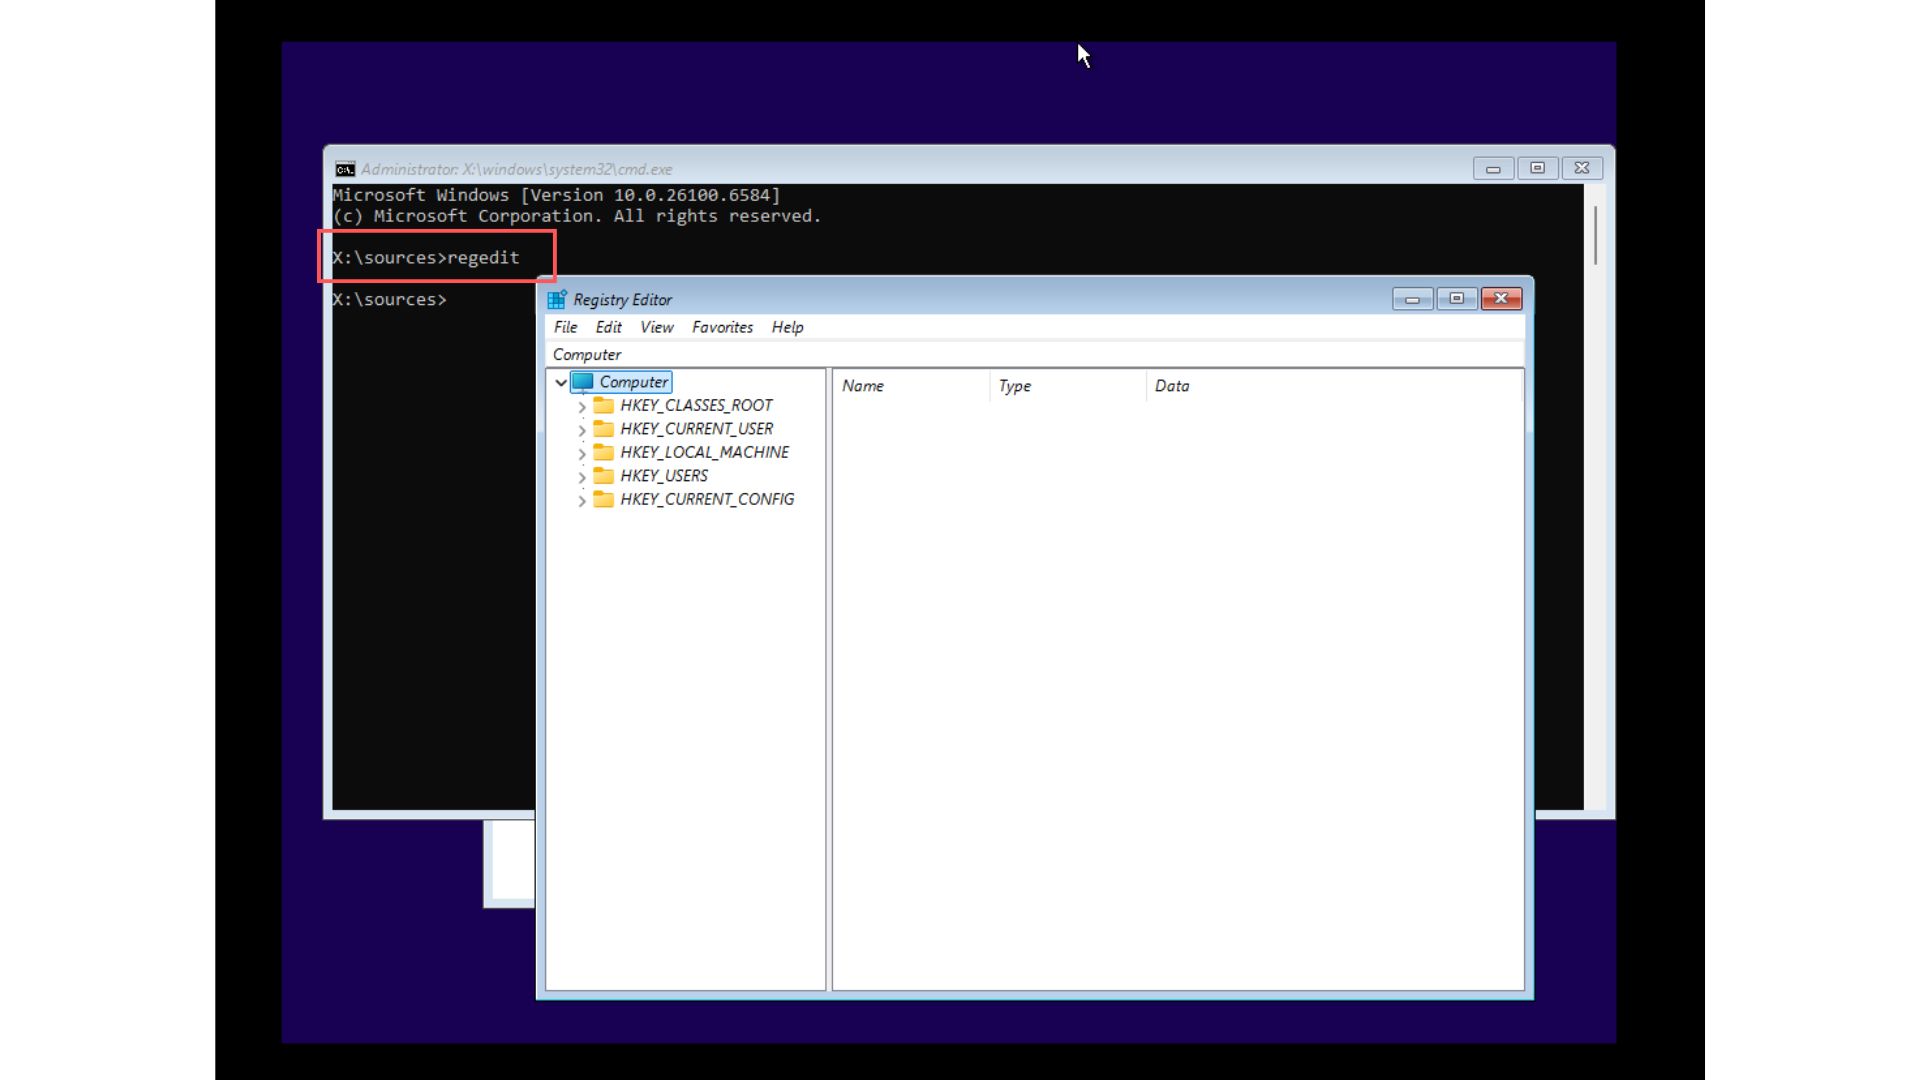
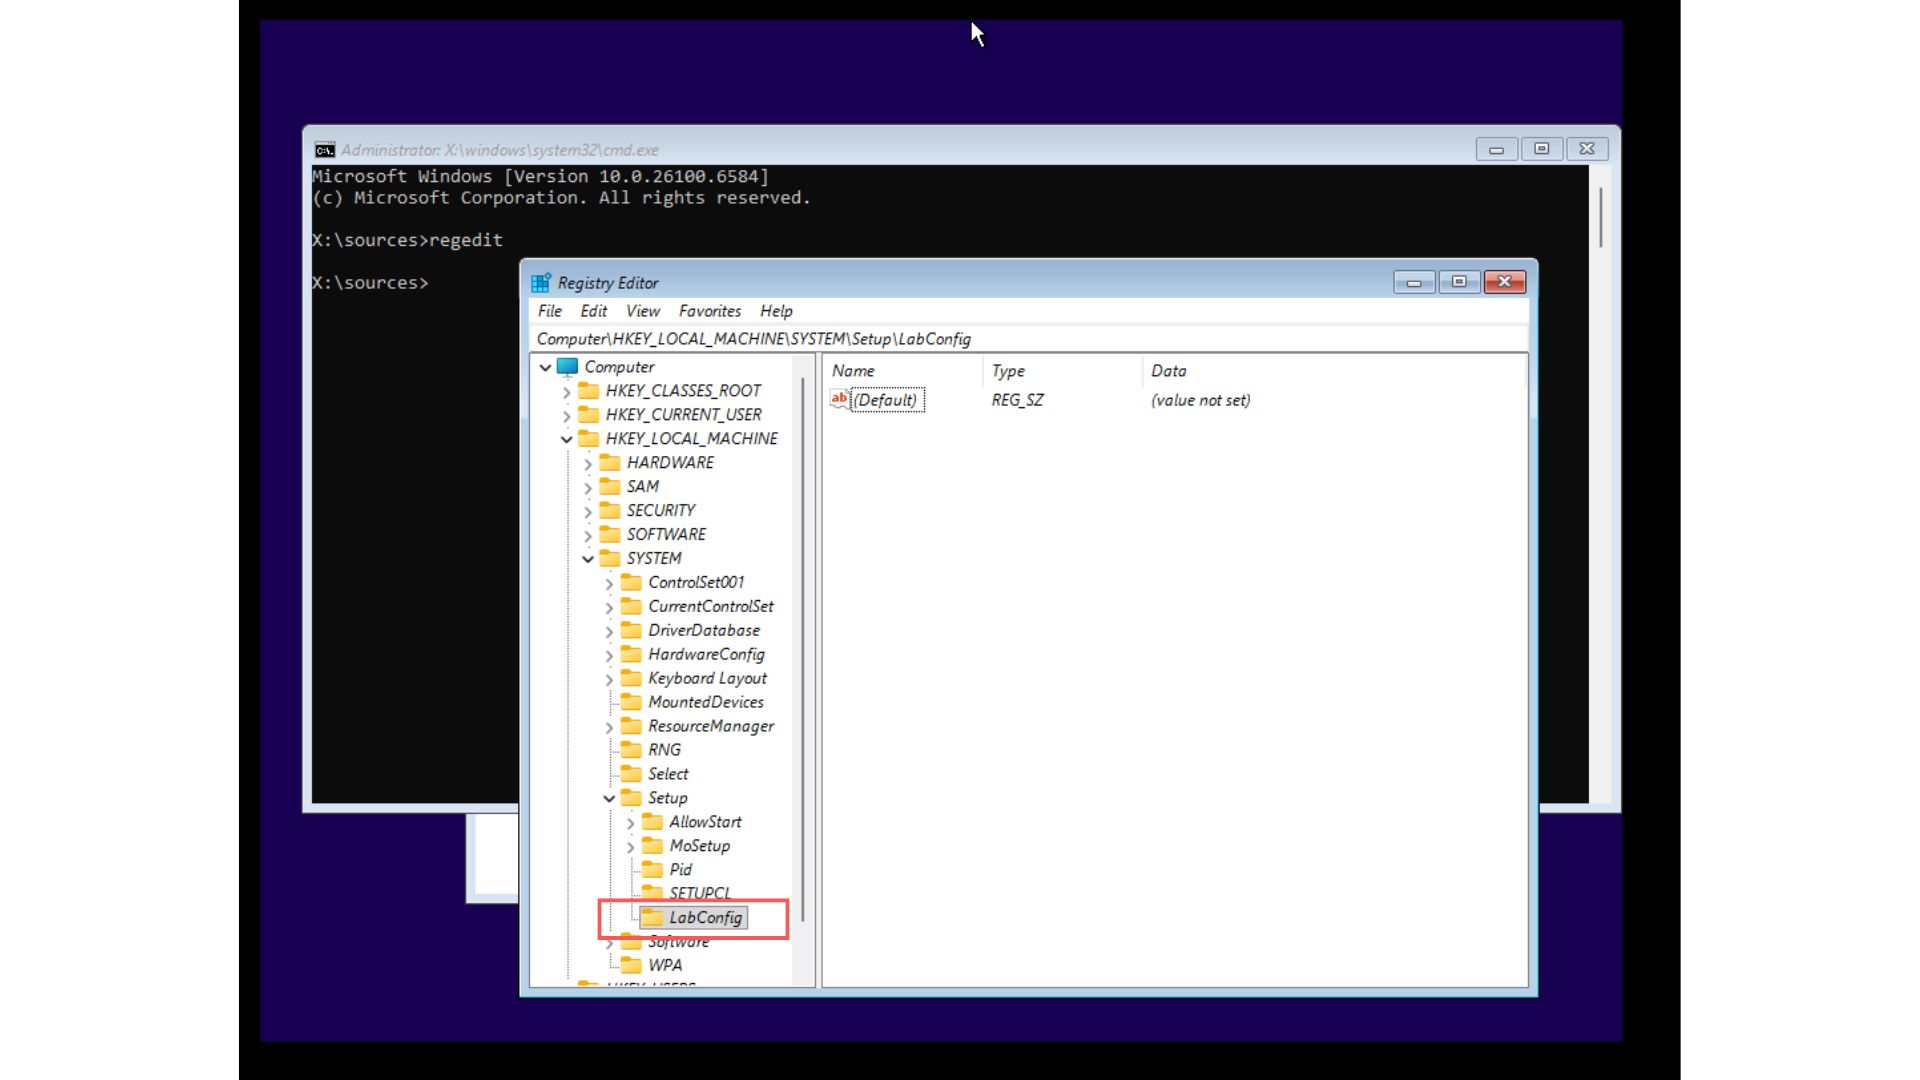
- Expand HKEY_LOCAL_MACHINE by double-clicking it. Continue expanding to SYSTEM > Setup. You will arrive at: HKEY_LOCAL_MACHINE\SYSTEM\Setup
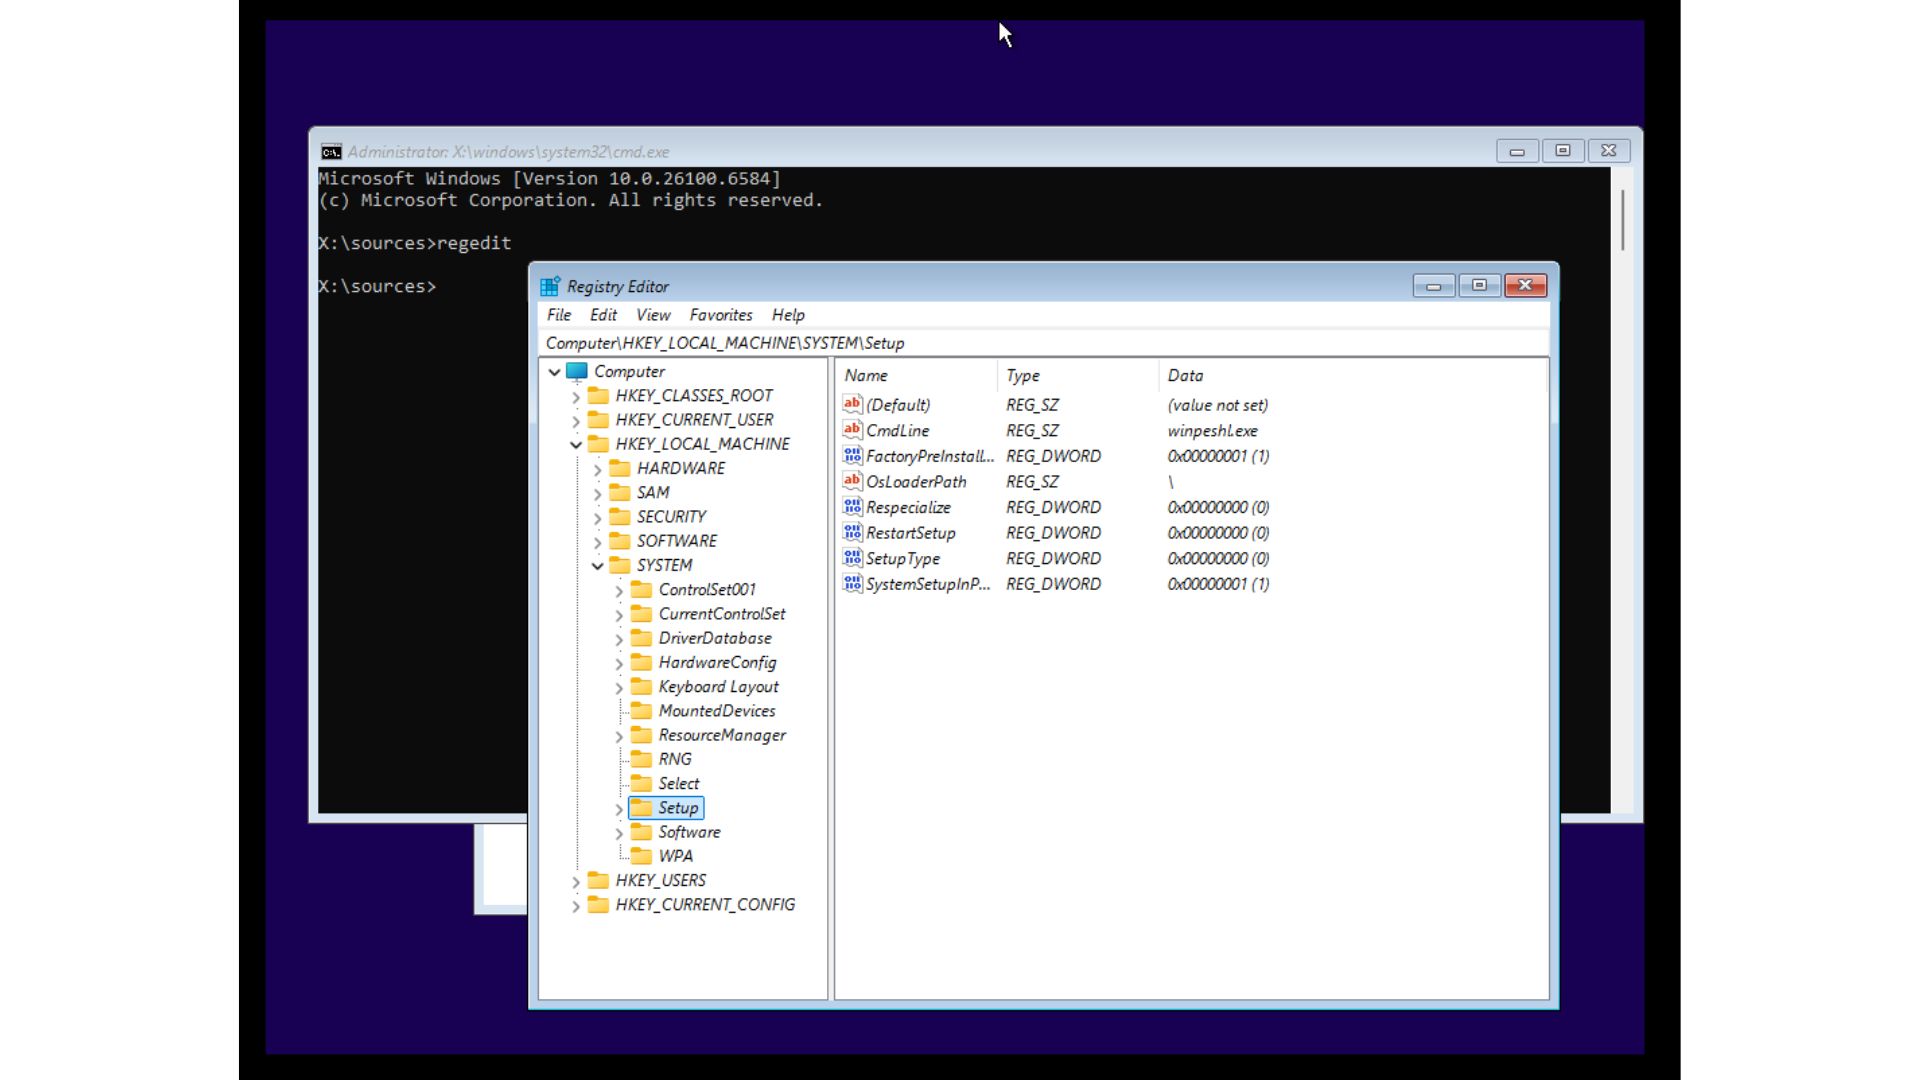
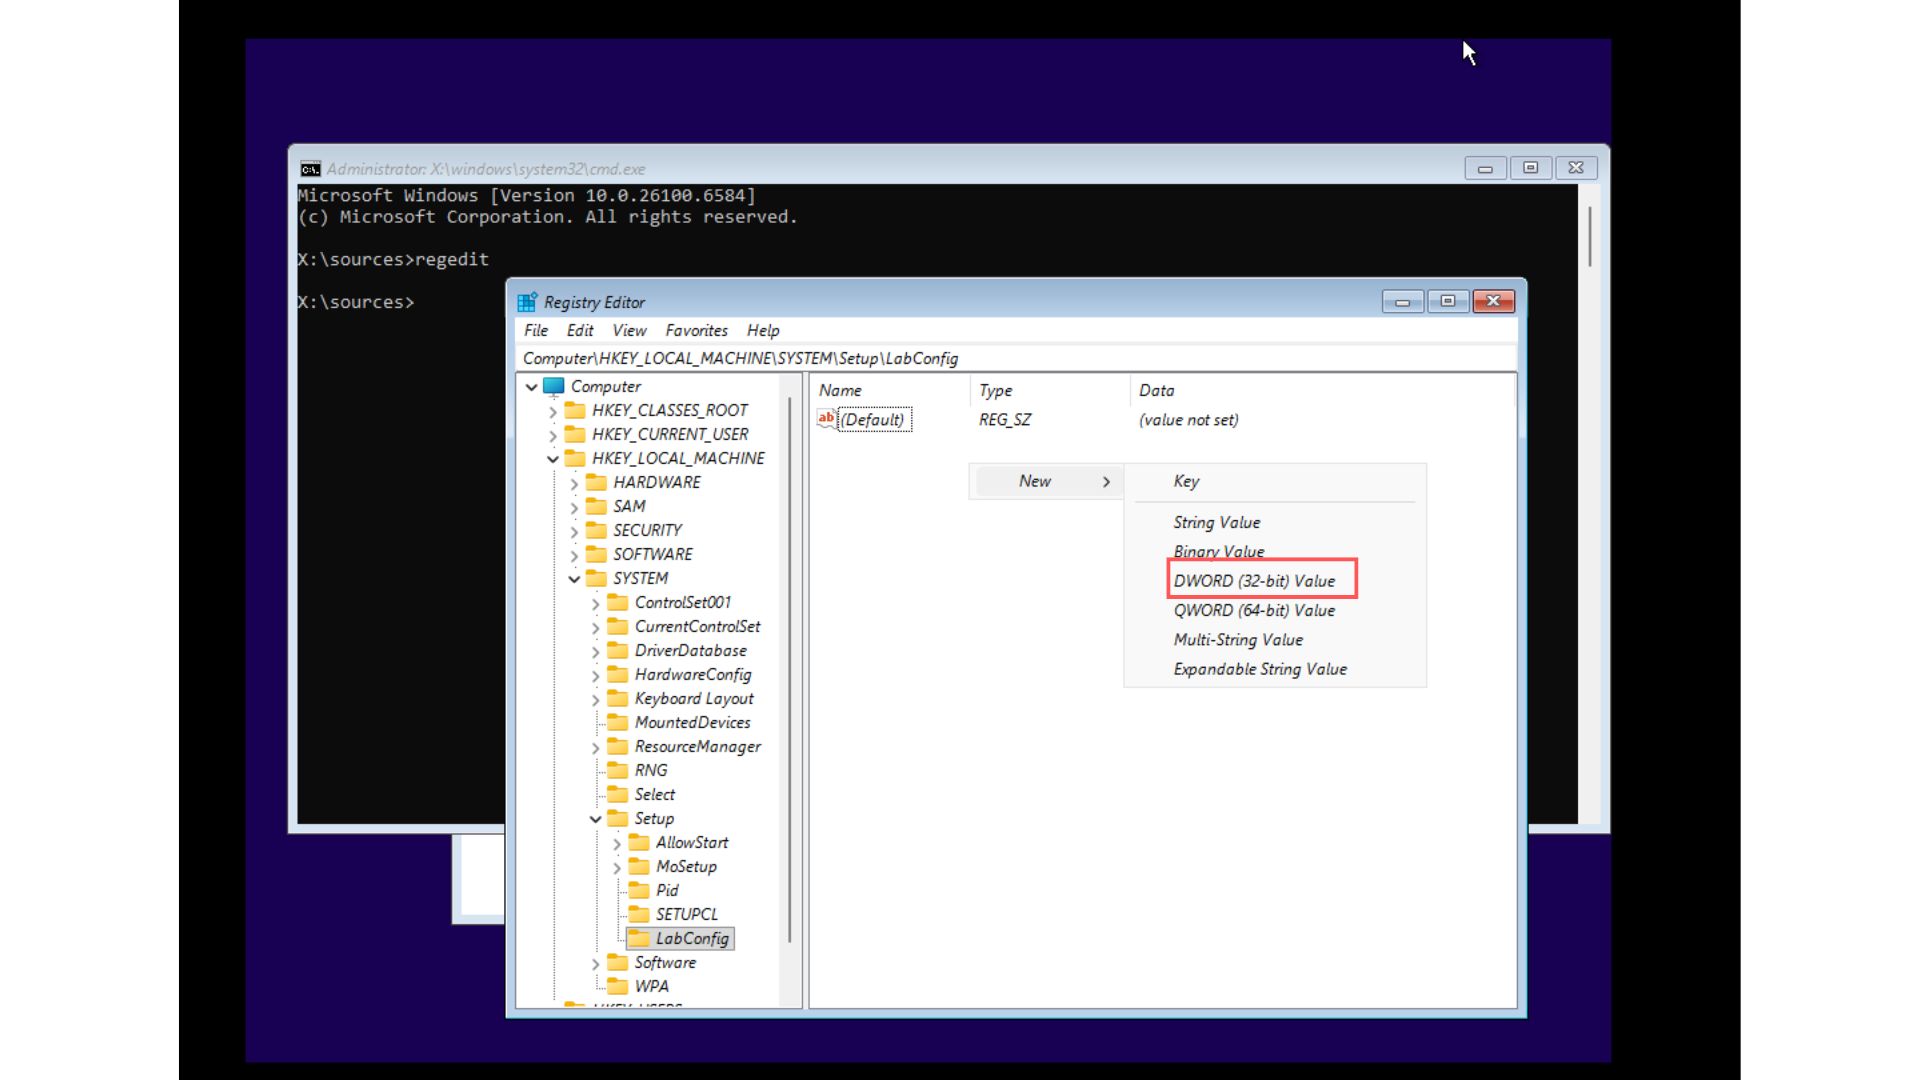
- Right–click on the blank white space to the right, select New, and press Key.
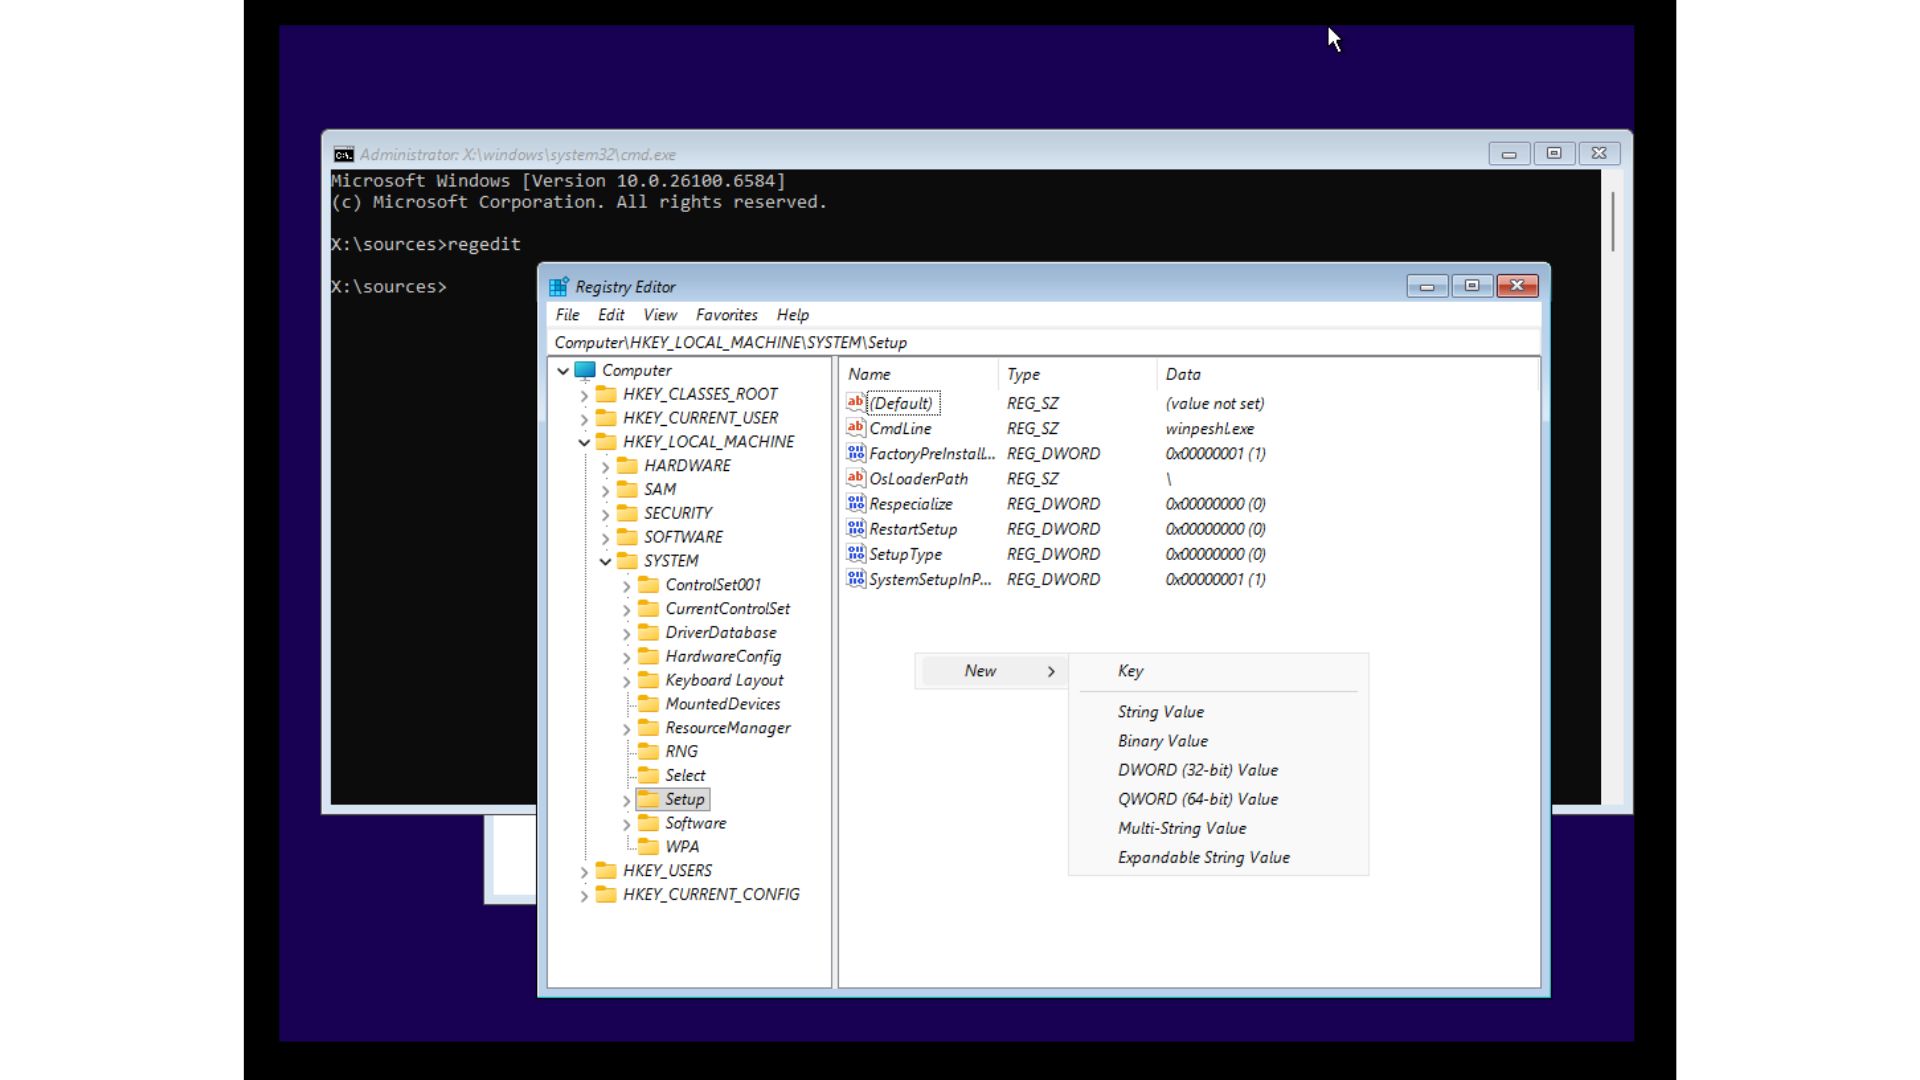
- You have created a new registry key. Name it “LabConfig” and press Enter.
- In the white space inside LabConfig, you have to right-click and select “DWORD (32-bit) Value”.
- Type “BypassTPMCheck” as the new DWORD Value name and press Enter.
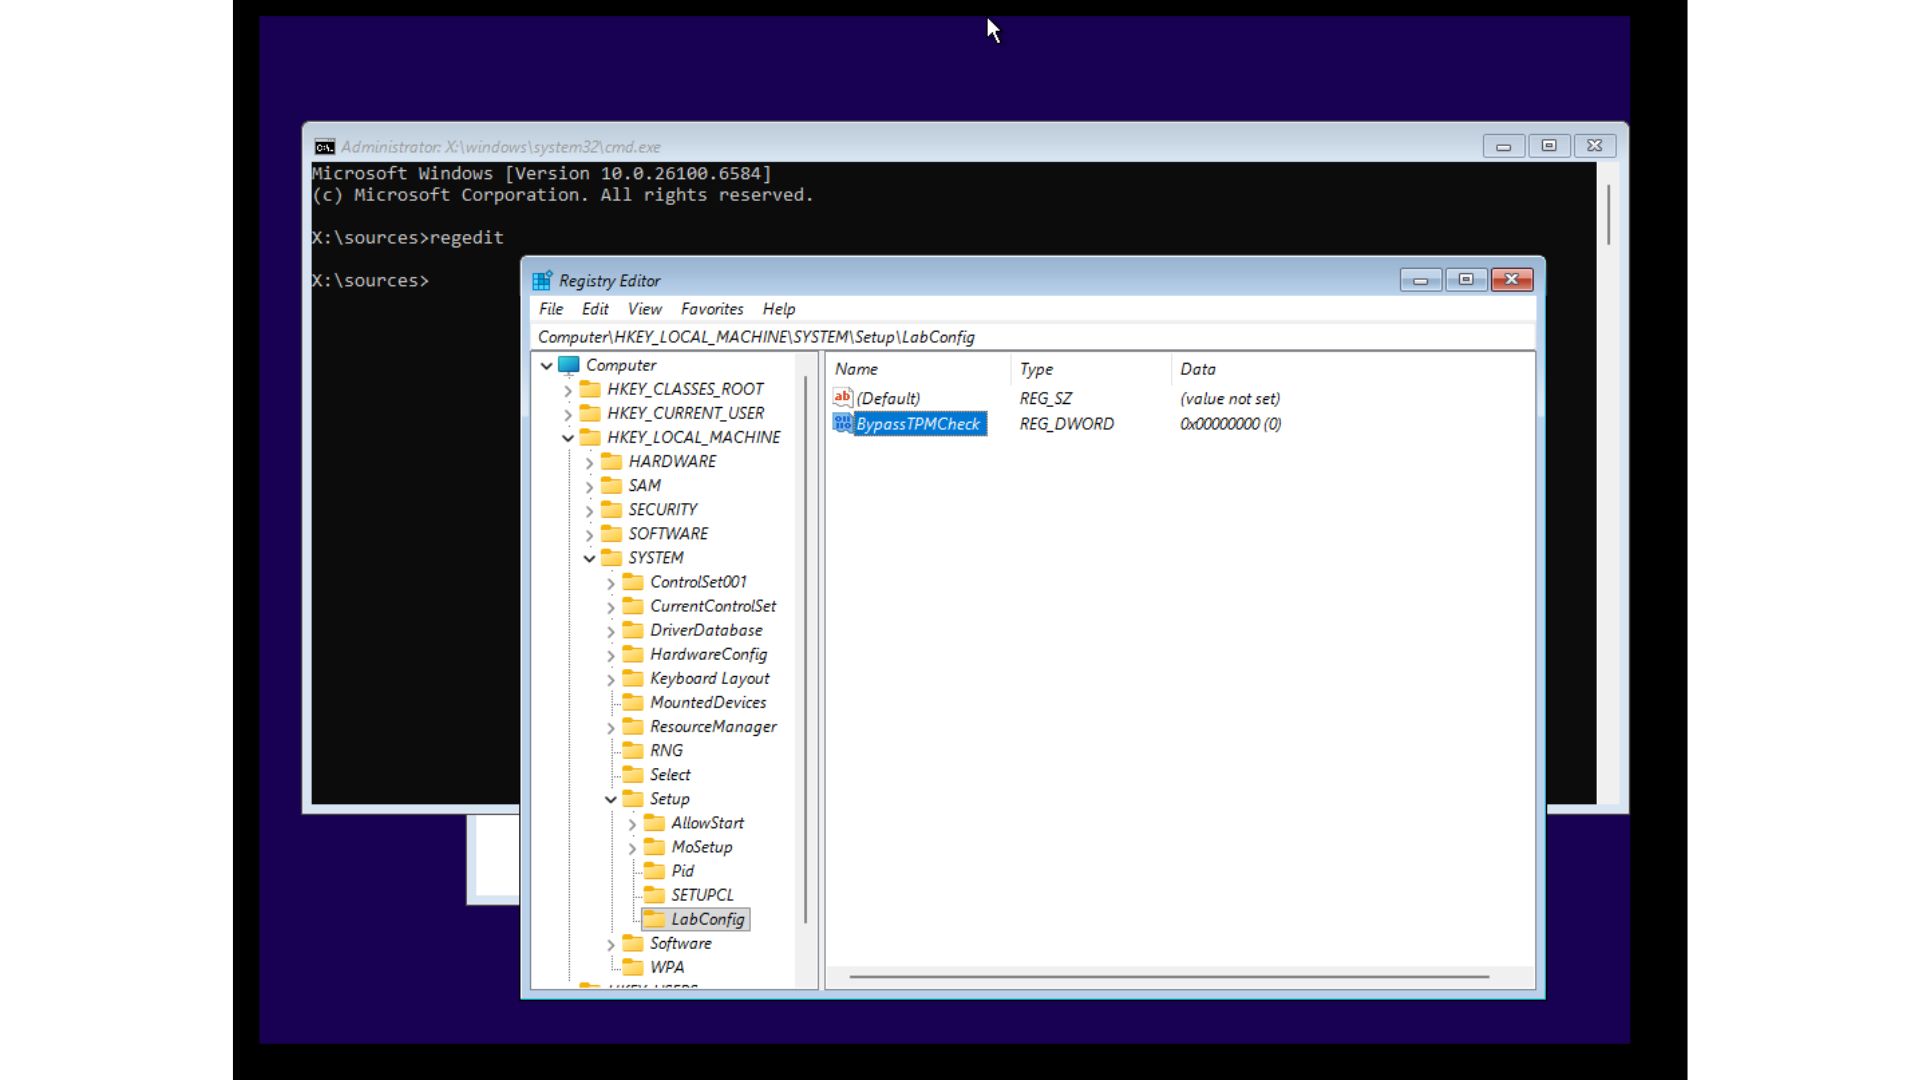
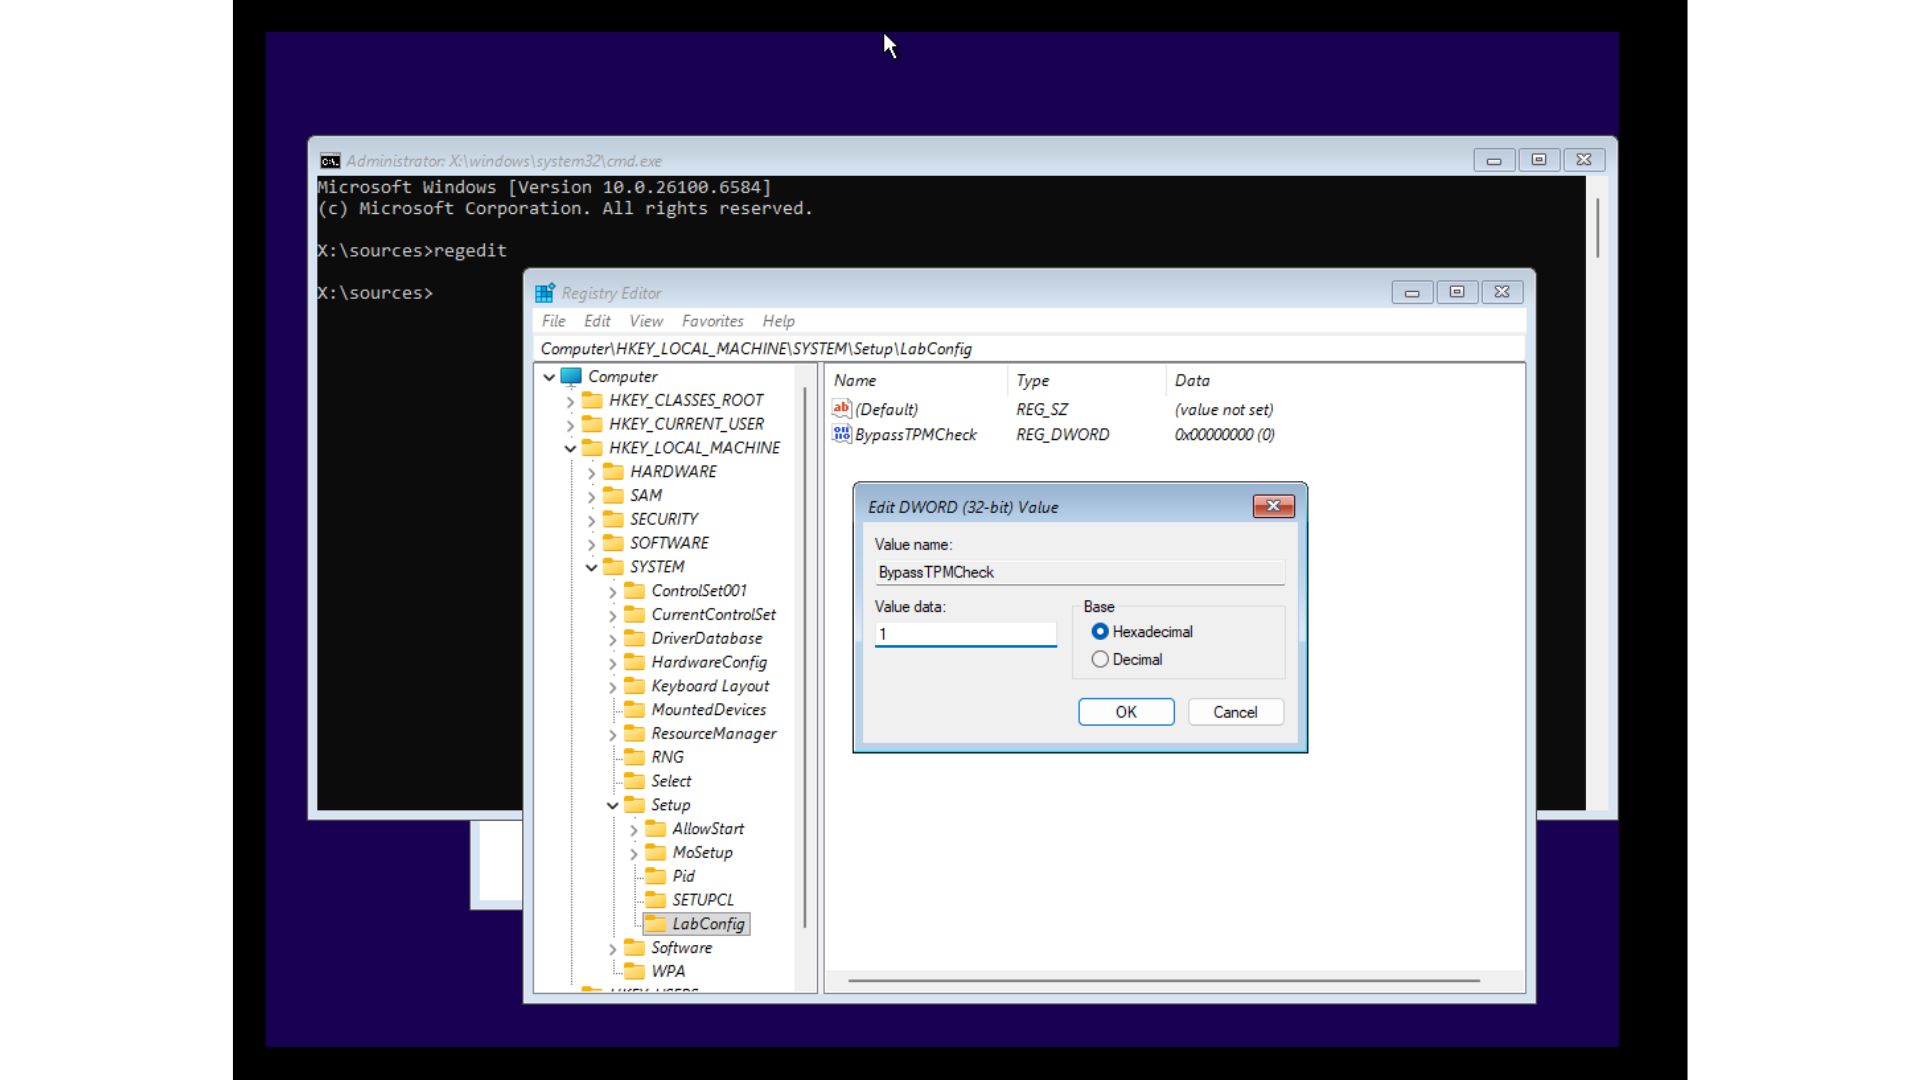
- Double-click on this new DWORD Value name and type the Value data as “1”. Press OK. This skips the TPM check while installing Windows 11.
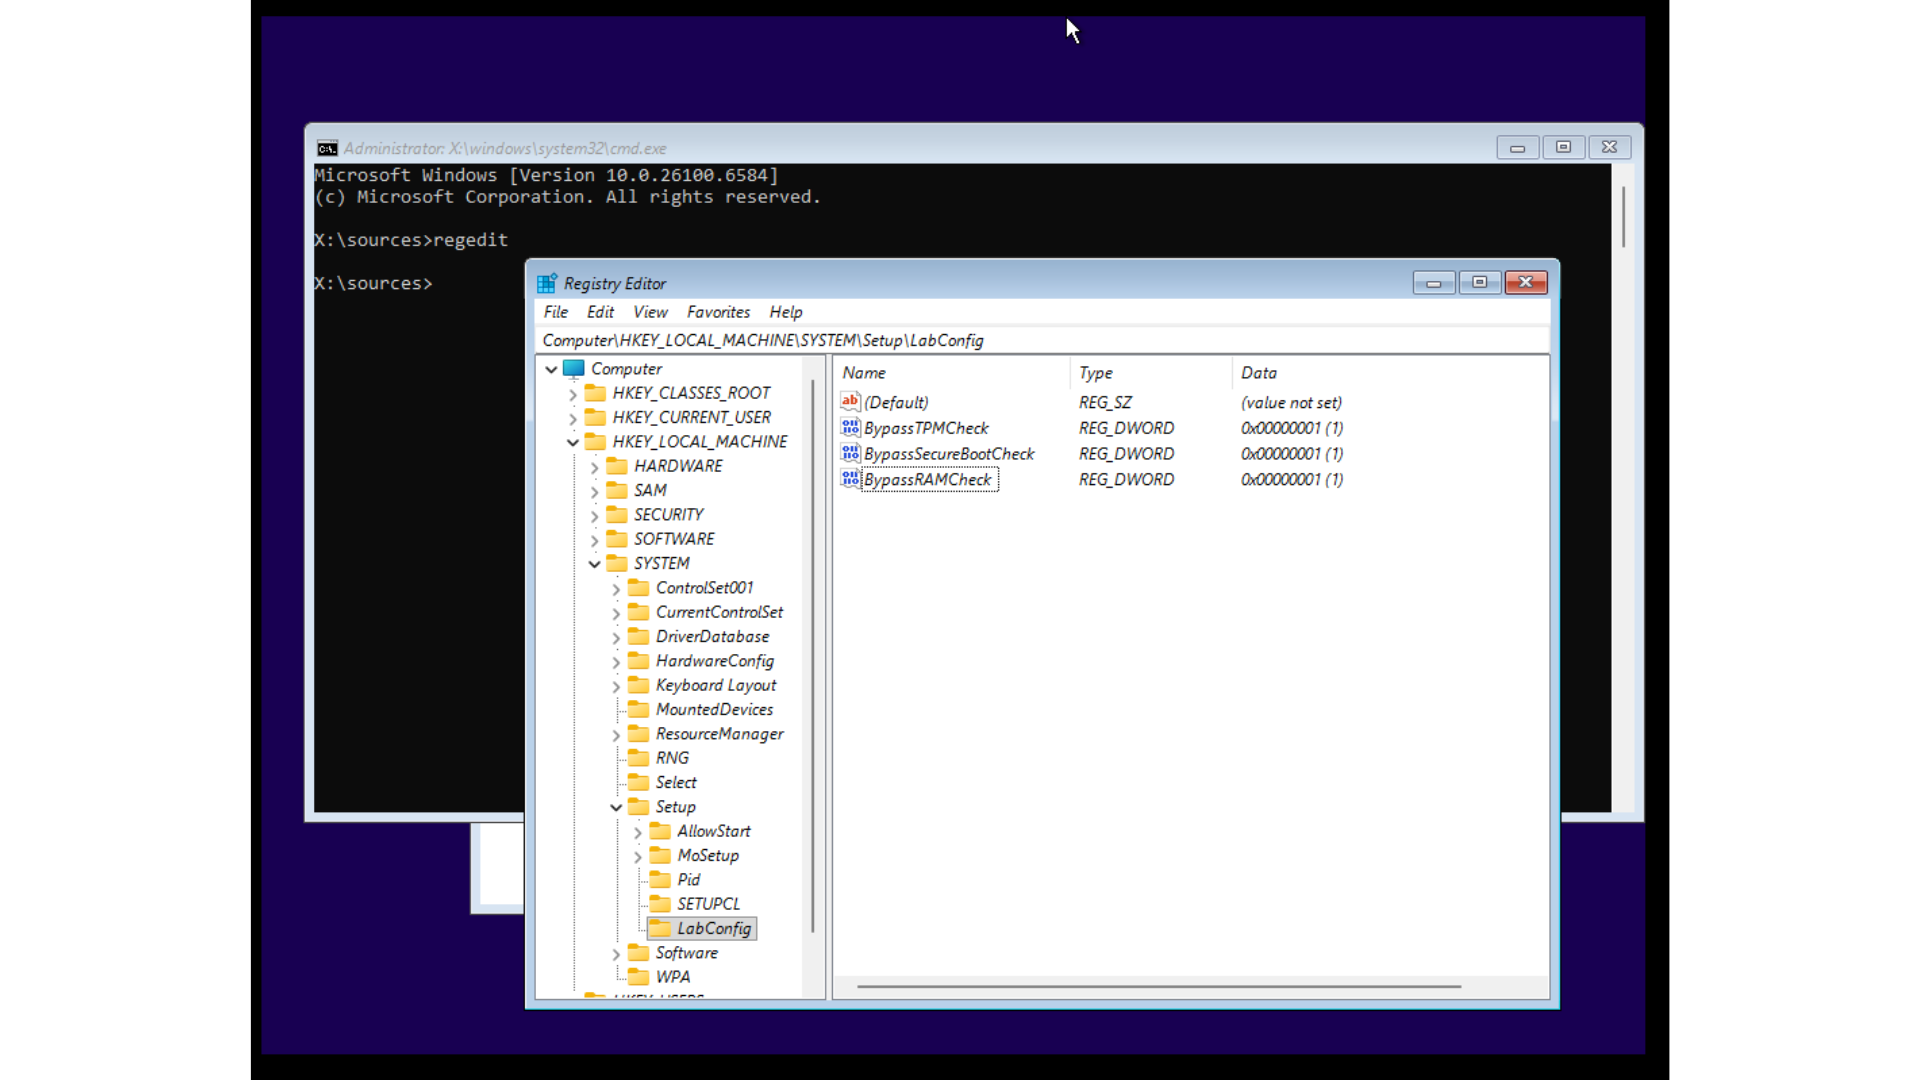
- Similarly, create DWORD values for BypassSecureBootCheck and BypassRAMCheck. Set the value to “1” for each.
- Close both the Registry Editor and the Command prompt.
Now, you can continue installing Windows 11. Note that you’ll be prompted to agree to deleting all data from your existing Windows 10 installation. Windows 11 installation continues only if you click this check mark. 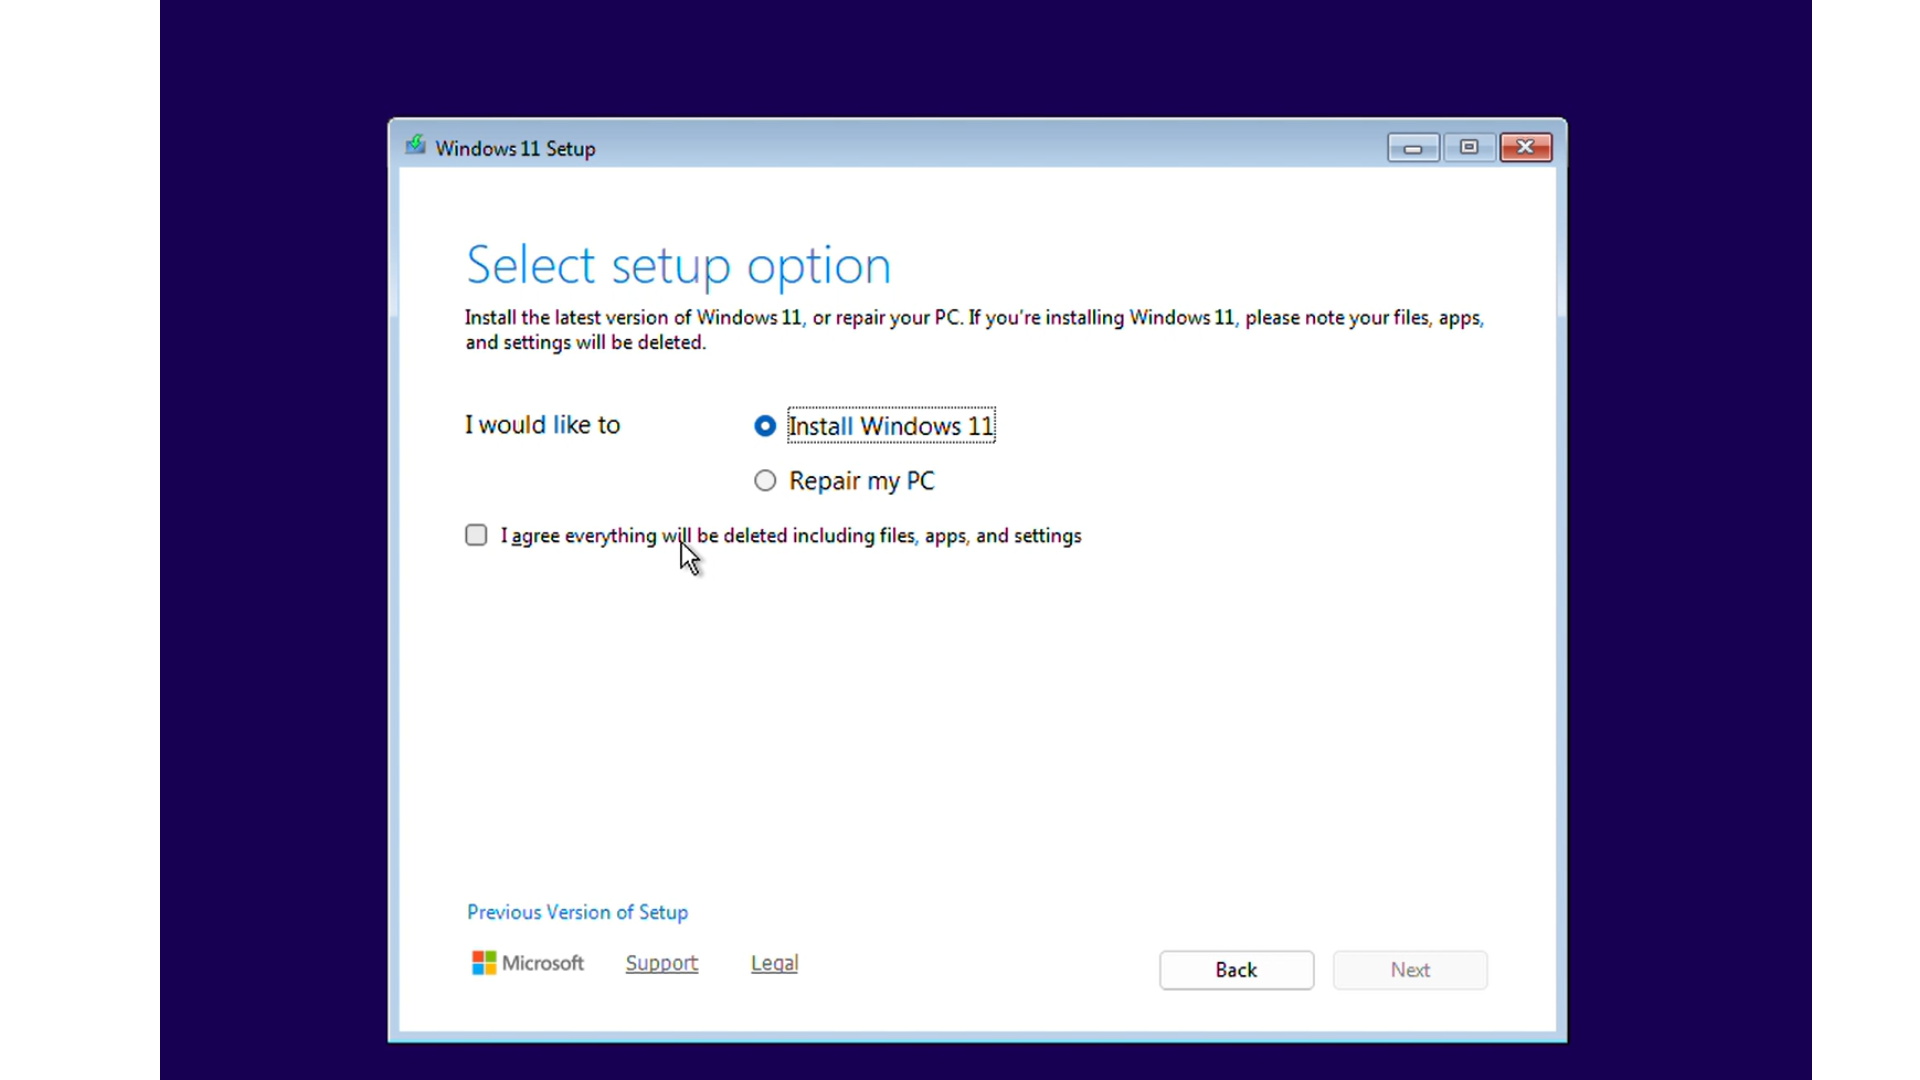
Finally, the Ready to install page shows with “Keep nothing” option turned on, signifying that this is a clean install. 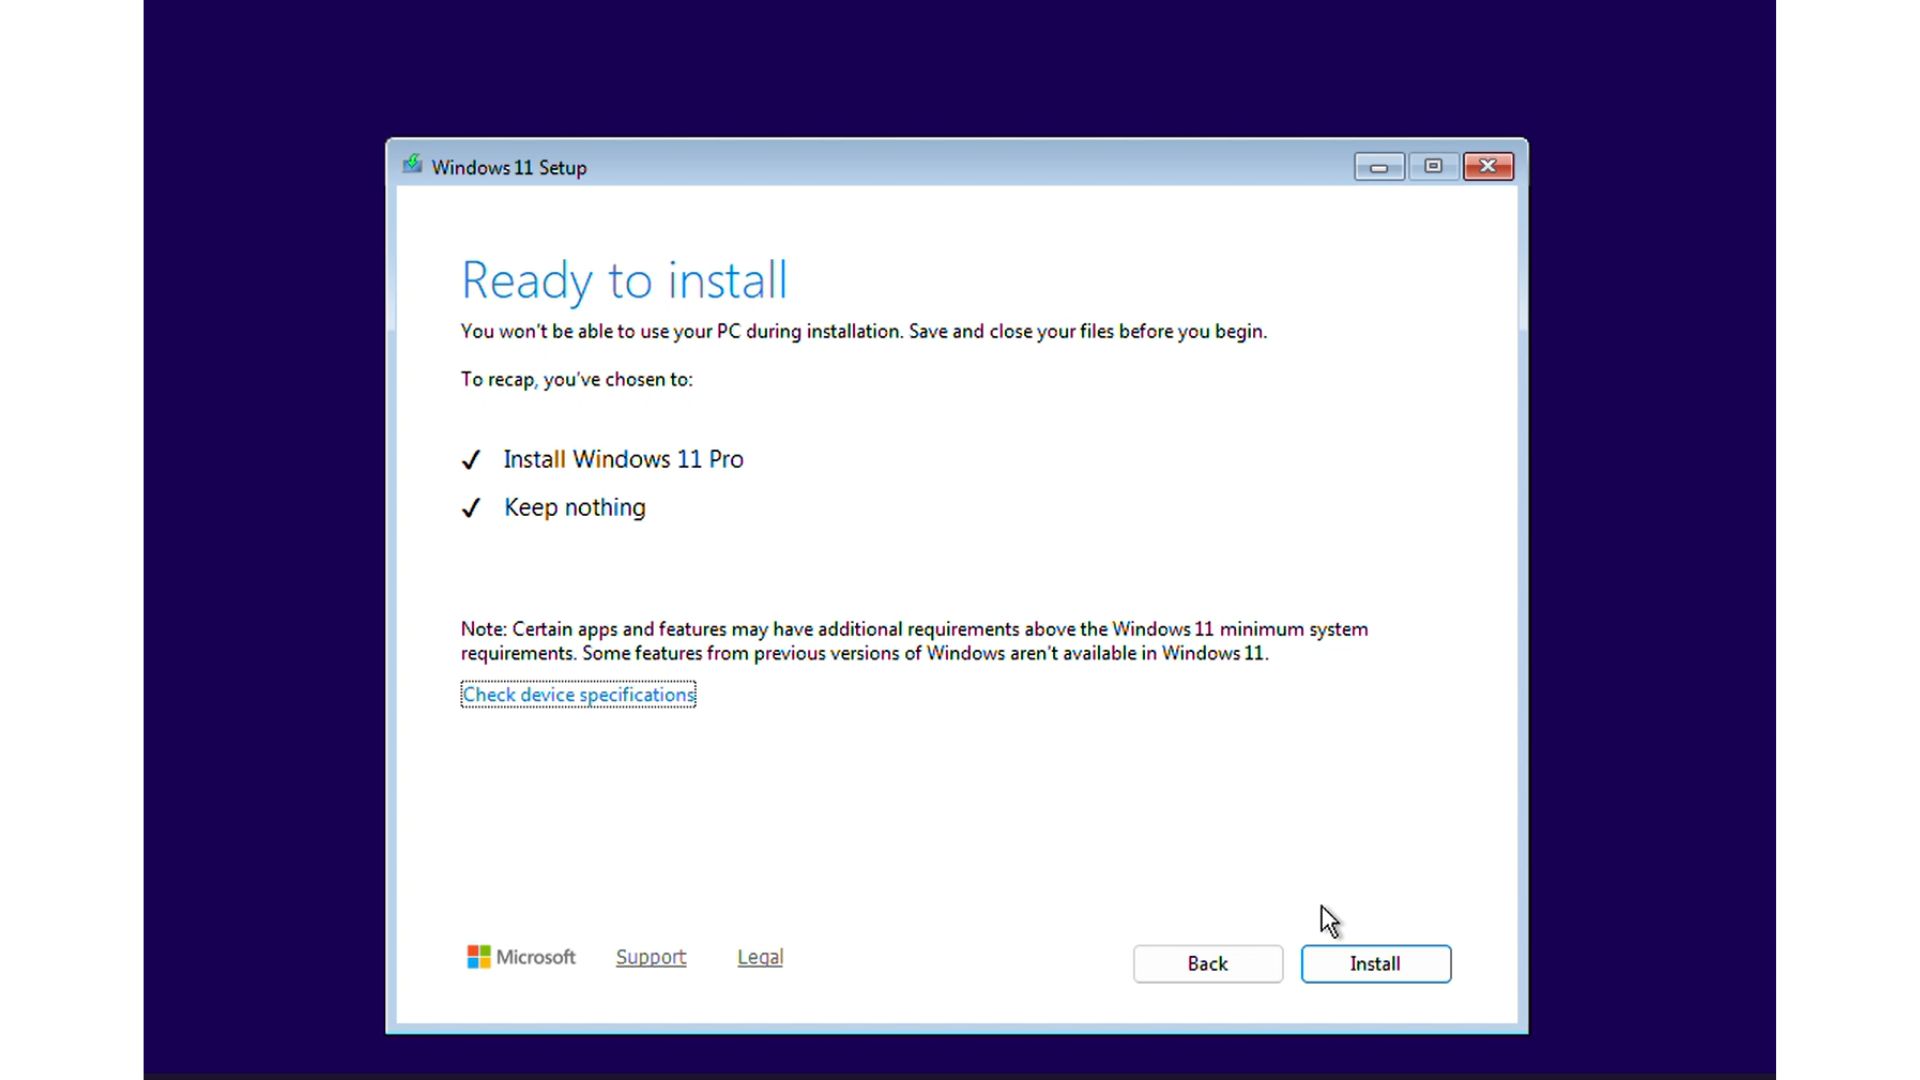
How to go back to Windows 10 after upgrading to Windows 11?
If, for some reason, you’re not satisfied with Windows 11, or if you’re experiencing lag in the UI due to older hardware, you can roll back to Windows 10.
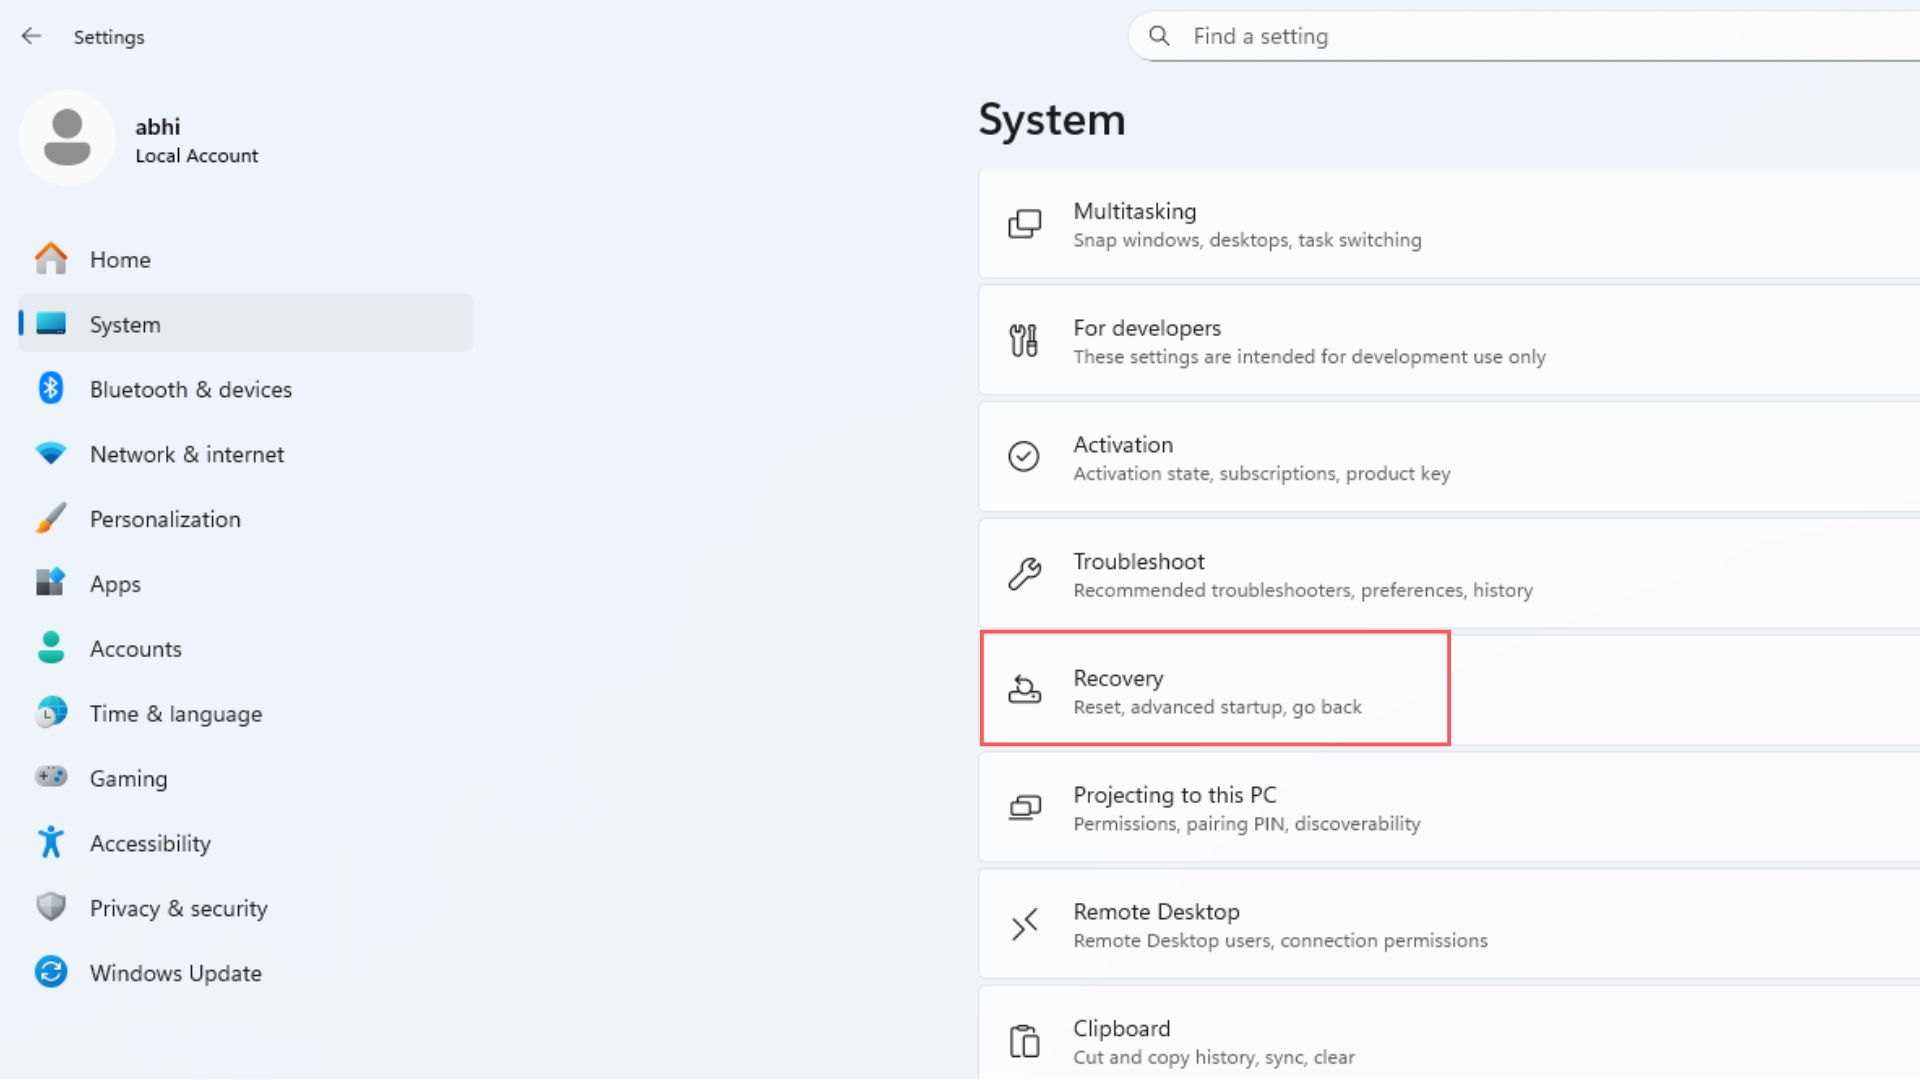
In Windows 11, go to Settings > System > Recovery.
In the Recovery page, click on Go back.
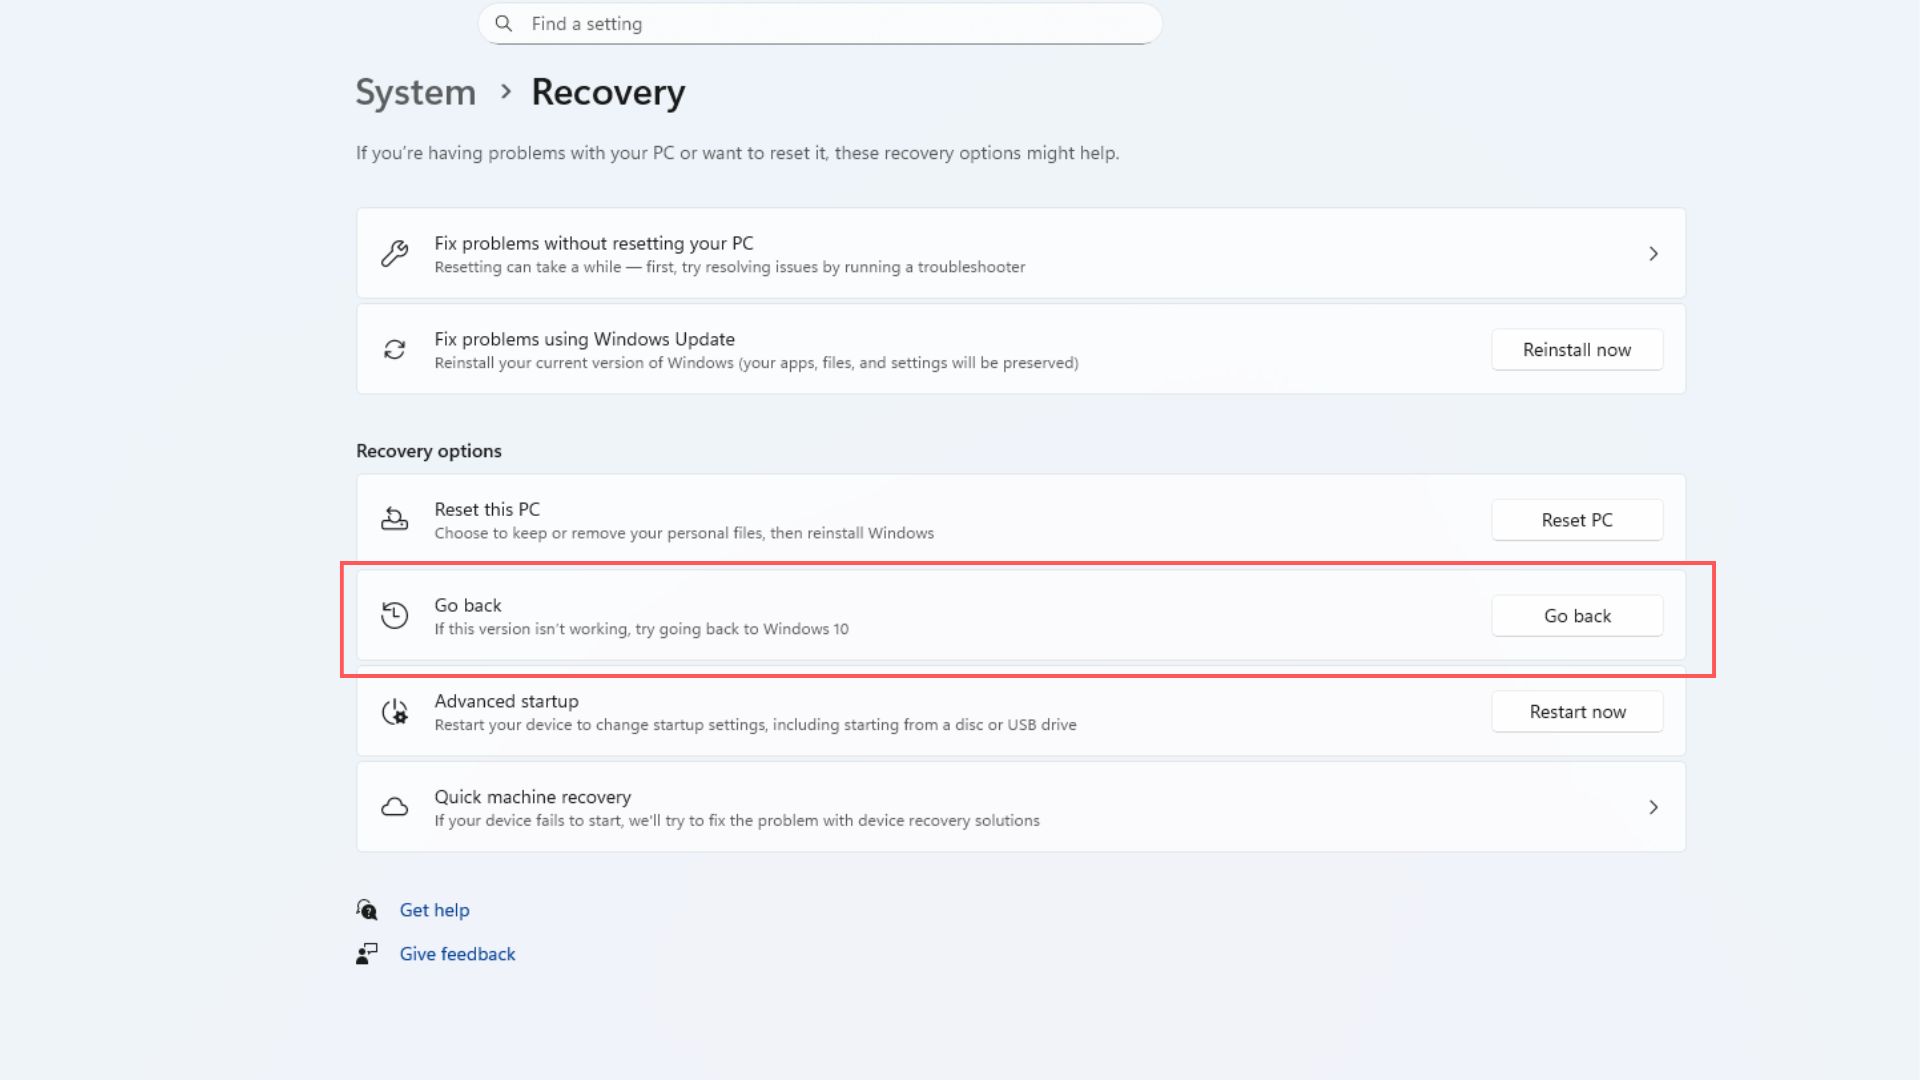
Clicking it will uninstall Windows 11 and take you back to Windows 10. Before you click Go back, make sure you have backed up your files. While this wouldn’t delete files, it would remove changes in the settings you have made in Windows 11. Also, you may have to reinstall some apps.
Microsoft will show you 5 pop-ups that would give you some warning signs, and at any point, you can cancel and go back to Windows 10.
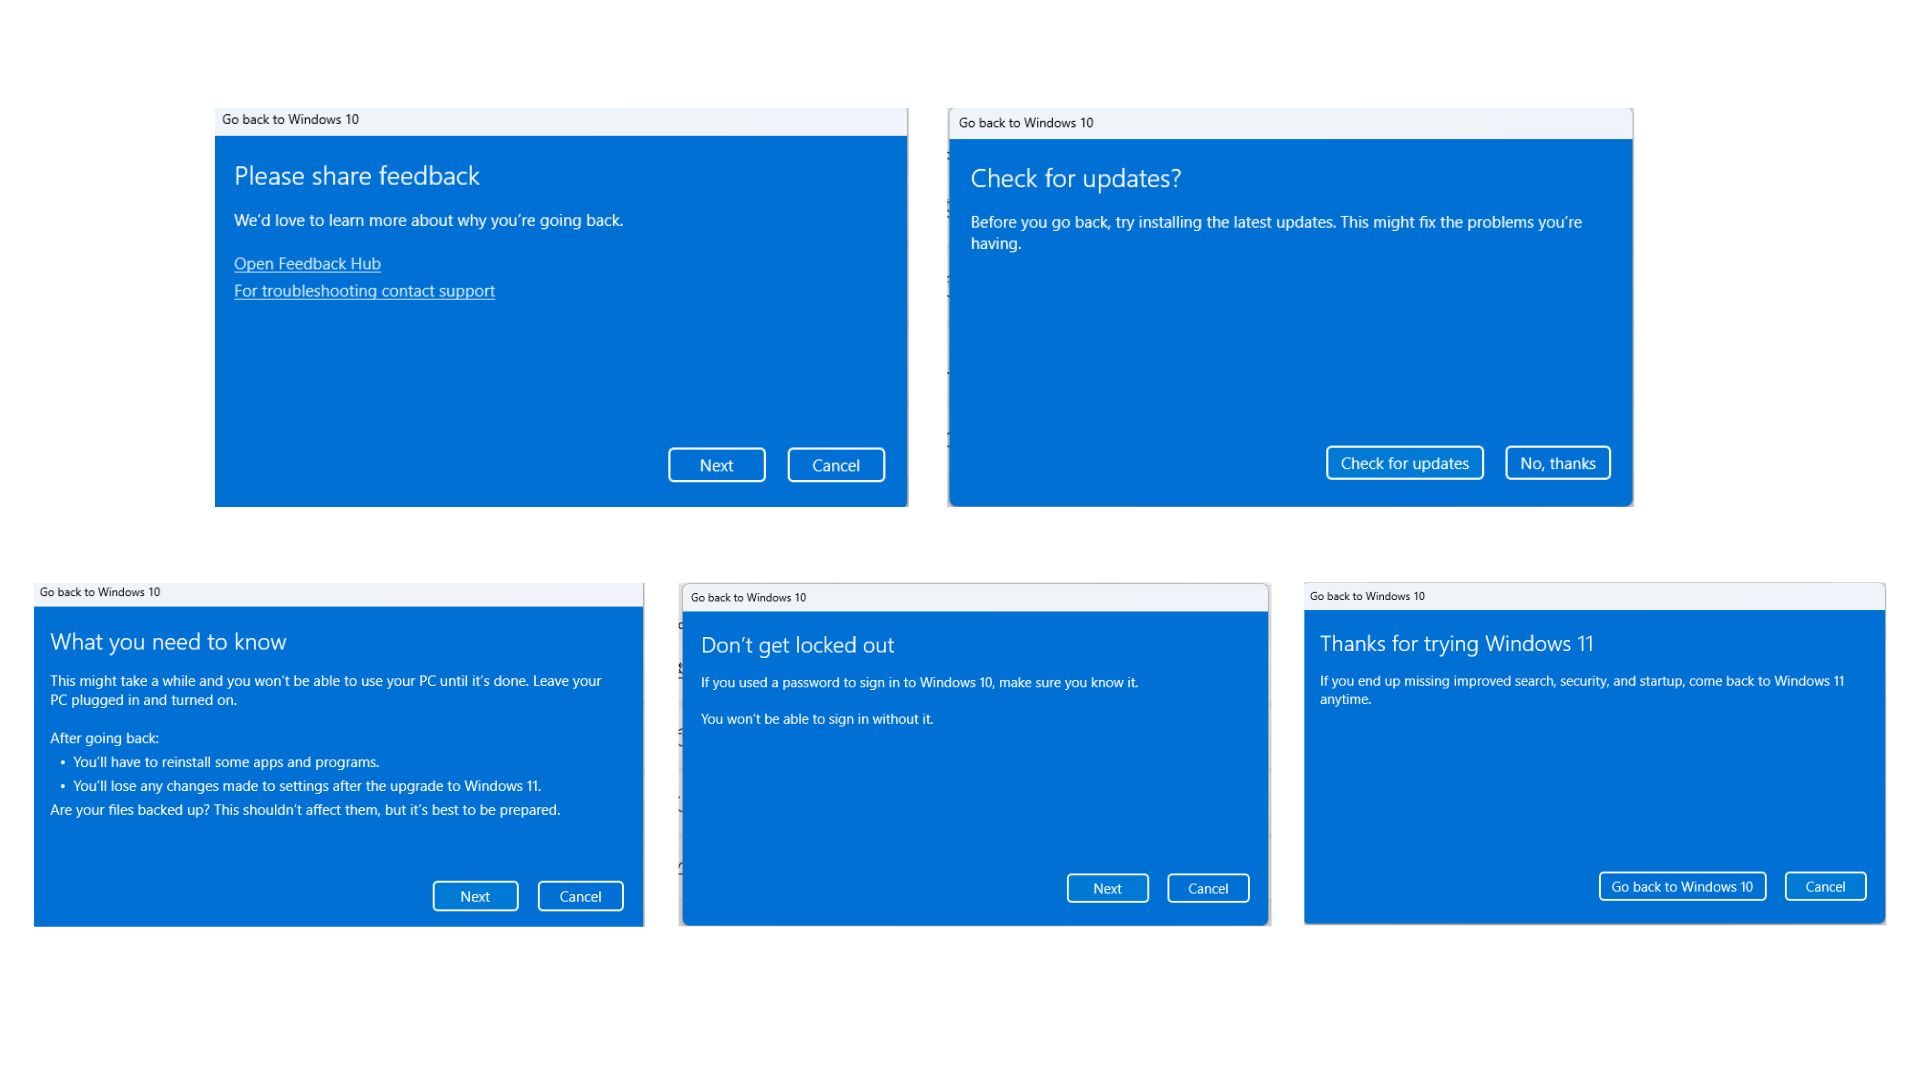
Clicking the final “Go back to Windows 10” button will show a black screen that tells you that the system is restoring Windows 10. Do not turn off your computer at this point. In a few moments, you’ll be back to Windows 10 with all your old settings.
This might be a déjà vu time for Microsoft, which has seen Windows 7 users complain about switching to Windows 10 when the latter was launched in 2015. Back then, Windows 7 was reaching end-of-life.
Now, Windows 10 has already reached its end-of-life, and users are unwilling to switch to Windows 11, despite it having a host of new features, like the incredibly powerful Snipping Tool, which can even replace Google Lens.
One major difference is that Windows 10 didn’t have stricter hardware requirements, so Windows 7 users eventually switched to Windows 10 without a hassle. Although that’s not the case with Windows 11, the above-mentioned methods can bypass Windows 11 hardware requirements.

")


 update on more PCs, requires a reboot to install")

")

 and it removes old modem drivers")

