
")


")


Windows 10’s May 2020 Update, which was released on May 27, has ended up breaking an essential app. The app in the question is OneDrive and it’s apparently made by Microsoft. After upgrading to Windows 10 version 2004, people have been complaining that they cannot access files synced to OneDrive.
Users are reporting that if they synced files to Microsoft’s cloud backup tool before upgrading to May 2020, the serious problem will prevent them from accessing those files. Others complain that OneDrive no longer works after applying the feature update.
Microsoft has now acknowledged that this problem is real and the company is working on a fix, which will be included in the next cumulative update.
The tech giant noted that devices with certain apps installed may not be to connect to OneDrive. In addition, Windows 10 May 2020 Update also blocks users from opening previously synced/downloaded files.
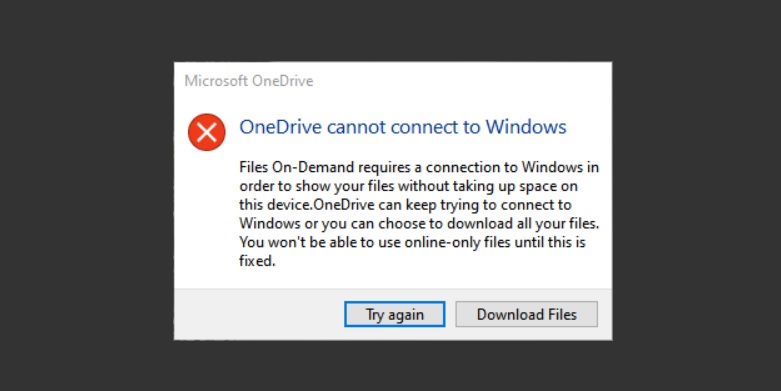
Microsoft is showing “OneDrive cannot connect to Windows” error message on affected devices when the users access the synced files or the app itself.
Fortunately, Microsoft has already started rolling out a temporary fix via the built-in troubleshooter tool. Depending on your system configurations, Troubleshooter might run automatically.
Windows 10’s troubleshooter can help identify any problems and this can also reset the OneDrive app, which can help kickstart the download process. To verify troubleshooter status, click the Start button, then click the cog icon on the left, which will open up the Settings.
In the Settings, click ‘Update & Security’ then ‘Troubleshoot’. Click on ‘View history’ in the Troubleshoot section and you will see “Files On-Demand troubleshooter” if the troubleshooter has attempted to run on your PC. Once the troubleshooter process is finished, Microsoft recommends you to reboot your device.
If the troubleshooter has not run, you can modify the Registry entries using Command Prompt and manually fix the OneDrive problem. In Command Prompt, enter the following command:
reg add HKLM\System\CurrentControlSet\Services\Cldflt\instances /f /v DefaultInstance /t REG_SZ /d “CldFlt”
If you’re unable to run the above command, you can also make changes to Registry manually.
Type ‘Registry Editor’ into the Windows Search and select ‘Registry Editor’ when it appears on the right pane. In Registry Editor, navigate to the following path ‘HKEY_LOCAL_MACHINE\SYSTEM\CurrentControlSet\Services\CldFlt\Instances’.
In the right sidebar, look for ‘DefaultInstance’ and click it to change its value from CldFlt to CldFltUpper. Restart your device after applying the above change to the Registry.
As we noted, Microsoft is aware of this problem and is working on a fix, which will be included in the next cumulative update.
")


")


")

")