


")
")

 and it removes old modem drivers")

In 2026, all major consumer-focused operating systems have AI baked in. However, Windows 11 is the only one getting all the hate, and it can all be laid at Microsoft’s door.
The company went too far too fast, and made a desktop OS, with 1 billion users, a testing ground for their half-cooked AI companion – the infamous Copilot.
While Copilot itself has an app, with its own dedicated key in all the latest Windows laptops, Microsoft made the daring decision to integrate the AI and its logo in all its popular applications, including the Edge browser, Notepad, File Explorer, the Office suite, and even the Windows 11 Taskbar.
Unsurprisingly, this aggressive AI push has earned Microsoft the unflattering moniker of “Microslop”. Frustrated users now use Microslop to describe what Windows 11 has become in their eyes. An OS with the Copilot logo slapped everywhere, powering features nobody asked for. And for users who simply want a fast, reliable desktop without an AI assistant waiting desperately for every other click, the obvious question is, can you completely disable Copilot in Windows 11?
Well, in this guide, we will show you how to remove Copilot and other AI components from Windows 11, disable AI integrations, and reclaim a clean, distraction-free Windows.
#1 How to completely uninstall the Copilot app
Before we start scrubbing off AI stains from individual apps, we need to cut off the head of the snake, the main Copilot application itself.
Copilot is essentially a glorified web wrapper installed as a standard Windows app. This makes it easier to remove, but don’t be fooled, as it likes to reinstall itself or linger in the background if not dealt with properly.
Here is how to remove the main Copilot application:
- Open Settings and go to Apps > Installed Apps.
- Search for “Copilot” in the list.
- Click the three dots (…) next to the Copilot icon.
- Select Uninstall and confirm your choice.
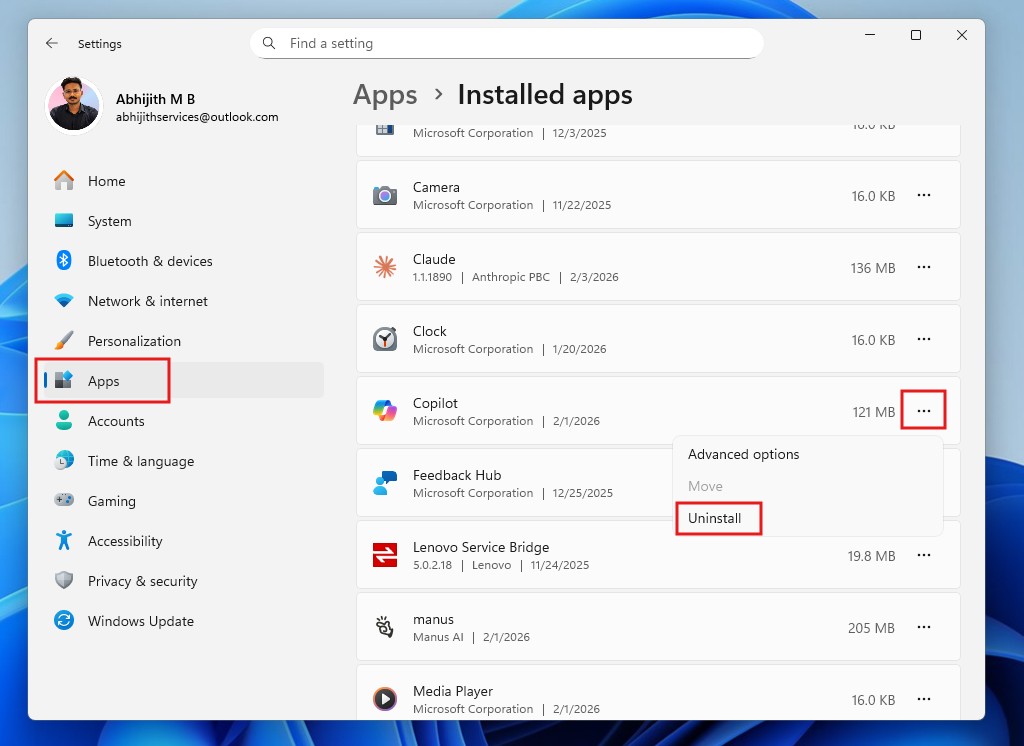
Uninstalling the Copilot app will remove the icon from the Taskbar, the right-click context menu in the File Explorer, and Ask Copilot in the taskbar (including Copilot Voice and Copilot Vision). Ask Copilot is turned off by default, though.
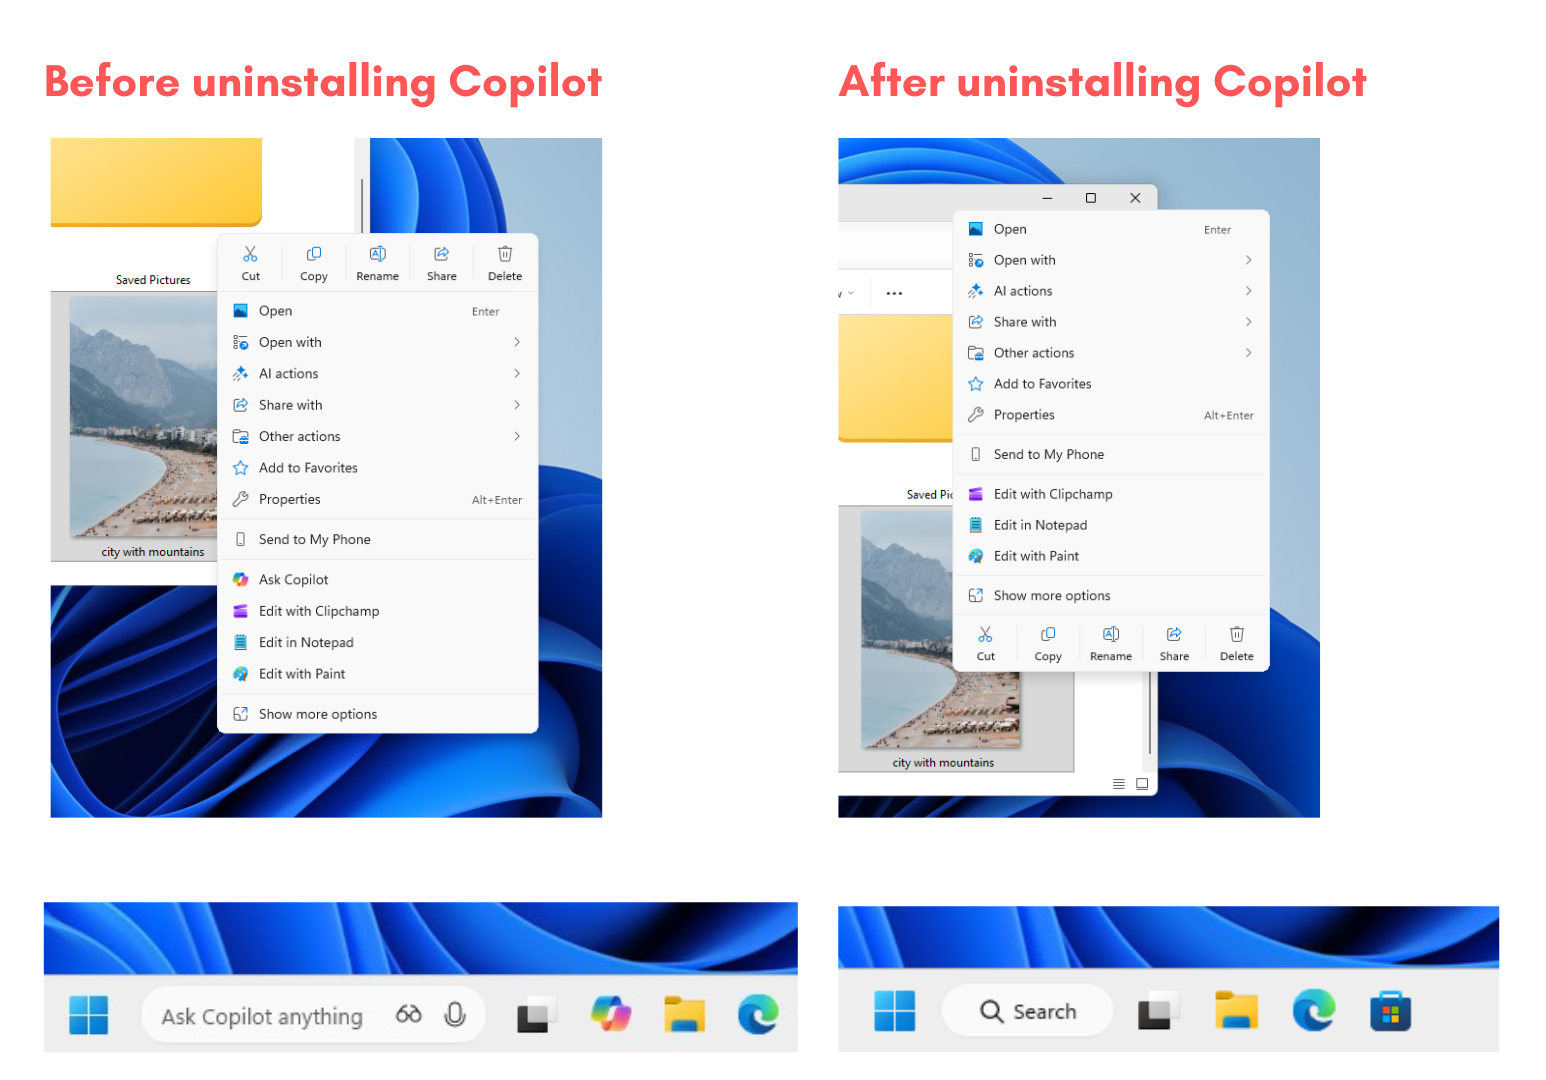
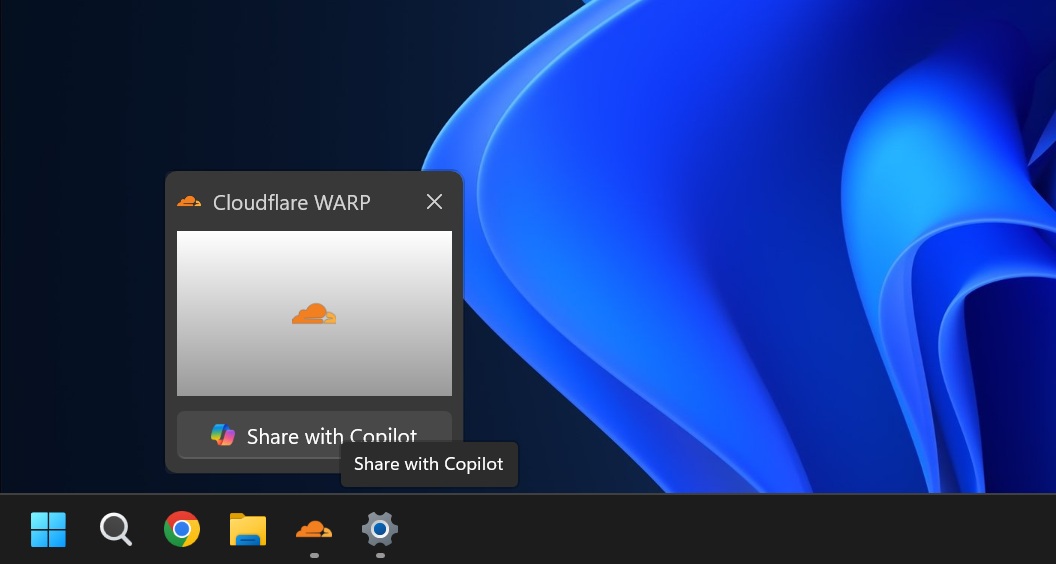
Microsoft recently introduced “Share with Copilot” option while hovering over an open app in the taskbar. It allows you to share an open app’s screen directly to Copilot Vision. Yes, it’s extremely intrusive, but fortunately, it is not on by default, and even if it is turned on, uninstalling Copilot removes this feature entirely from Windows.
However, the Copilot logo still doesn’t go away from Windows Search, even after uninstalling the app. Fortunately, there’s an easy Registry Edit for that…
#2 Remove Copilot logo from Windows Search
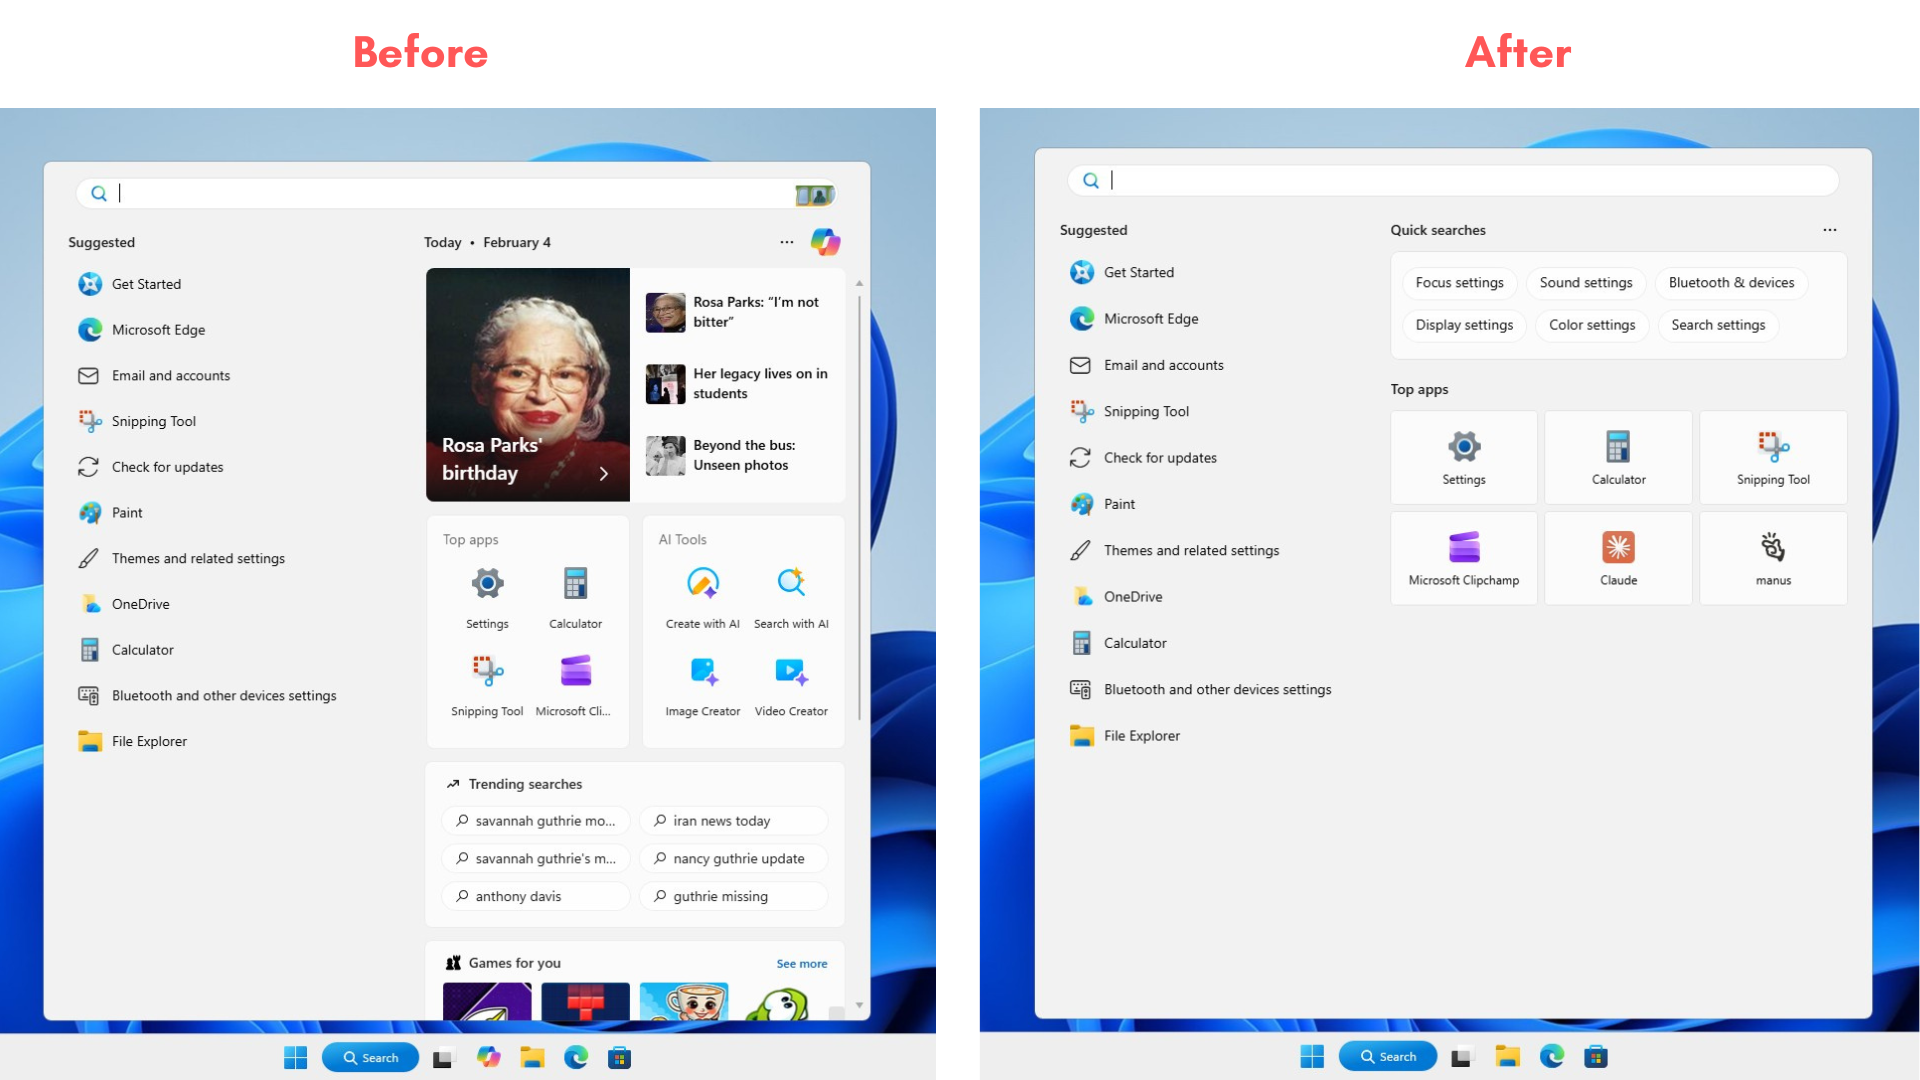
Windows Search is now a cluttered mess with suggestions from Microsoft, the day’s highlights, Top apps, AI Tools, Trending searches, Games for you, Trending news from the web, and, to make matters worse, there’s the Copilot logo on the top left. Here is a way to remove all of these and make the Windows Search cleaner and faster:
- Open the Run command box by pressing Win+R.
- Type regedit and press Enter. You’ll see the Registry Editor
- Navigate to HKEY_LOCAL_MACHINE\SOFTWARE\Policies\Microsoft\Windows
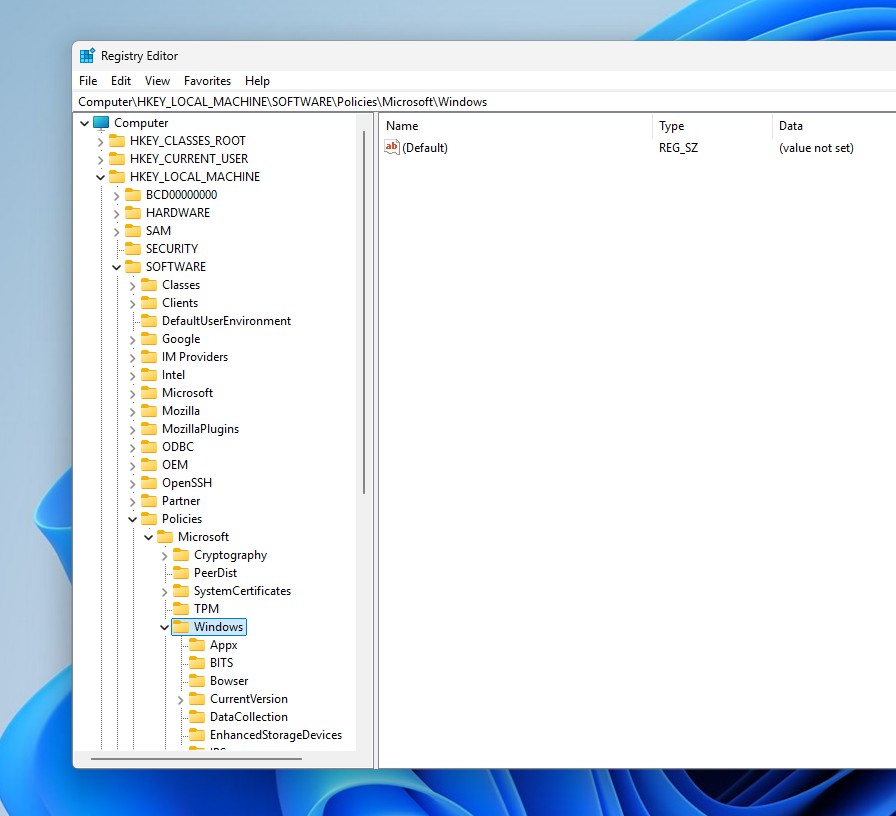
- Check if it contains a key called “Explorer”. If it doesn’t, like mine, right-click on the Windows key, select New > Key. Rename the Key as Explorer
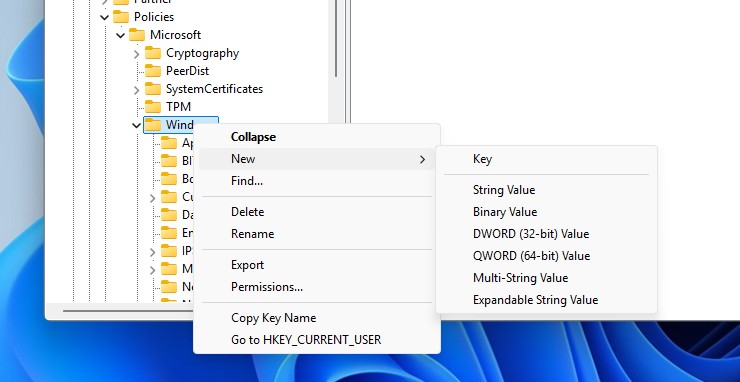
- Now that the Explorer key is open, right-click on the white space and select DWORD (32-bit) Value.

- Rename the value to DisableSearchBoxSuggestions.
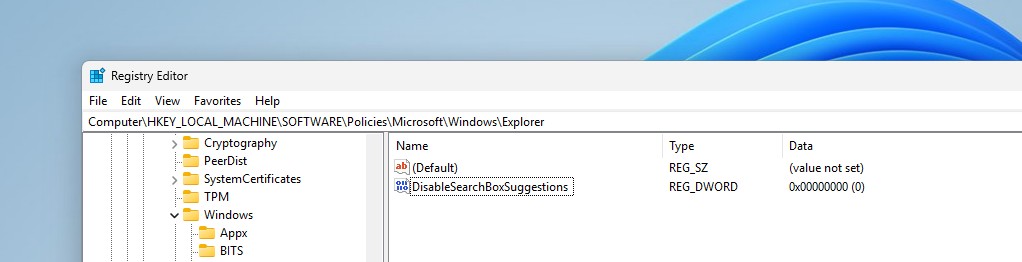
- Double-click on this new value, and you’ll see an option to edit the Value data. Change it from 0 to 1. Press OK.

- Restart your PC.
After the restart, open Windows Search and you’ll see a cleaner interface without any suggestions and, of course, no Copilot.
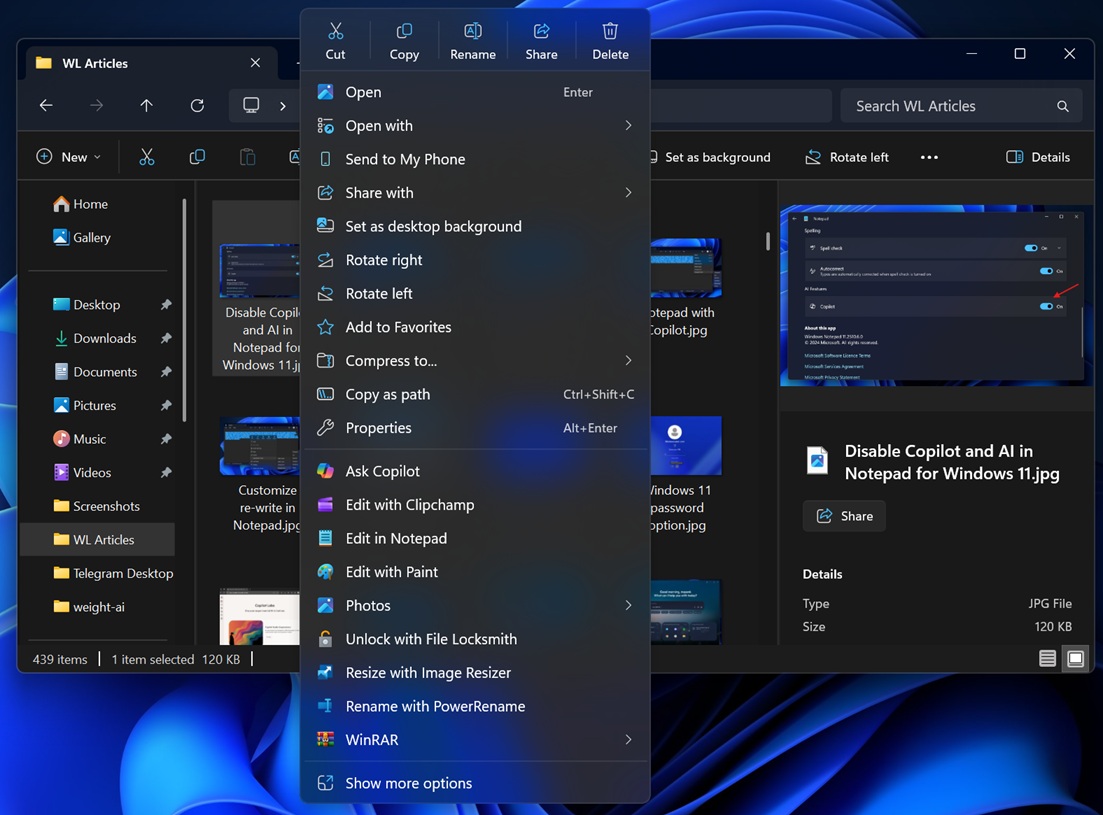
#3 Remove AI Actions from File Explorer menu
In the Windows 11 File Explorer, if you right-click an image, the context menu will have an “AI Actions” option, which will have sub-options to do visual search, blur background, erase objects and remove background.
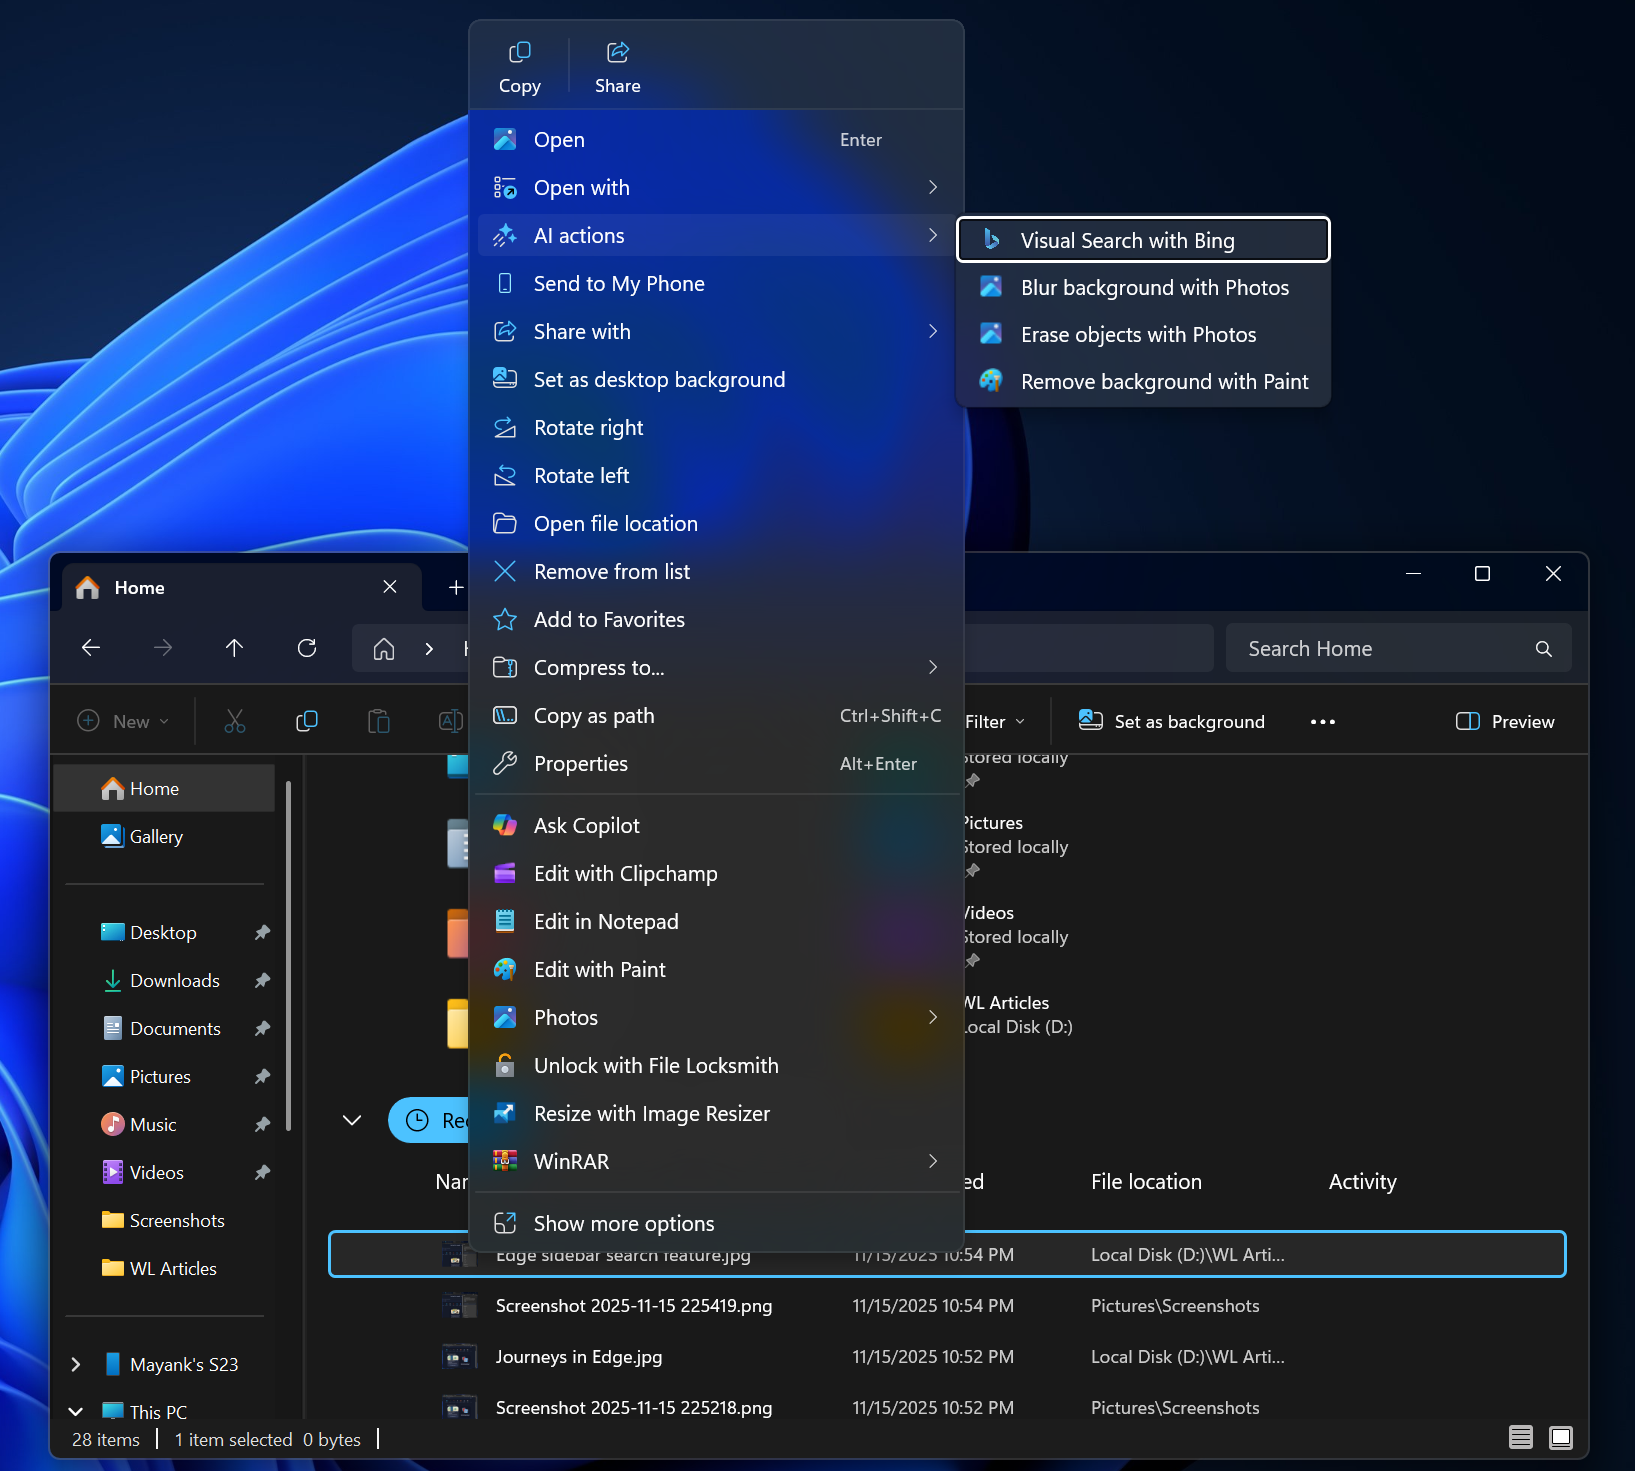
While these are useful stuff, the File Explorer context menu is already too long, and if you already have your specialty tools for editing images, you may not need it. Fortunately, you can remove these AI Actions from the File Explorer, but there’s an unwelcome twist.
To remove AI Actions, open Settings > Apps > Actions, and turn off the toggle for all available options, like Paint, Photos, Teams, Microsoft 365 Copilot, etc.
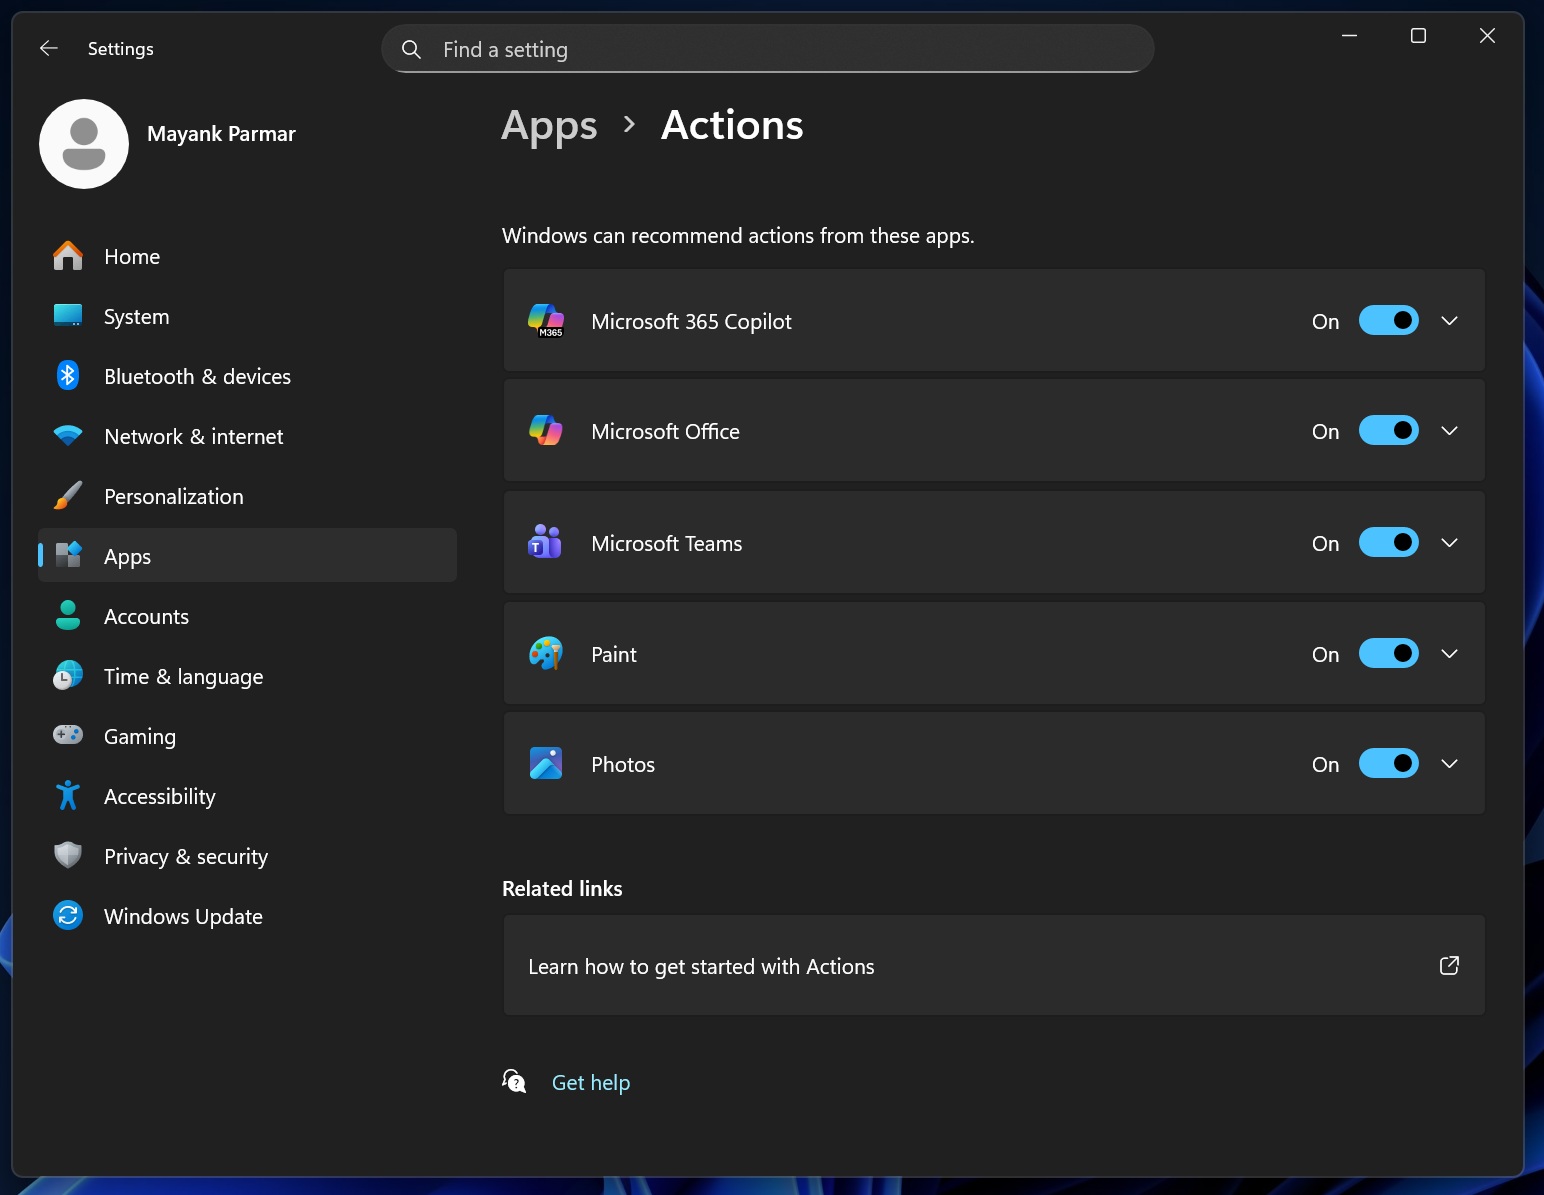
Unchecking these options will remove the sub-options (nested menu) in AI Actions, but the catch is that the label for AI Actions will still be visible in the context menu. Hovering over it will show “No actions available”.

Luckily, about a month ago, as reported by Windows Latest, Microsoft confirmed that they’ll let us remove “AI Actions” completely from the File Explorer, like in the image below. The company noted that “If there are no available or enabled AI Actions, this section will no longer show in the context menu”.
AI Actions is now hiddenHowever, this ability is still rolling out to testers and will take some time for it to arrive to the general public. Meanwhile, you can follow the above steps to remove all AI Actions, so when the update arrives, AI Actions will automatically vanish from the context menu.
#4 How to turn off Copilot in the Edge browser
Microsoft Edge browser had Copilot integration for quite some time now, and the company was keen on experimenting with how to make it obvious enough for users to click. The present iteration has the Copilot logo on the toolbar in Edge with “Chat” written next to it. Then there is a Copilot Discover toggle as well.
![]()
Also, in a bid to make us used to the inevitable agentic AI future, Microsoft recently introduced Copilot Mode in Edge, which includes Copilot Journeys and Copilot Actions.
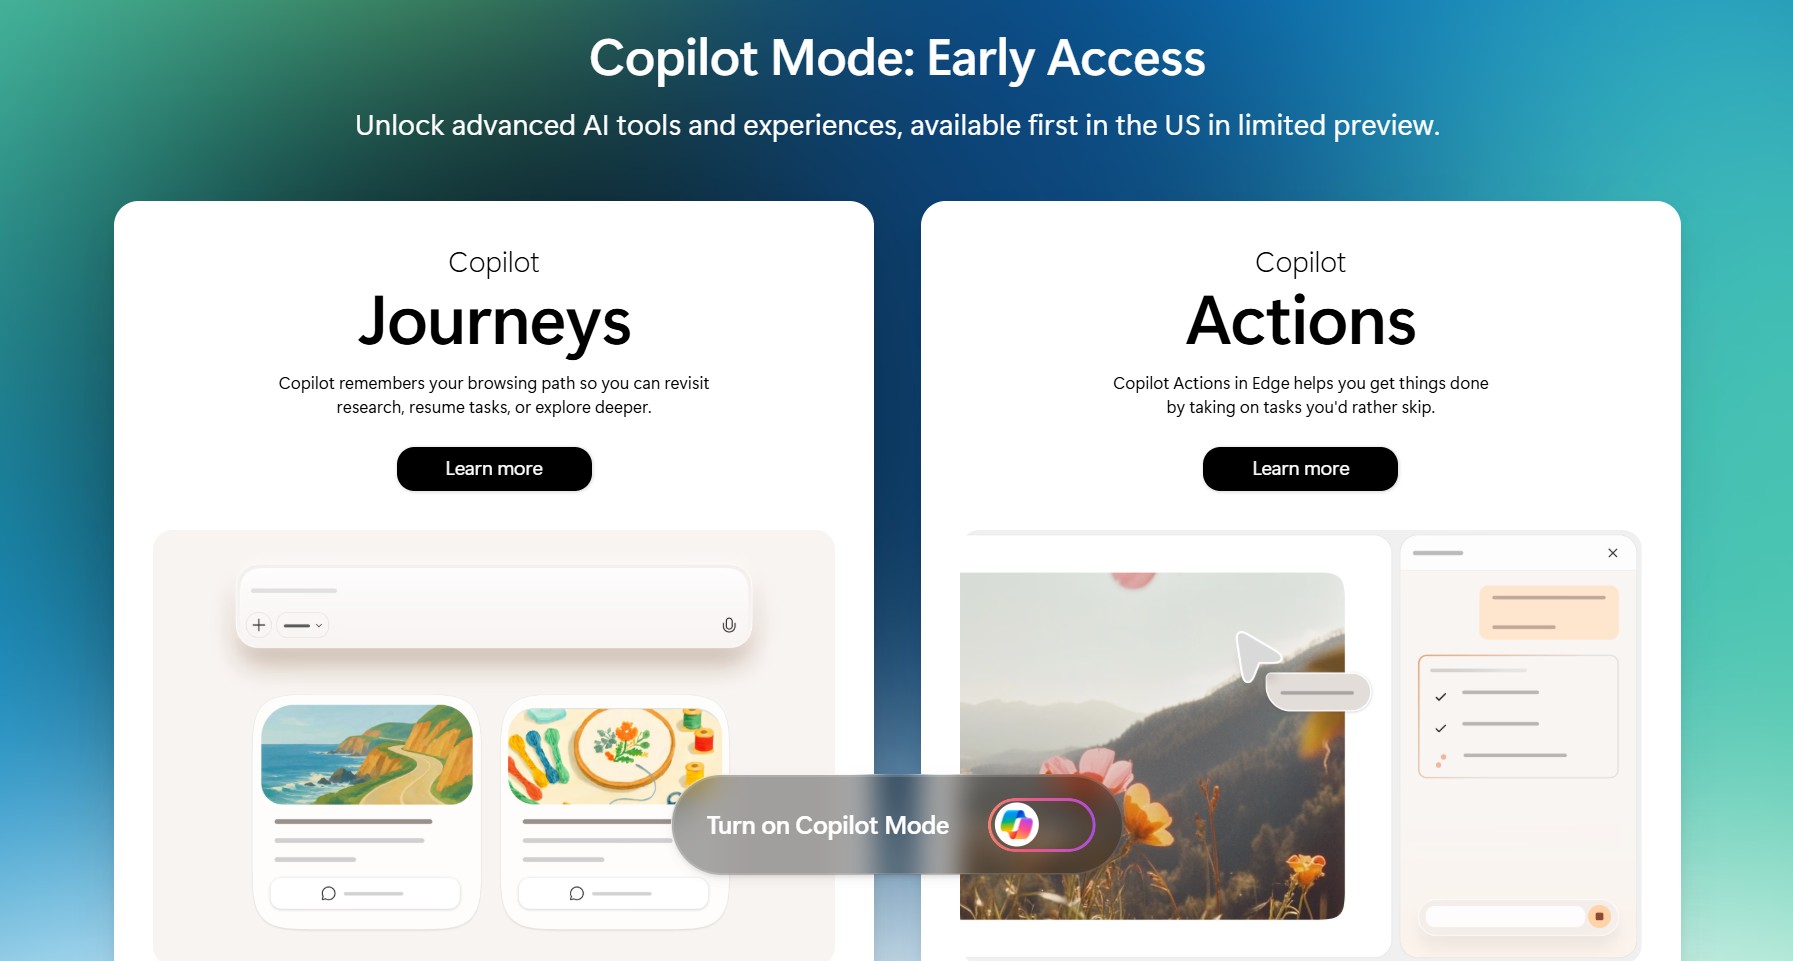
Yeah, that’s a lot of Copilot branding. So, if you want to remove AI features from the Edge browser, these are the steps:
- Open Microsoft Edge and click the three dots on the toolbar, or press Alt + F. Click Settings.
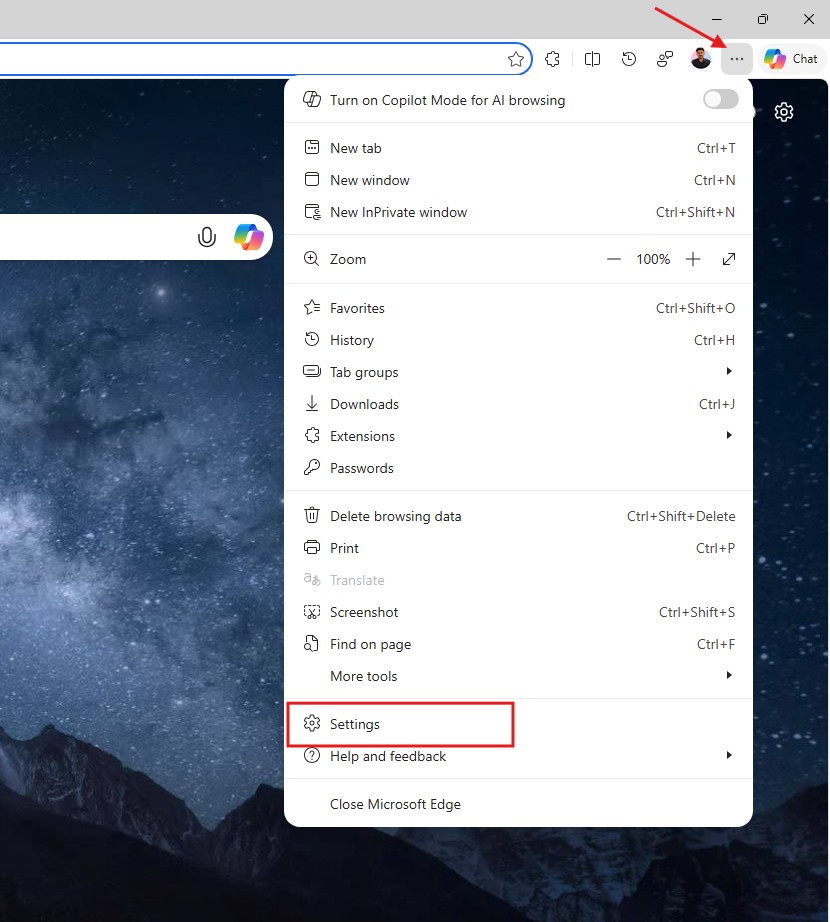
- From the Settings page, select Appearance. Scroll down and click Copilot and sidebar.
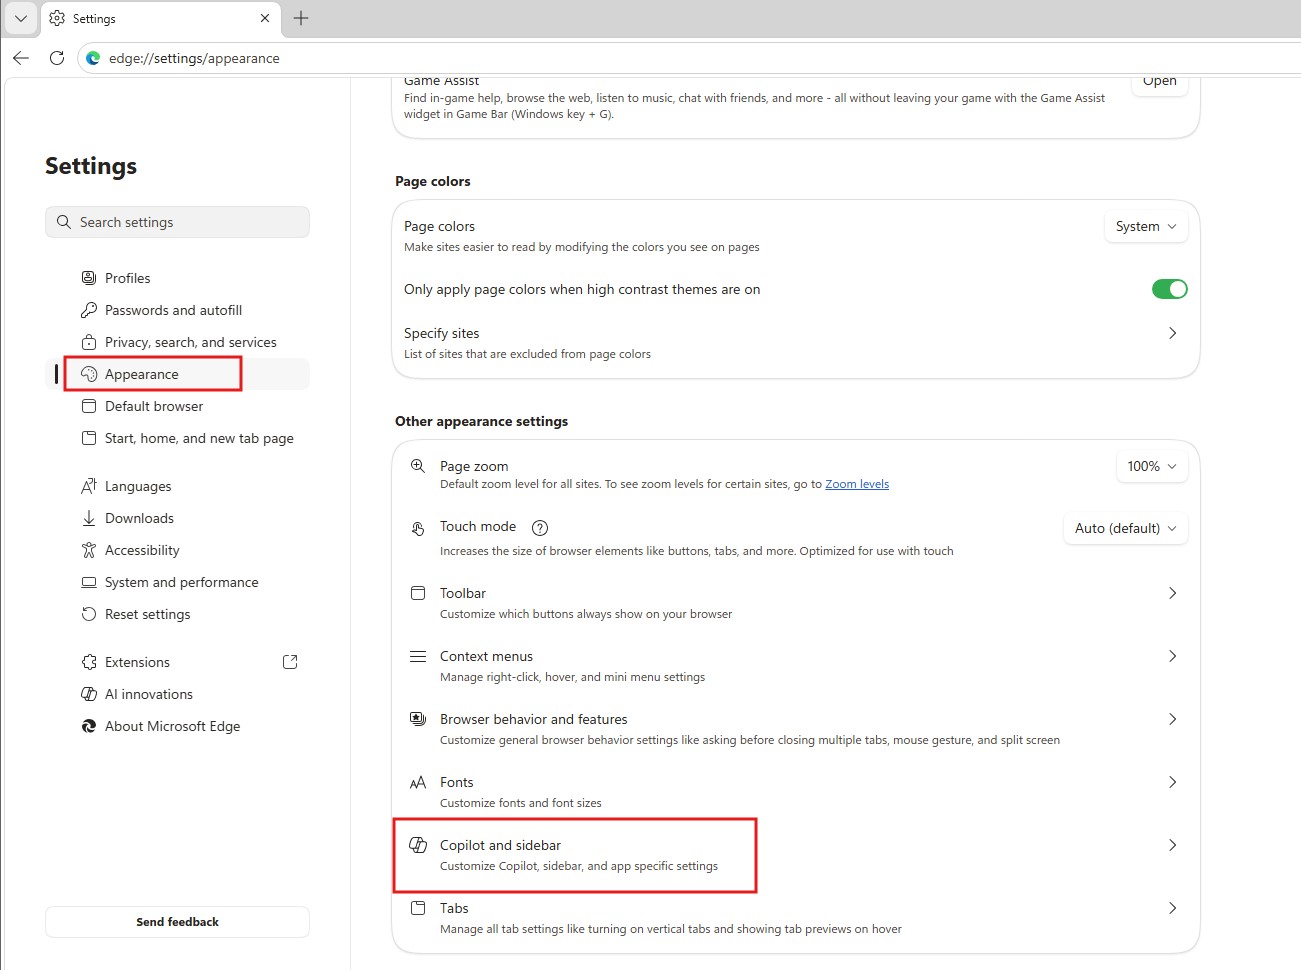
- Here, if you wish to do so, you can turn off the Sidebar altogether, as I have done.
- But most importantly, click the Copilot option.
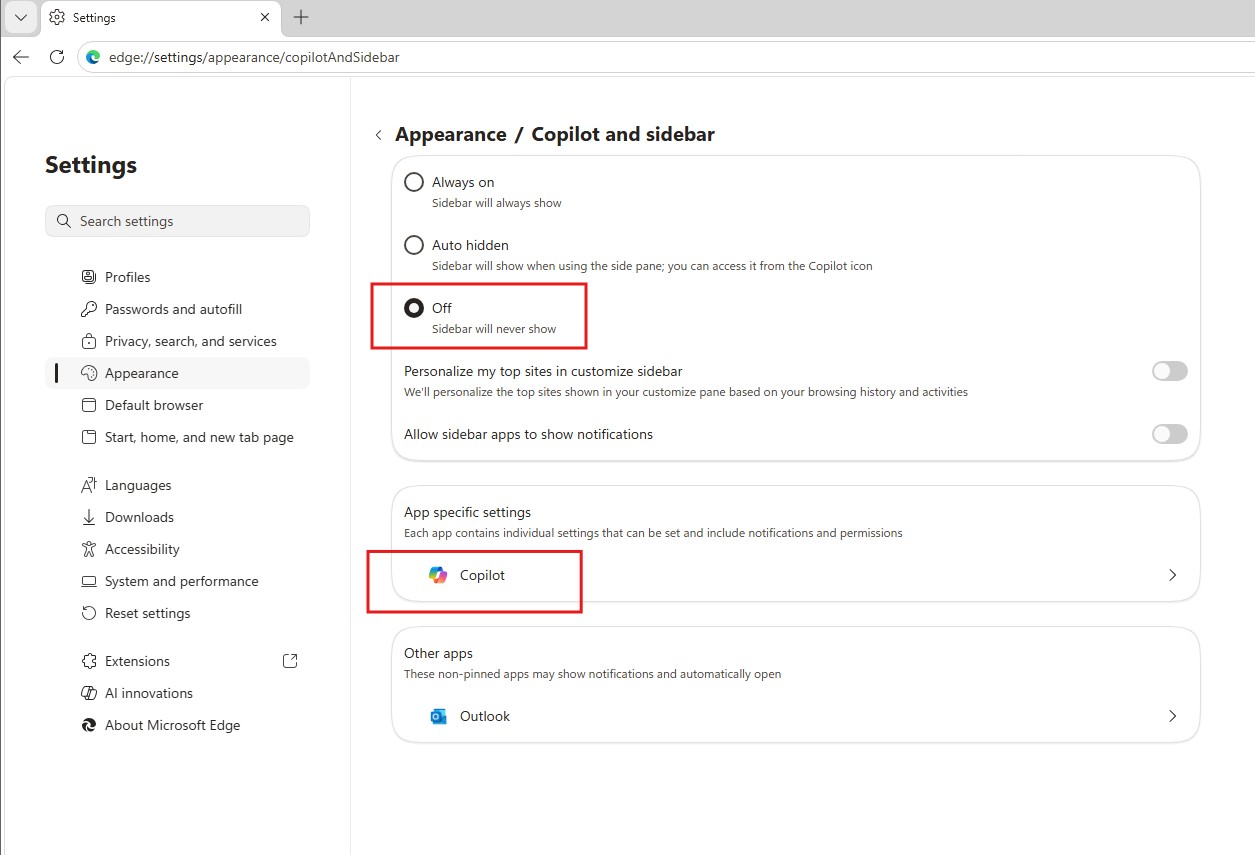
- This page may be different based on your version of Edge and your region; either way, you can turn off the Show Copilot button on the toolbar to remove that Copilot logo at the top of Edge. Also, we recommend turning off the toggles below as well.
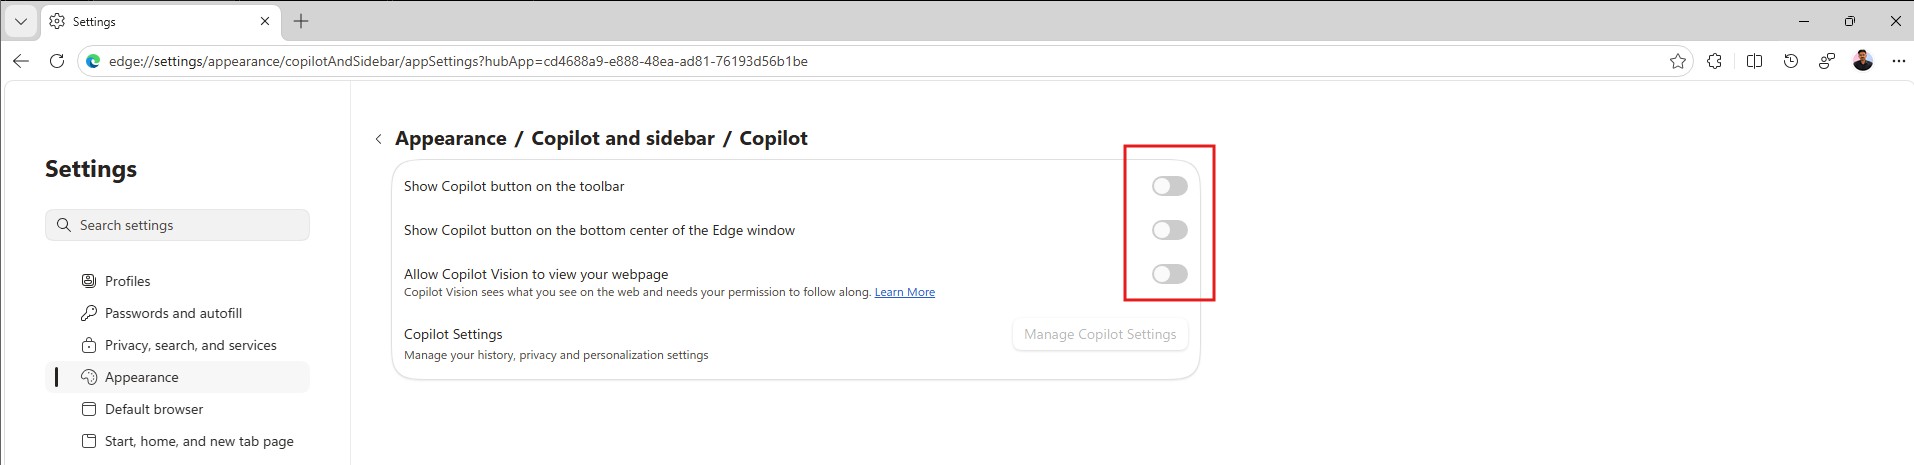
- Now click on Languages, which is below Appearance.
- Scroll down and turn off the toggle for Use Copilot for writing on the web.
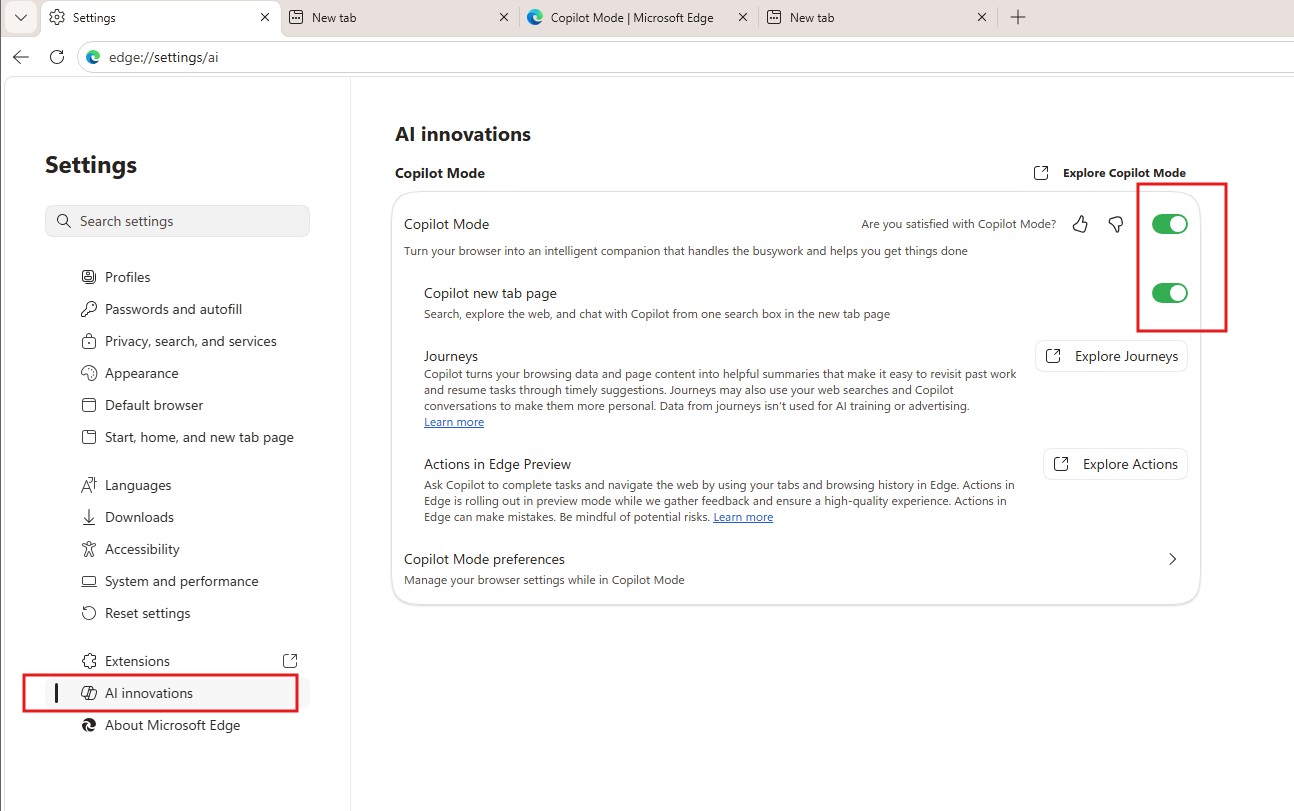
- Further down in Settings, click on AI innovations.
- If your Edge browser has Copilot Mode turned on, just click on the first toggle to turn it off.
These steps combined will remove all AI features in the Edge browser, including the “Ask Copilot” context menu that shows up when you select text while browsing in Edge.
#5 Remove Copilot features in Notepad for Windows 11
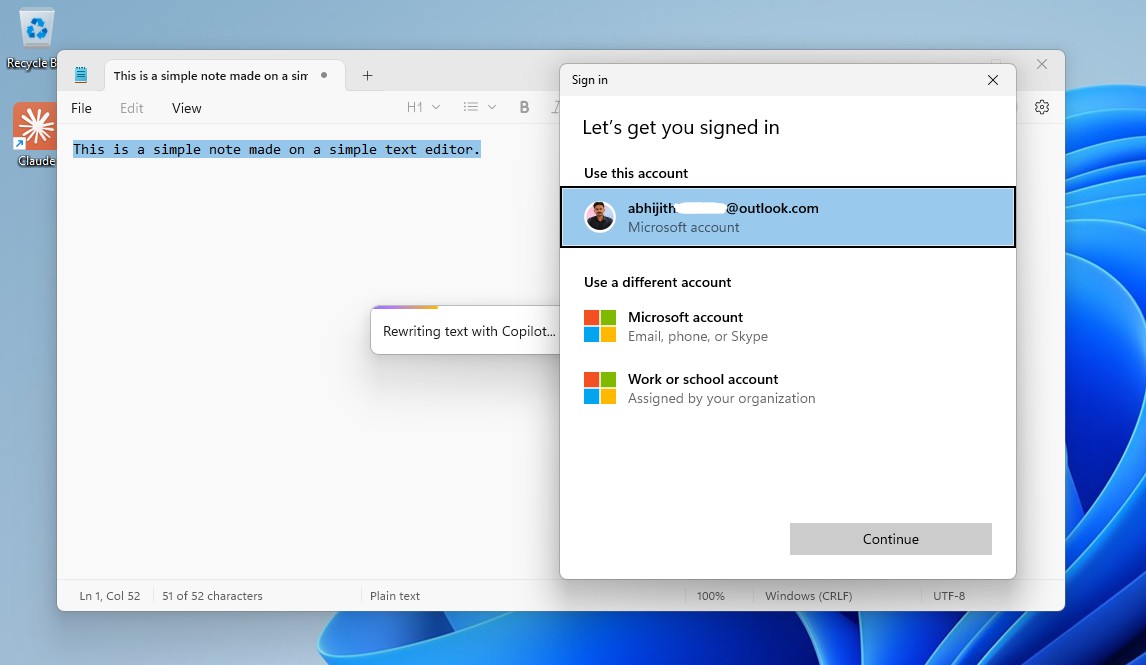
Notepad, the supposedly simple text editor, is anything but simple now. In fact, when I opened Notepad after a long while in my VM, I saw a prompt to sign in to it. Fortunately, this can be dismissed by pressing the cross button.
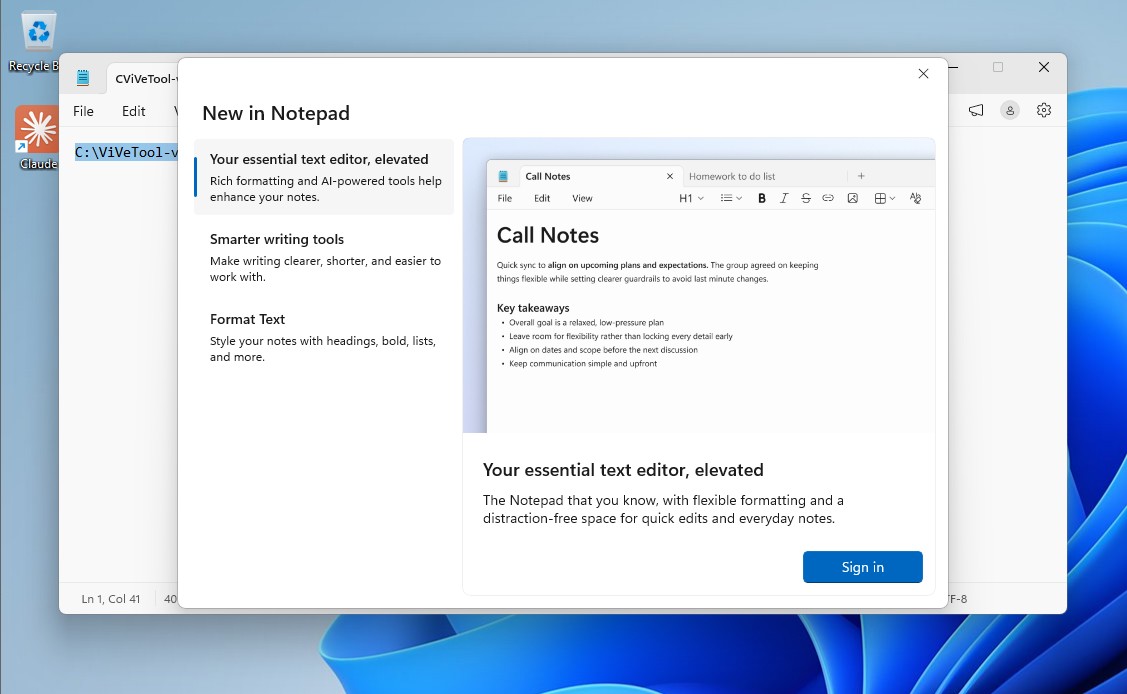
While some features like the Dark Mode, formatting, and even tables are a good addition, having to sign in and Copilot integration are both absolutely unnecessary.
Luckily, disabling Copilot in the Notepad app is pretty easy, and we hope Microsoft will rethink their decision to slap the Copilot logo in Notepad, as people familiar with the matter reportedly said that the company plans to cut back or reevaluate Copilot integration throughout Windows 11.
Use the following steps to remove AI features in Notepad:
- Open Notepad.
- Click on the Settings icon on the top right.
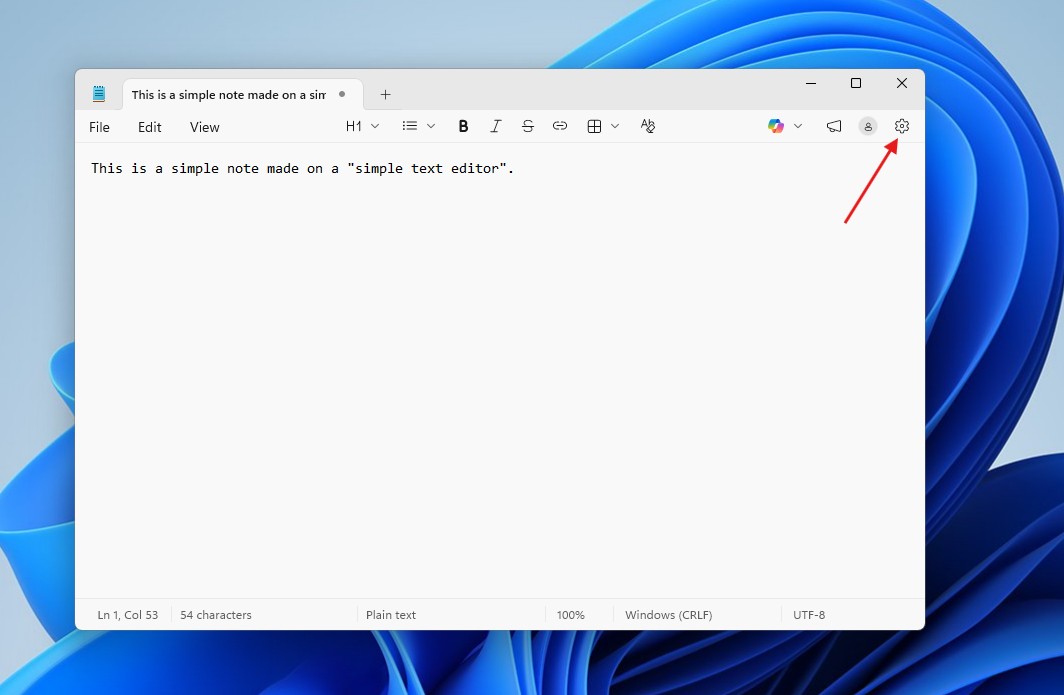
- Under AI Features, you’ll see the Copilot toggle. Turn it off to disable AI in Notepad.
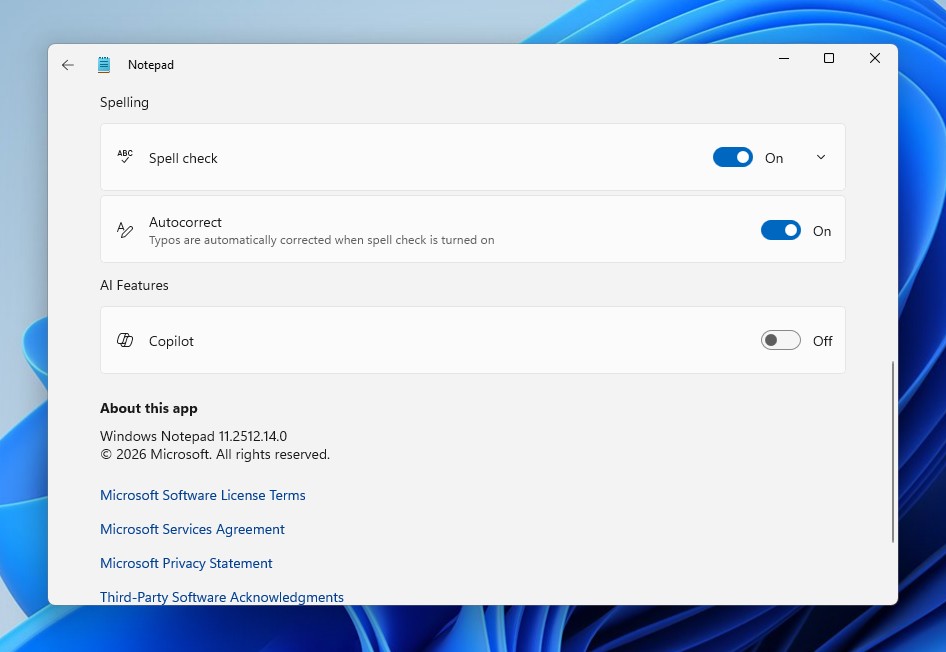
That’s it, and you won’t see the Copilot logo in Notepad again. Turning off the formatting and spelling features will bring back the simple look of Notepad.
 #6 Remove AI features from the Windows Photos app
If you want a gallery app that just opens images and has some basic editing features, then the legacy Windows Photos app was more than enough. The latest iteration, however, has Copilot in it, along with some AI features. Things like background erase/blur, and the object remover are useful, though.
If you are in that second group, there is good news.
Microsoft still allows you to install the classic, no-nonsense Photos Legacy app through the new Photos app itself. This legacy version does not include AI editing tools or smart features. But it does have cloud sync from OneDrive, though you can turn it off.
Here is how you can disable AI features in the Microsoft Photos app:
Step 1: Install the legacy Photos app
- Open the Photos app on Windows 11.
- Click the Settings icon in the top-right corner.
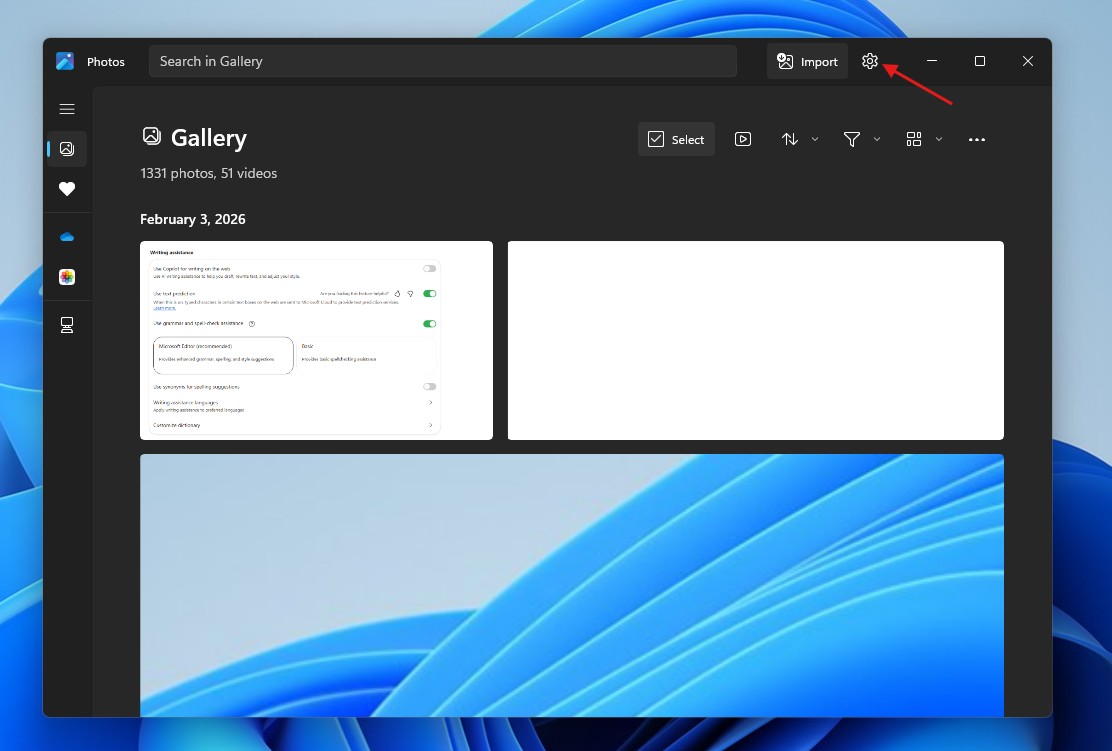
- Scroll down until you see the option Photos Legacy.
- Click the Get Photos Legacy button.
- Click Get and allow Windows to download and install it from the Microsoft Store.
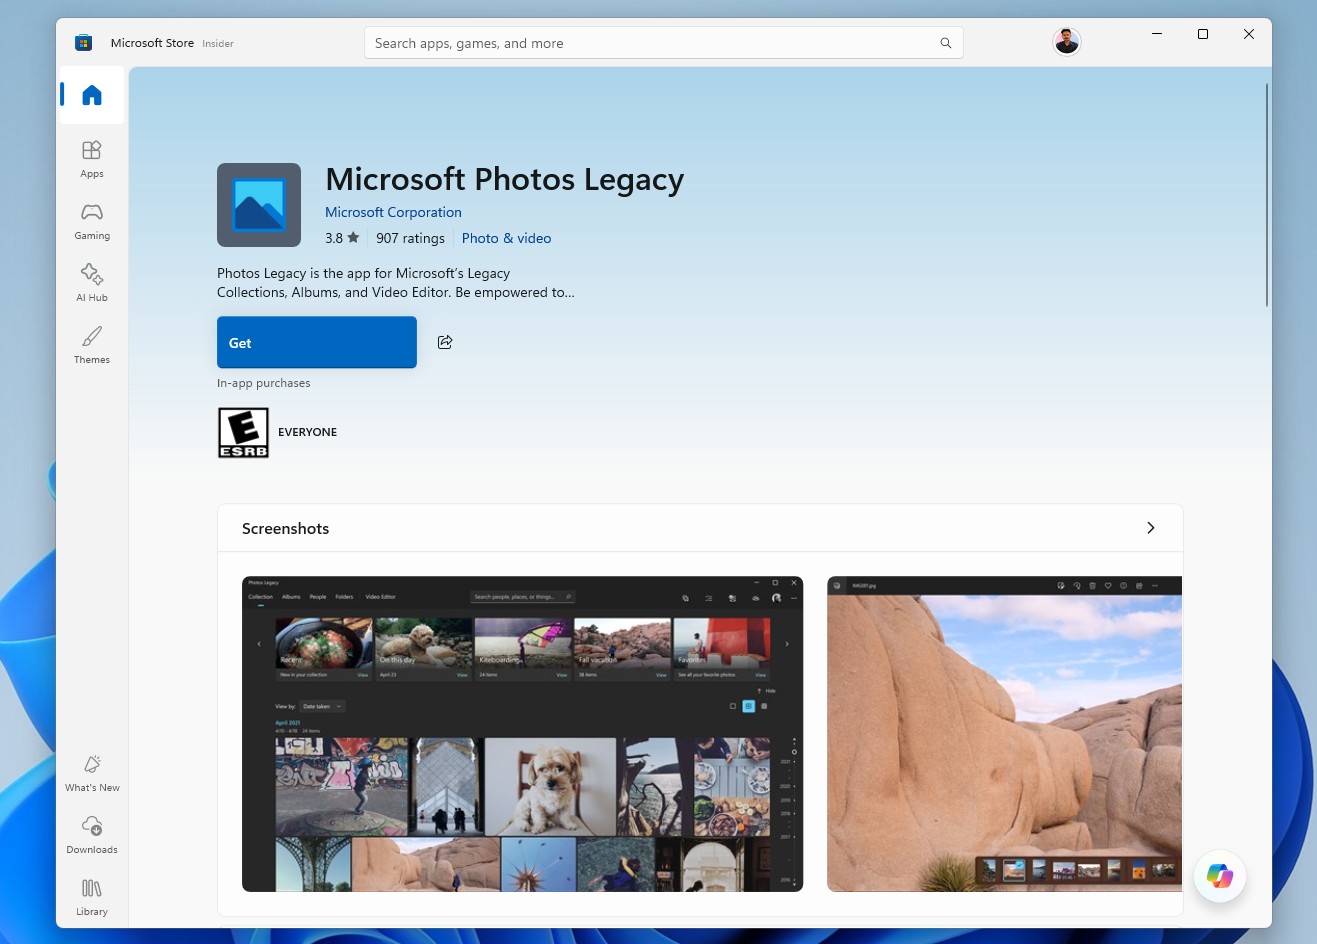
Once installed, you will see a new app called Photos Legacy on your system. 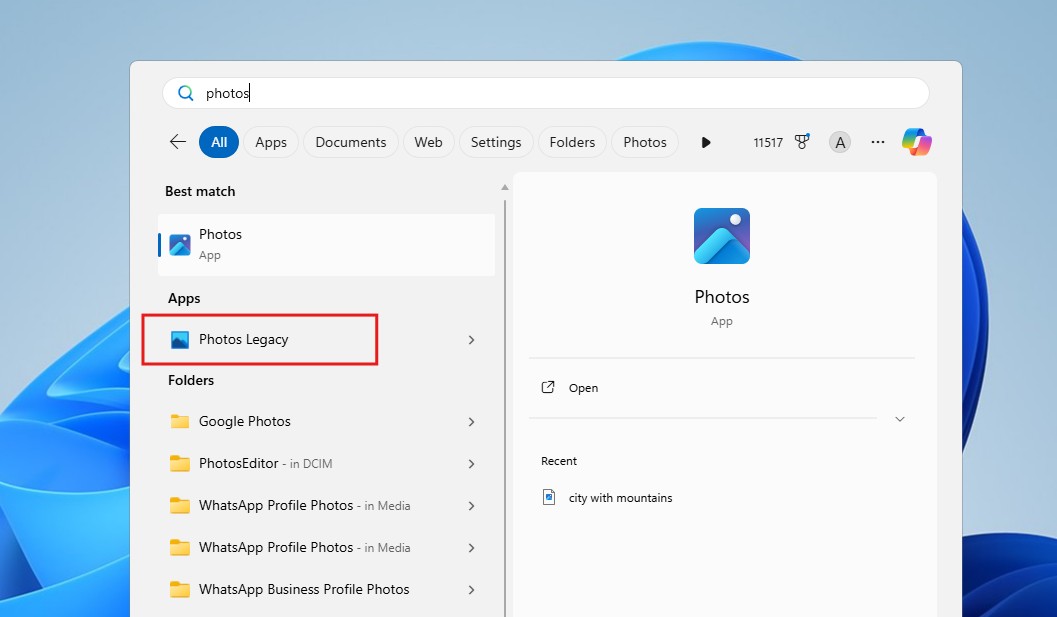 Step 2: Uninstall the modern Photos app
Uninstalling the new Photos app will make Photos Legacy the default app for opening images. Removing the new Photos app is safe and doesn’t delete your media.
- Open Settings.
- Click Apps.
- Select Installed apps.
- Search for Photos or scroll until you see it.
- Click the three dots next to it.
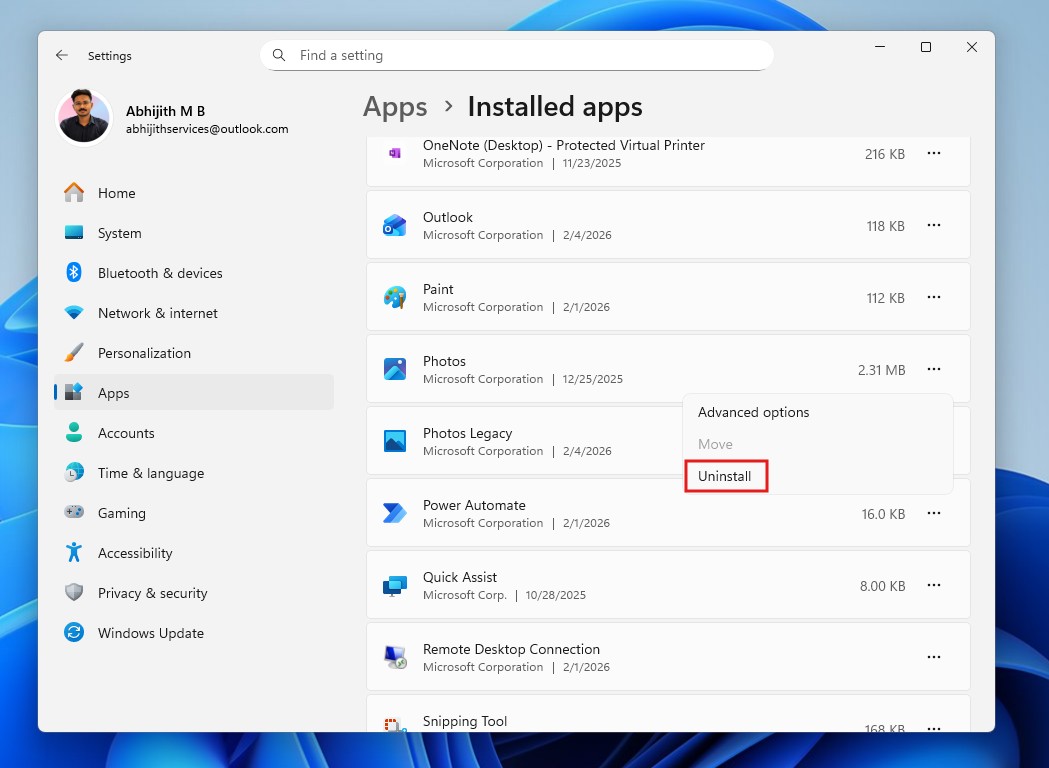
- Select Uninstall. Confirm when prompted.
After uninstalling, go to Settings > Apps > Default apps. And scroll till you find Photos Legacy. Click it, and you’ll see that some image file extensions are set to open with Photos Legacy as the default. Others will have the option “Choose a default”. Click on those, select Photos Legacy, and click Set default.
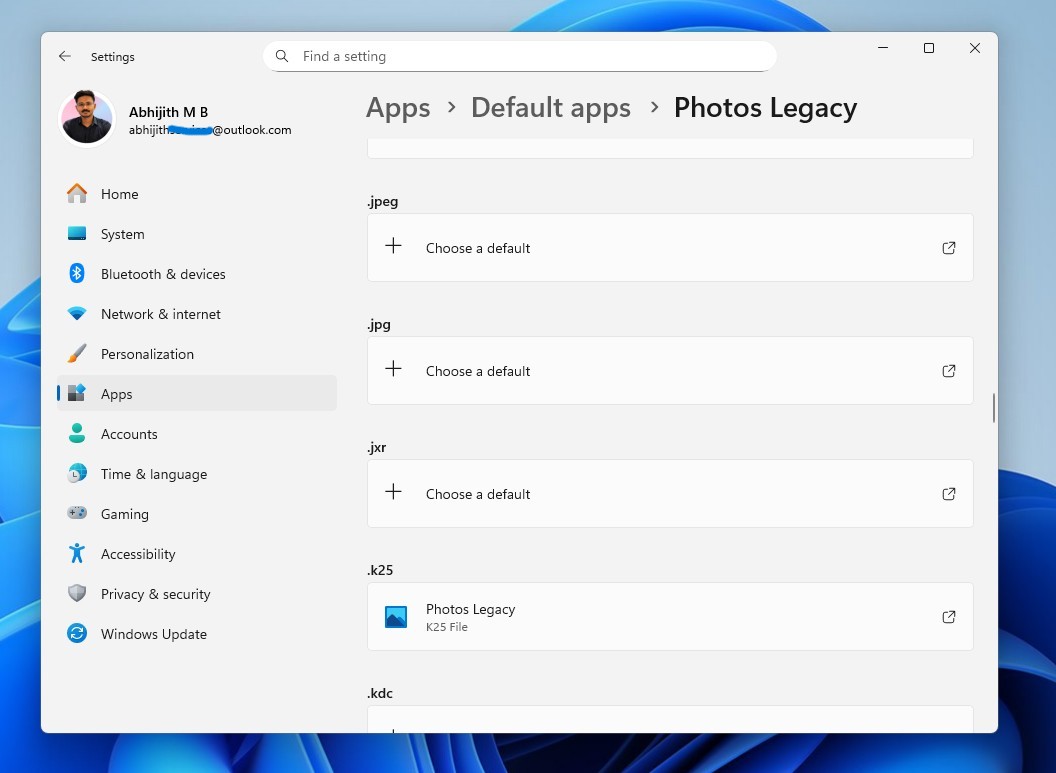
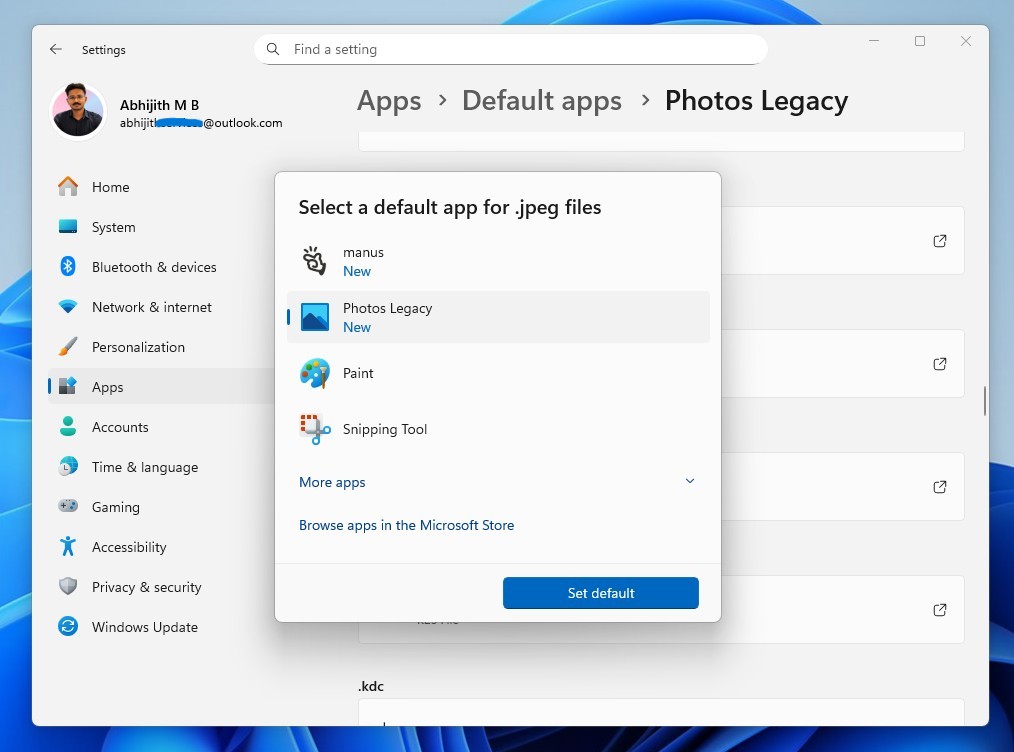
Once all are set as default, double-click an image file from the File Explorer, and you’ll see it open in Photos Legacy, without a single Copilot logo near it.
![]()
#7 How to Disable AI features in the Paint app
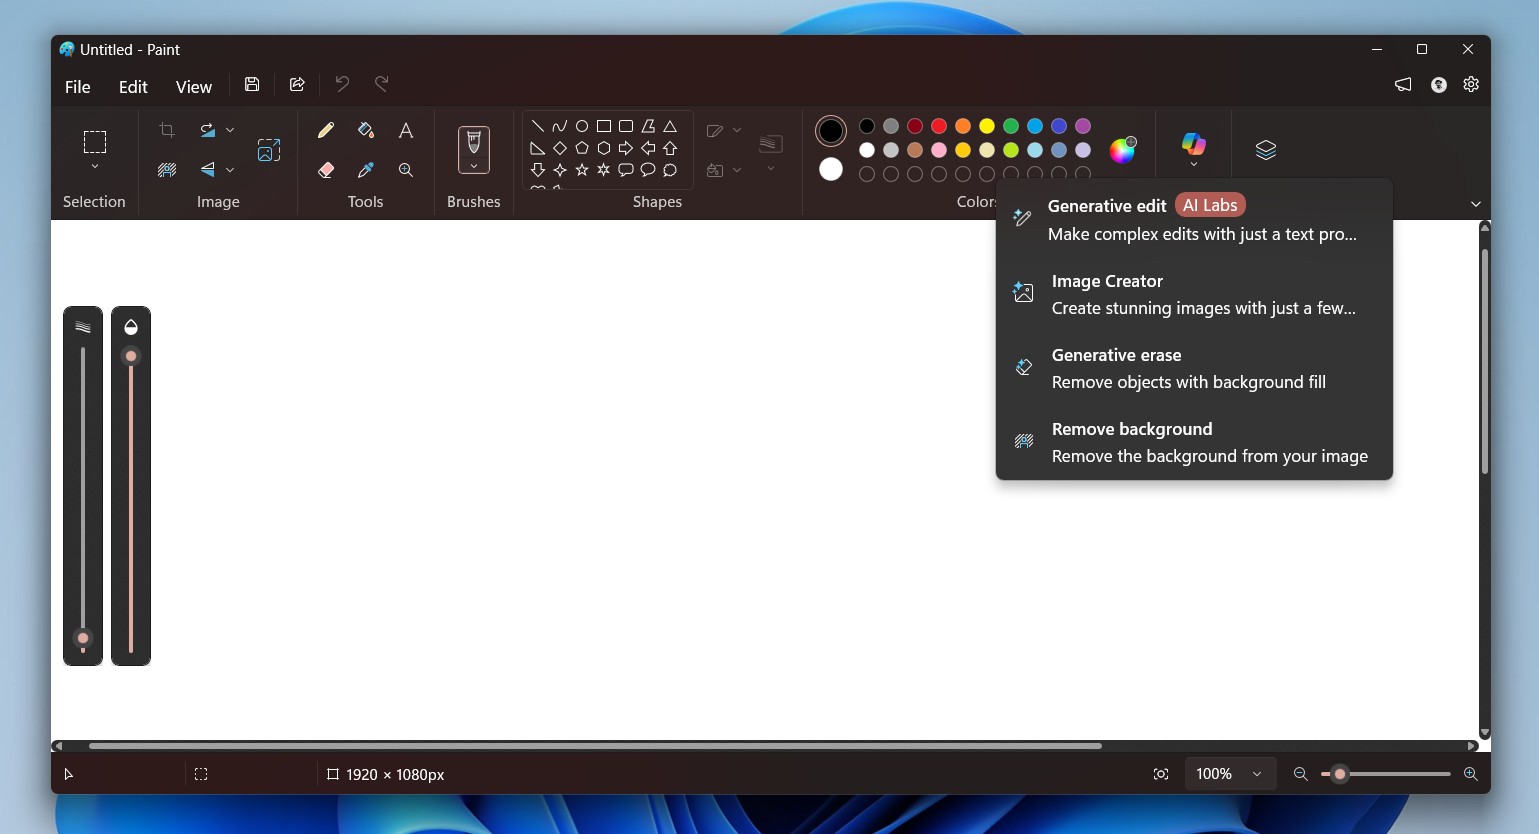
Like Notepad, Microsoft Paint in Windows 11 also has a colorful Copilot icon with features such as Generative edit, Image Creator, Generative erase, and Remove background. However, unlike Notepad, there isn’t a simple toggle here to turn off Copilot.
So, we’ll have to use either Group Policy Editor or Registry Editor. Choose any of the following to remove AI features from Paint:
Remove AI features in the Paint app using Registry Editor
Disable Image Creator in Paint
- Press Win+R and type regedit to open the Registry Editor
- Navigate to the following path: HKEY_LOCAL_MACHINE\SOFTWARE\Microsoft\Windows\CurrentVersion\Policies\Paint
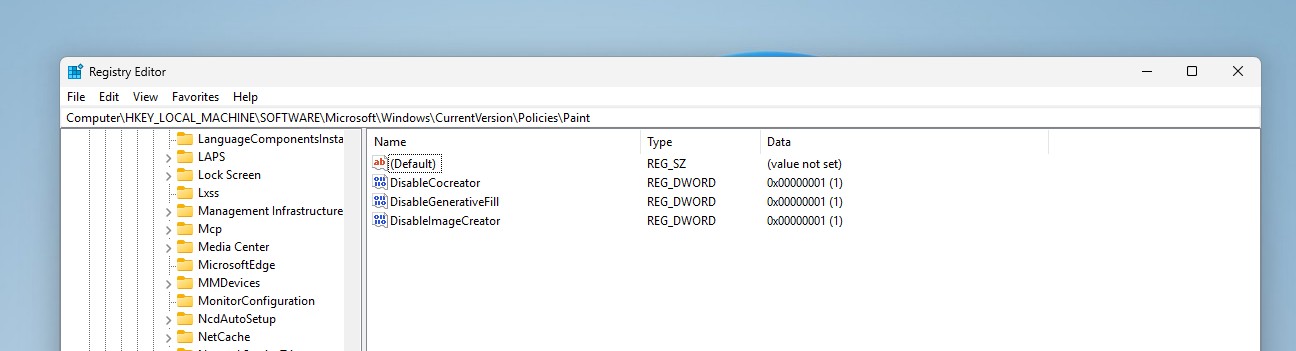
If you don’t find the Paint key, right-click Policies, select New, click Key, and rename it to Paint. - Select the Paint key, and right-click the white space on the right side, select New > DWORD (32-bit) Value.
- Give the name as DisableImageCreator. Then double-click it and change the Value data from 0 to 1. Click OK.
- Now close the Registry Editor and restart the Paint app. You’ll no longer see the Image Creator option under Copilot.
You can also do the same for Generative Fill and Cocreator with the DWORD Values DisableGenerativeFill and DisableCocreator, and changing the Value data to 1 for both, as shown in the screenshot below.
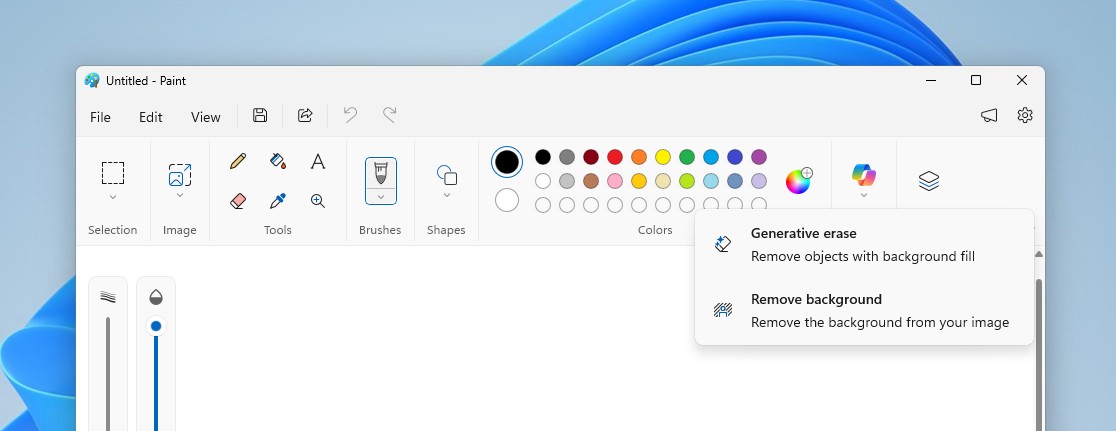
However, the AI features Generative erase and Remove background are both new additions to Paint, and those two can’t be removed, yet.
Remove AI features in the Paint app using the Group Policy Editor
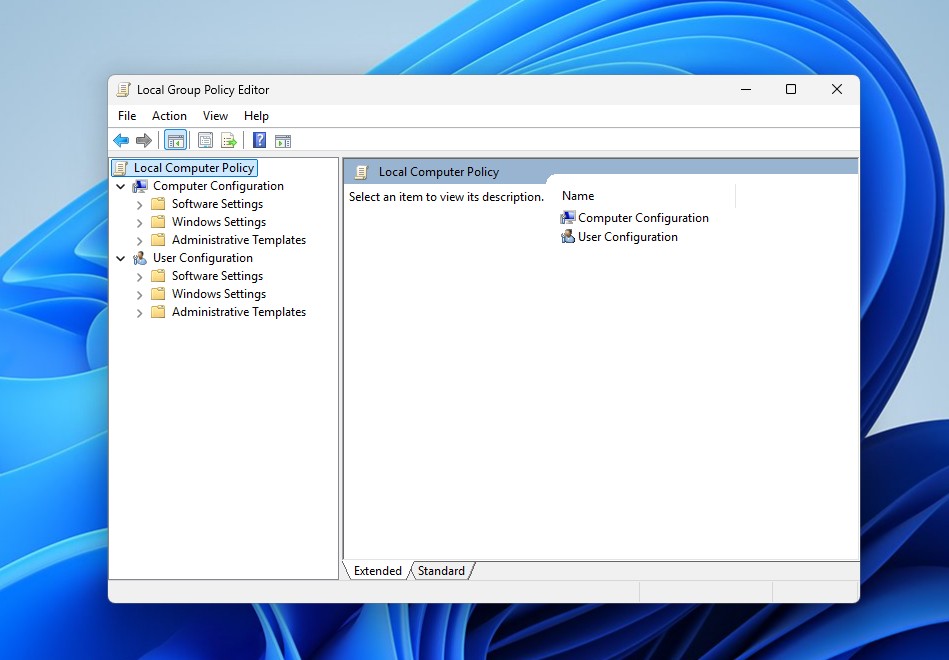
- Press the Windows key to open Start and type “gpedit”.
- You’ve now opened the Group Policy Editor.
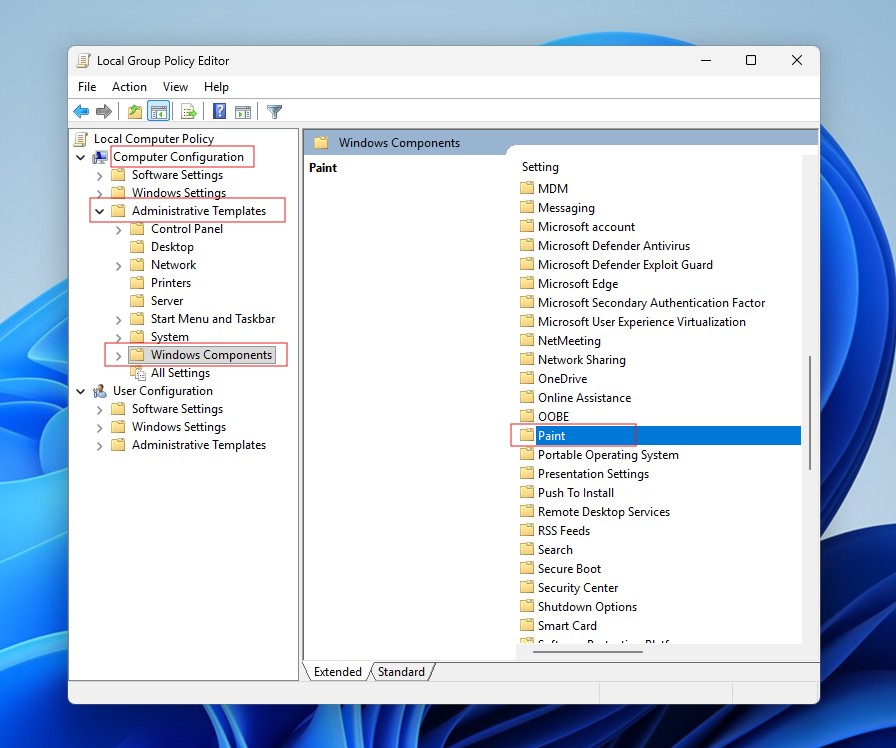
- Click on Computer Configuration, double click Administrative Templates, go to Windows Components, and scroll till you find Paint.
- Double-click on Paint and in Setting, right-click “Disable Cocreator” and select the Edit option.
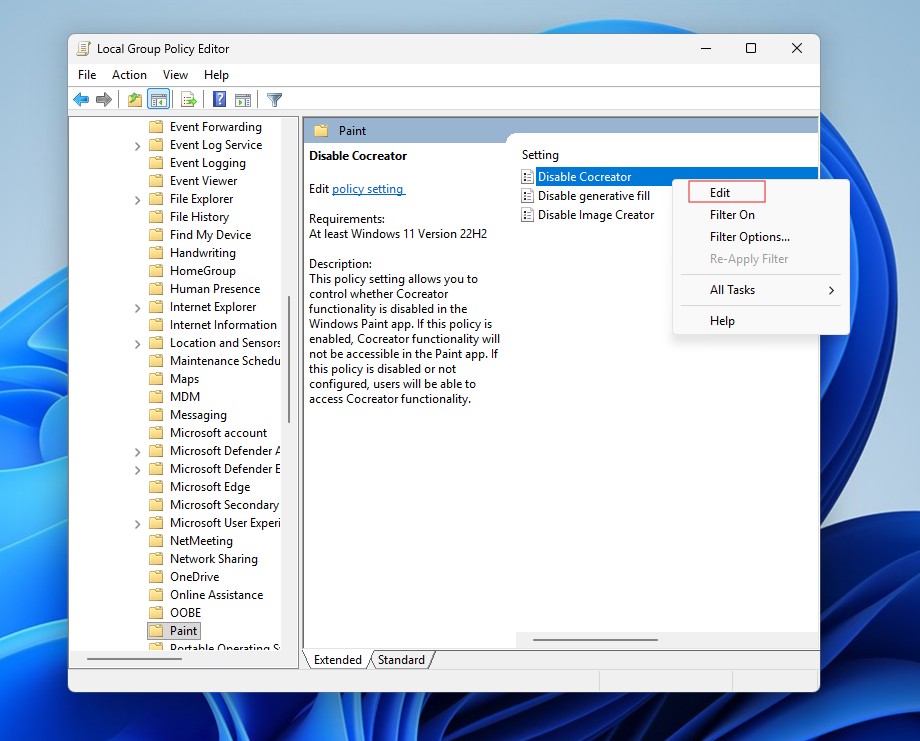
- Click the Enabled option to turn it on.
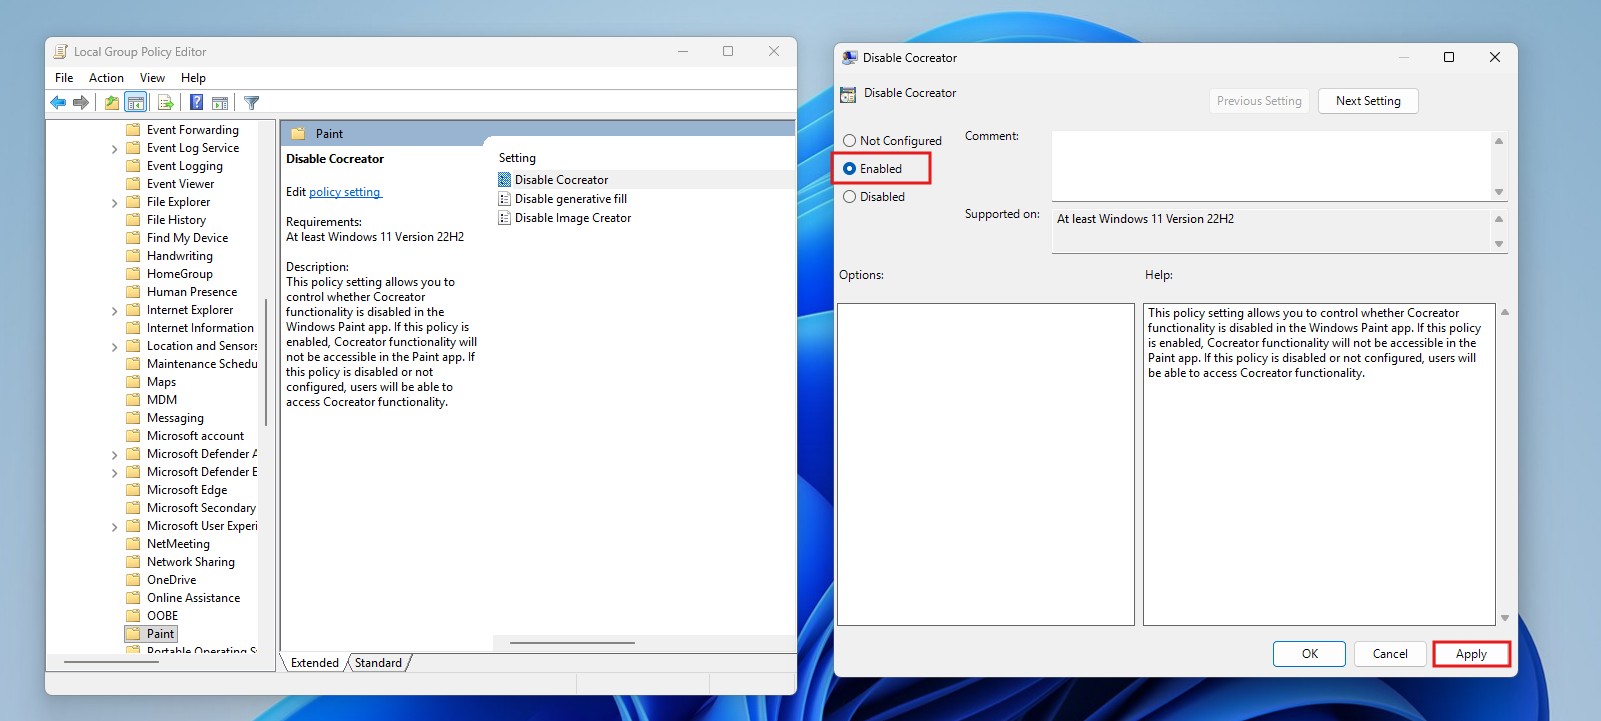
- Click the Apply button and then select the OK button.
- Now, right-click “Disable generative fill” policy and select the Edit option.
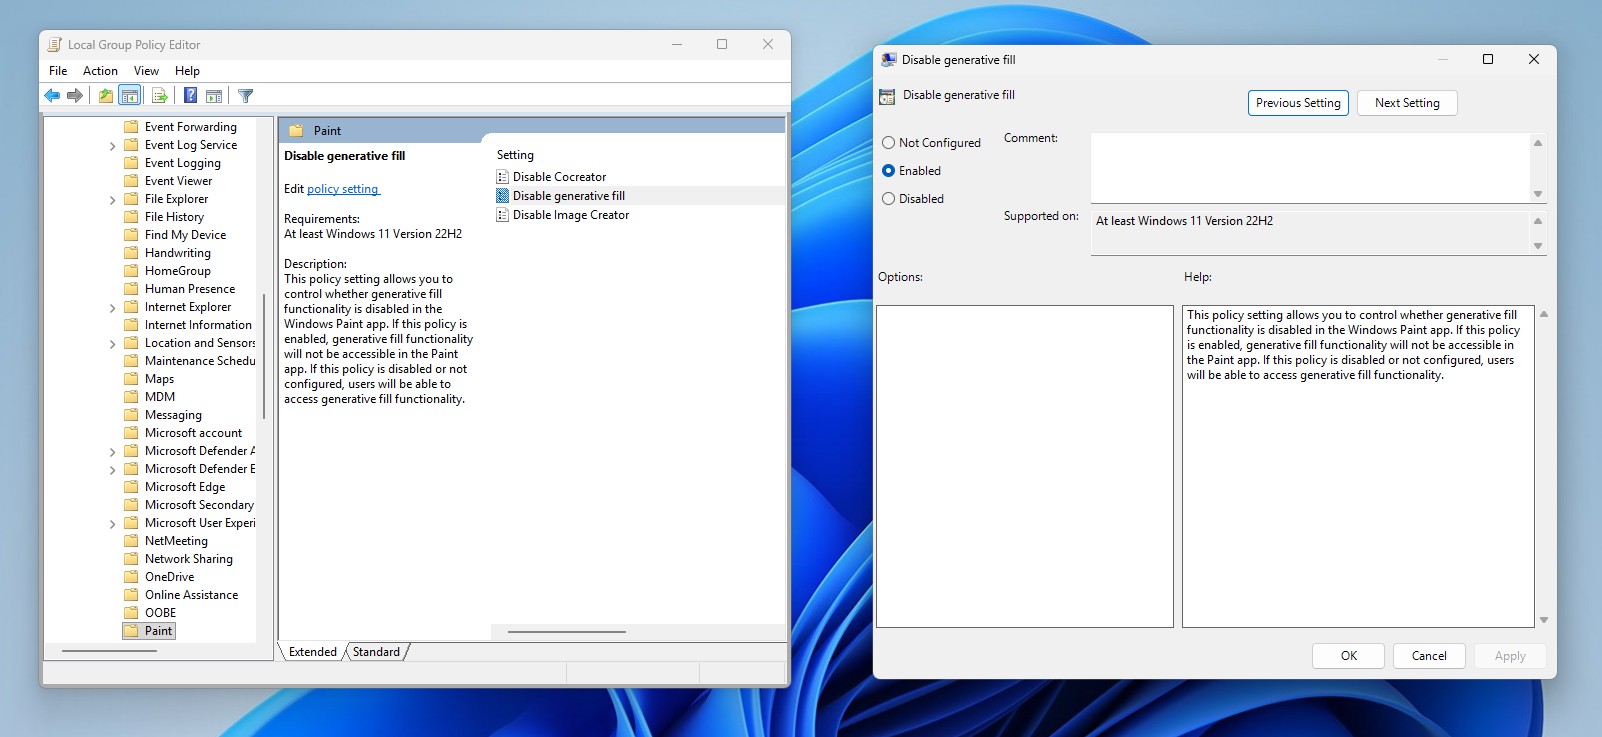
- Click Enabled. Select Apply and then click OK.
- Finally, right-click “Disable Image Creator” and select the Edit option.
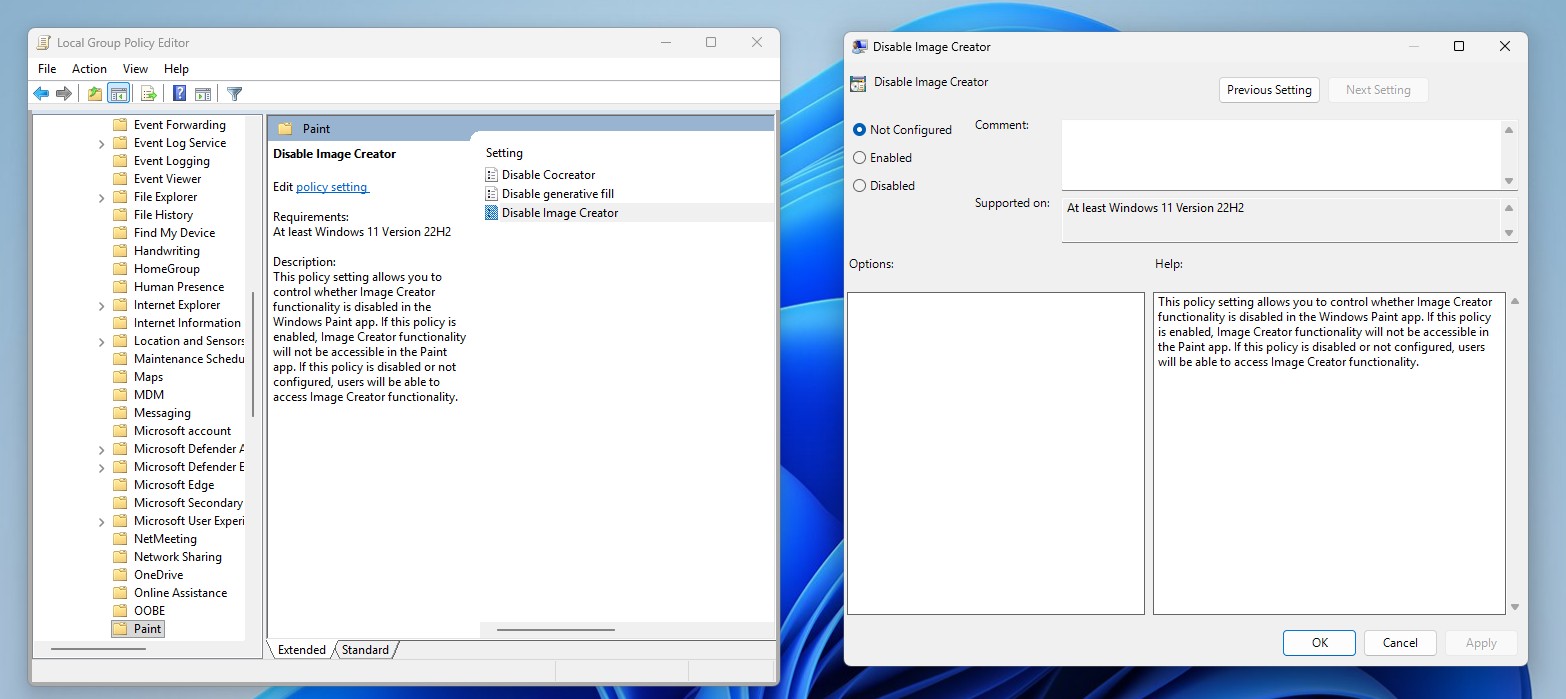
- Click Enabled. Select Apply and then click the OK button.
- Restart your PC.
Here too, the Copilot logo remains along with Generative erase and Background remover. If you want Paint to behave like the legacy Paint app, the only option left is to replace the new Paint app with the classic MS Paint. Microsoft doesn’t provide a direct method to download the legacy Paint app, but you can find installation copies of MS Paint taken from Windows 10 PCs.
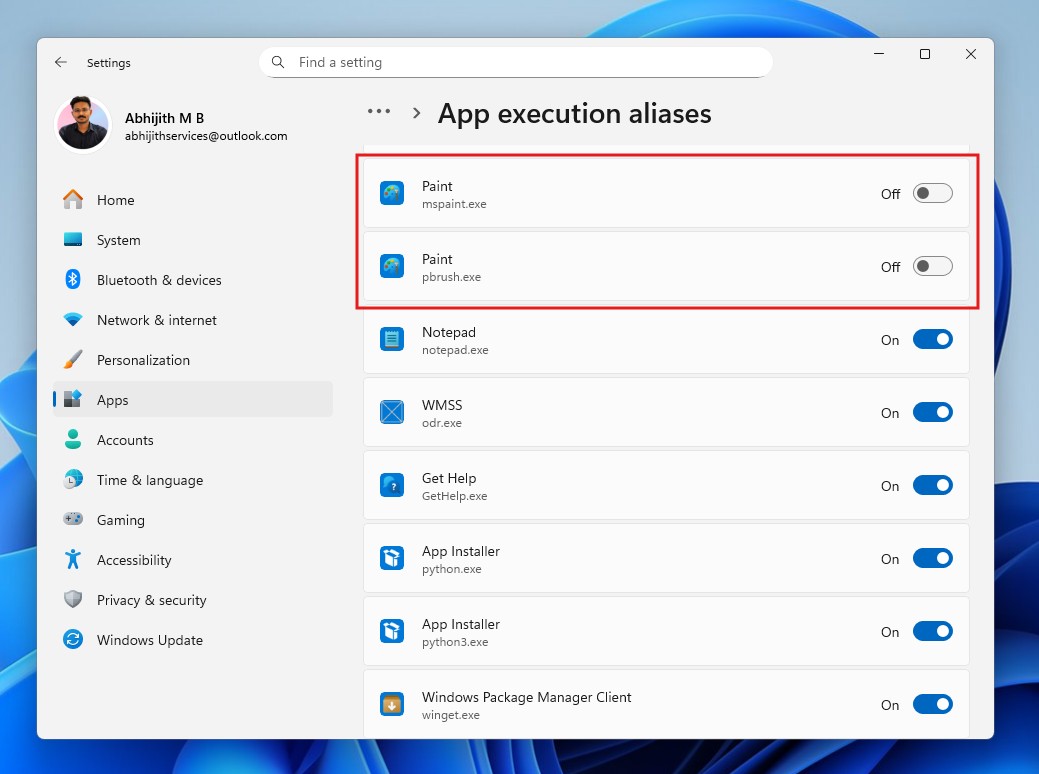
After installing the classic MS Paint, make sure to do the following to make this the default Paint app:
- Open Settings > Apps > Advanced app settings.
- Click on App execution aliases.
- Scroll down and find Paint (or mspaint.exe).
- Turn the toggle OFF. This stops Windows from intercepting the “paint” command, allowing the Classic Paint you just installed to launch instead.
#8 Remove AI features from Outlook
Outlook, as you might already know, is an email client, and most people do not want an AI swooping in to analyze the confidential emails that they send and receive. Outlook for Windows has a feature that analyzes our email content to provide connected experiences.
Although it doesn’t explicitly use the word “AI”, such data collection is typically used for AI-powered experiences.
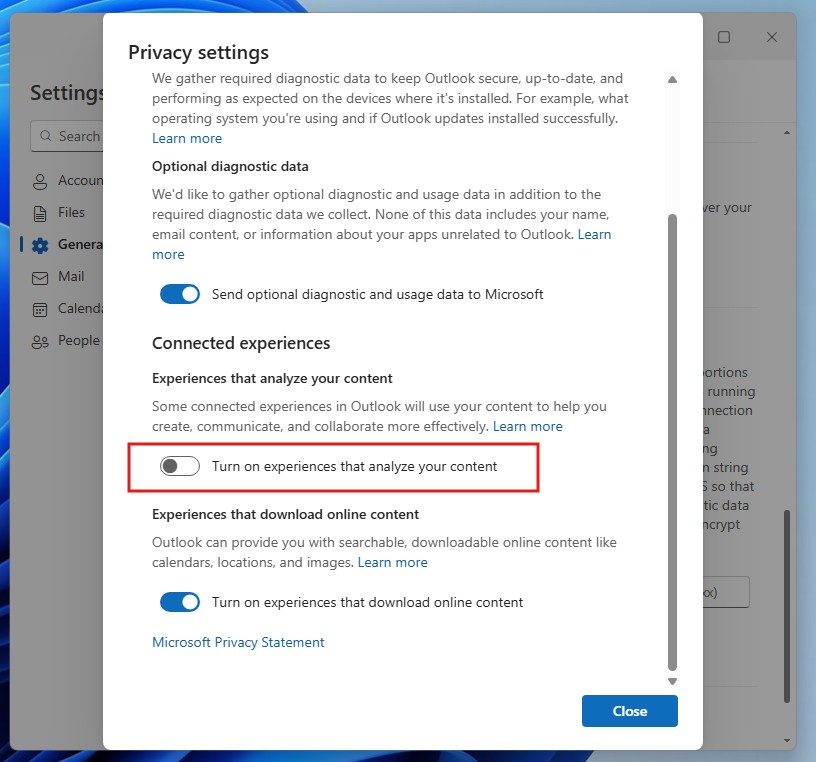
To turn this off in Outlook, go to Settings > General > Privacy and data > Privacy settings.
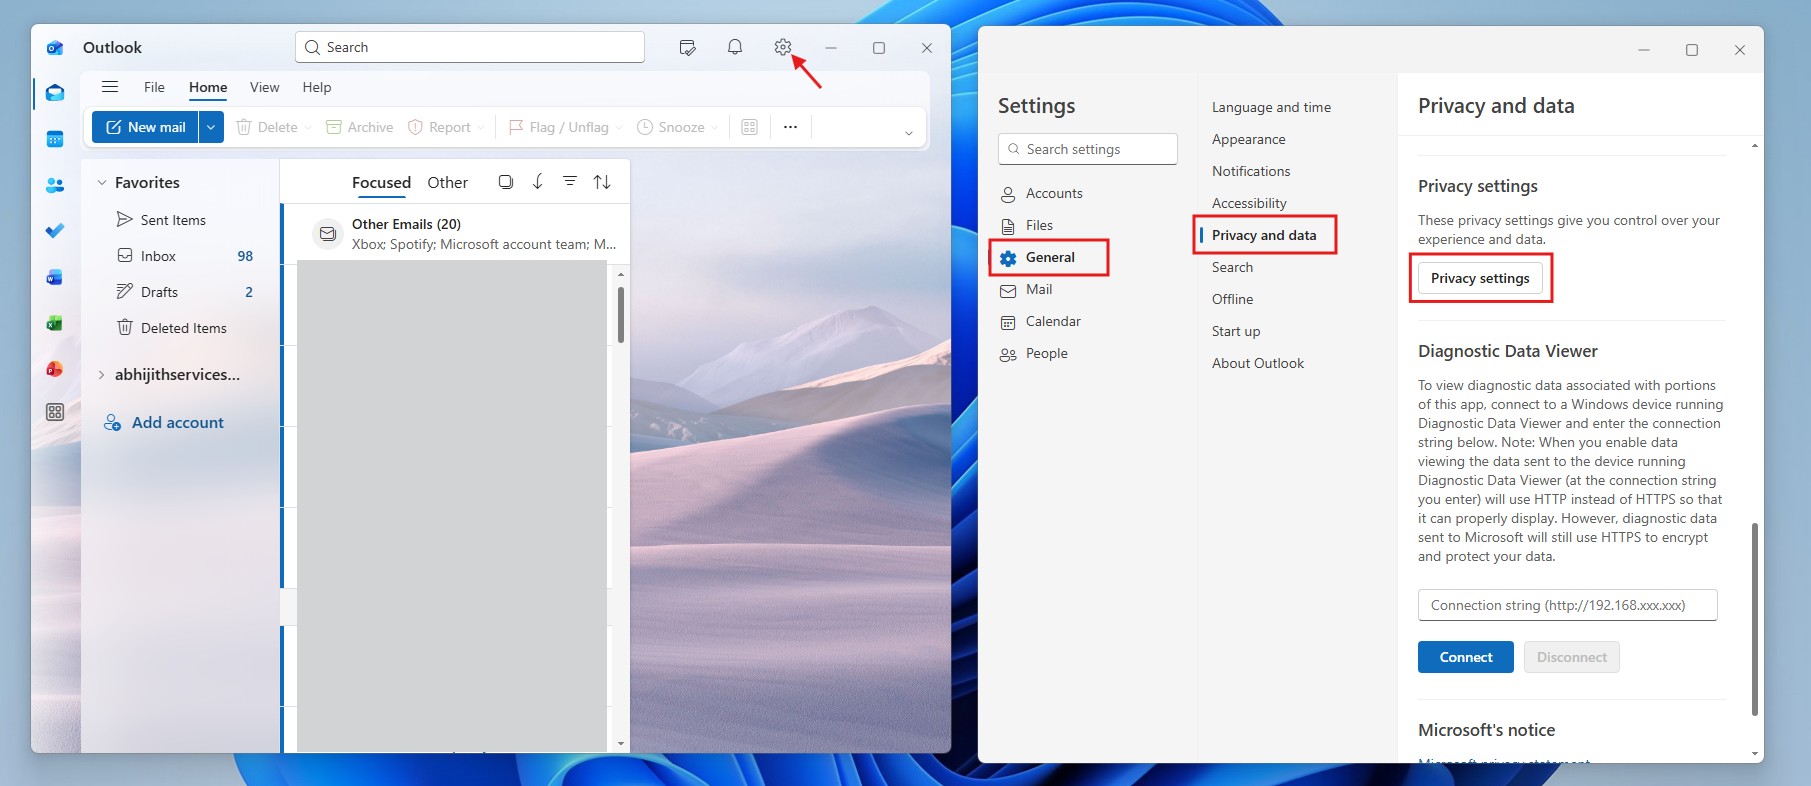
Now, turn off the toggle for “Turn on experiences that analyze your content”. For better privacy, we recommend turning off the toggles for “Send optional diagnostic and usage data to Microsoft” and “Turn on experiences that download online content” as well.
If you are a Microsoft 365 subscriber, your Outlook app will also have a Copilot logo in the ribbon with features that allow you to Chat with Copilot without leaving Outlook and Draft an email.
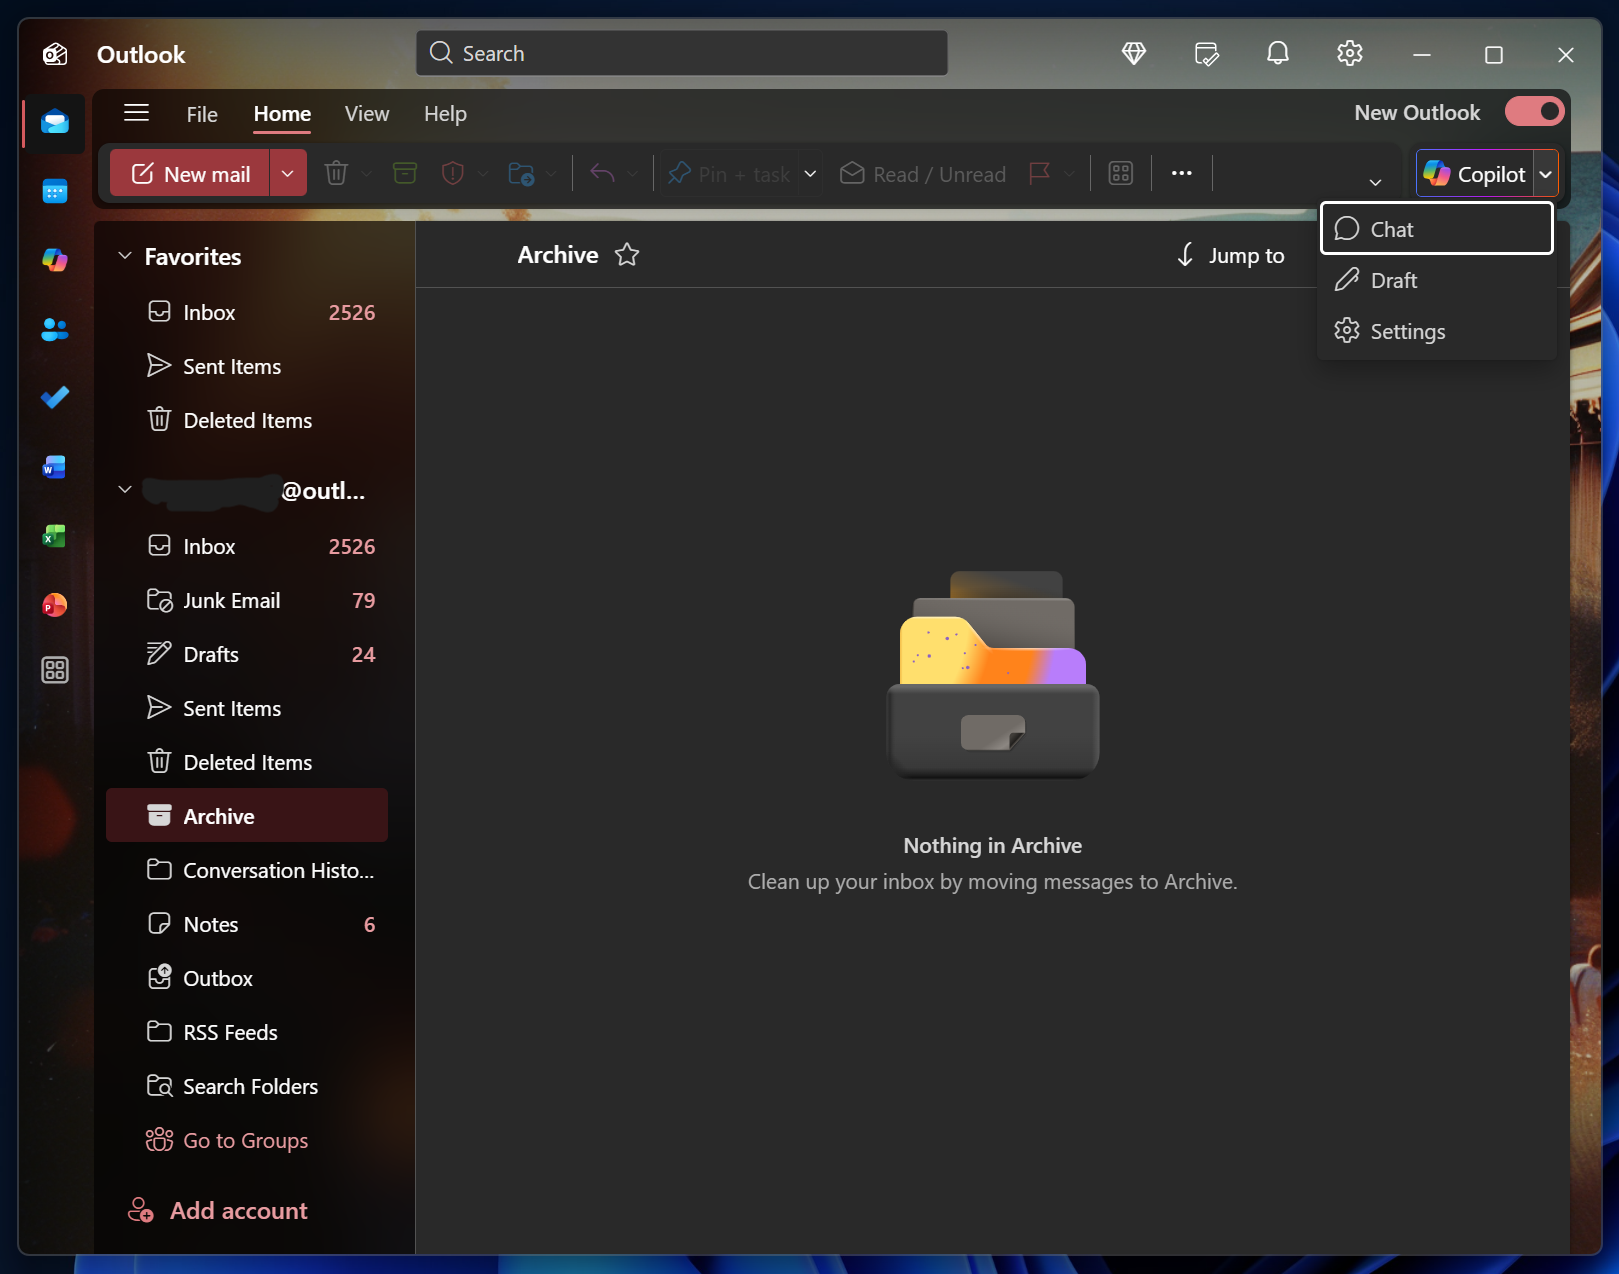
While drafting emails with AI is nothing new, not everyone wants it, and if you’re among them, here is how to disable Copilot from Outlook:
- Open Outlook and click the Settings icon on the top right.
- At the bottom of the list would be Copilot. Click on it.
- Turn off the toggle for “Turn on Copilot”. This would remove Copilot from the ribbon in Outlook.
#9 Remove AI features from OneDrive
Microsoft has been pushing Windows users to back up their PC in OneDrive, but the OneDrive app has an AI that scans through faces in the Photos you back up to the cloud storage service.
“OneDrive uses AI to recognize faces in your photos to help you find photos of friends and family”. If you don’t want AI to look through your photos, there is a way to turn it off.
Open the OneDrive app, click the gear icon on the top right, and then select Settings.  This opens the default browser since the official app for Microsoft’s cloud storage service is just a web wrapper, and the company didn’t bother to continue development for a native Windows app for OneDrive.
Either way, in the Options menu for OneDrive, click on Photos and turn off the toggle for “Use tags to find and organize photos”. That’s it. 
However, Microsoft, very recently, announced that AI Agents in OneDrive are now generally available, and since it is a new development, we do not have information about disabling them.
#10 Disable Gaming Copilot in Windows 11
Gaming Copilot is Microsoft’s attempt at showcasing AI to gamers. But as expected, gamers don’t need an AI to help with the game. The company markets the feature as a “personal gaming sidekick” and is currently in Beta.
The highlight feature is that Gaming Copilot helps you with contextual game strategies, as an overlay, without having to leave the game.
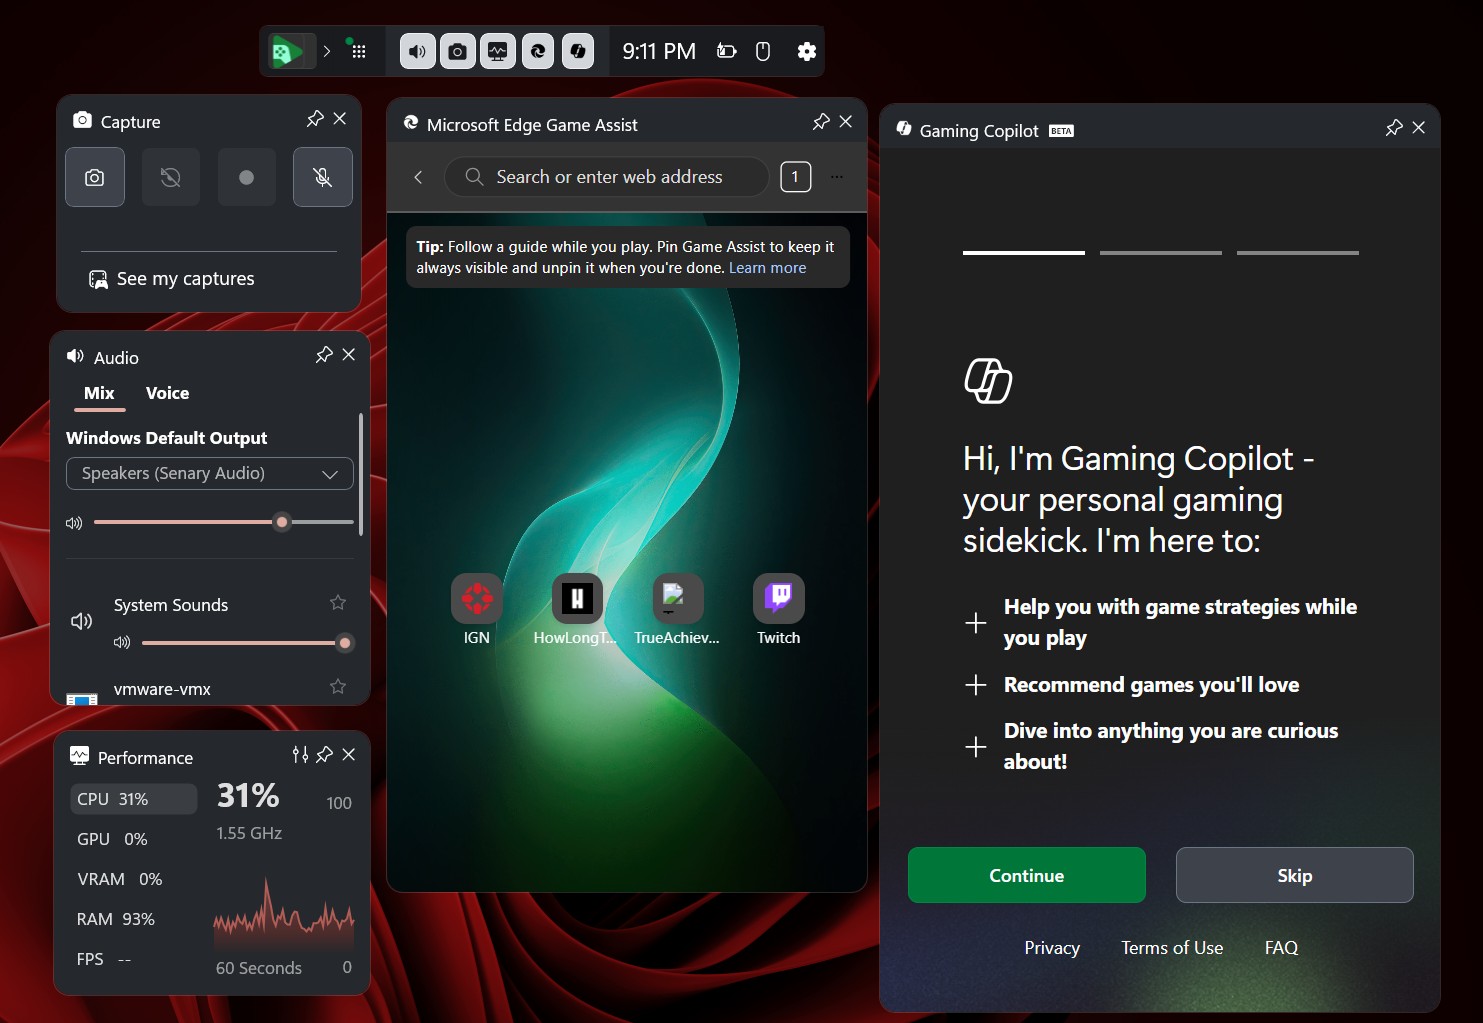
The Gaming Copilot banner shows up by default when you open Xbox Game Bar (Win + G), and can be annoying if you use Game Bar for useful stuff like performance monitoring.
To disable Gaming Copilot from the Xbox Game Bar, go to the Gaming Copilot panel and click Settings. From there, select Privacy settings.
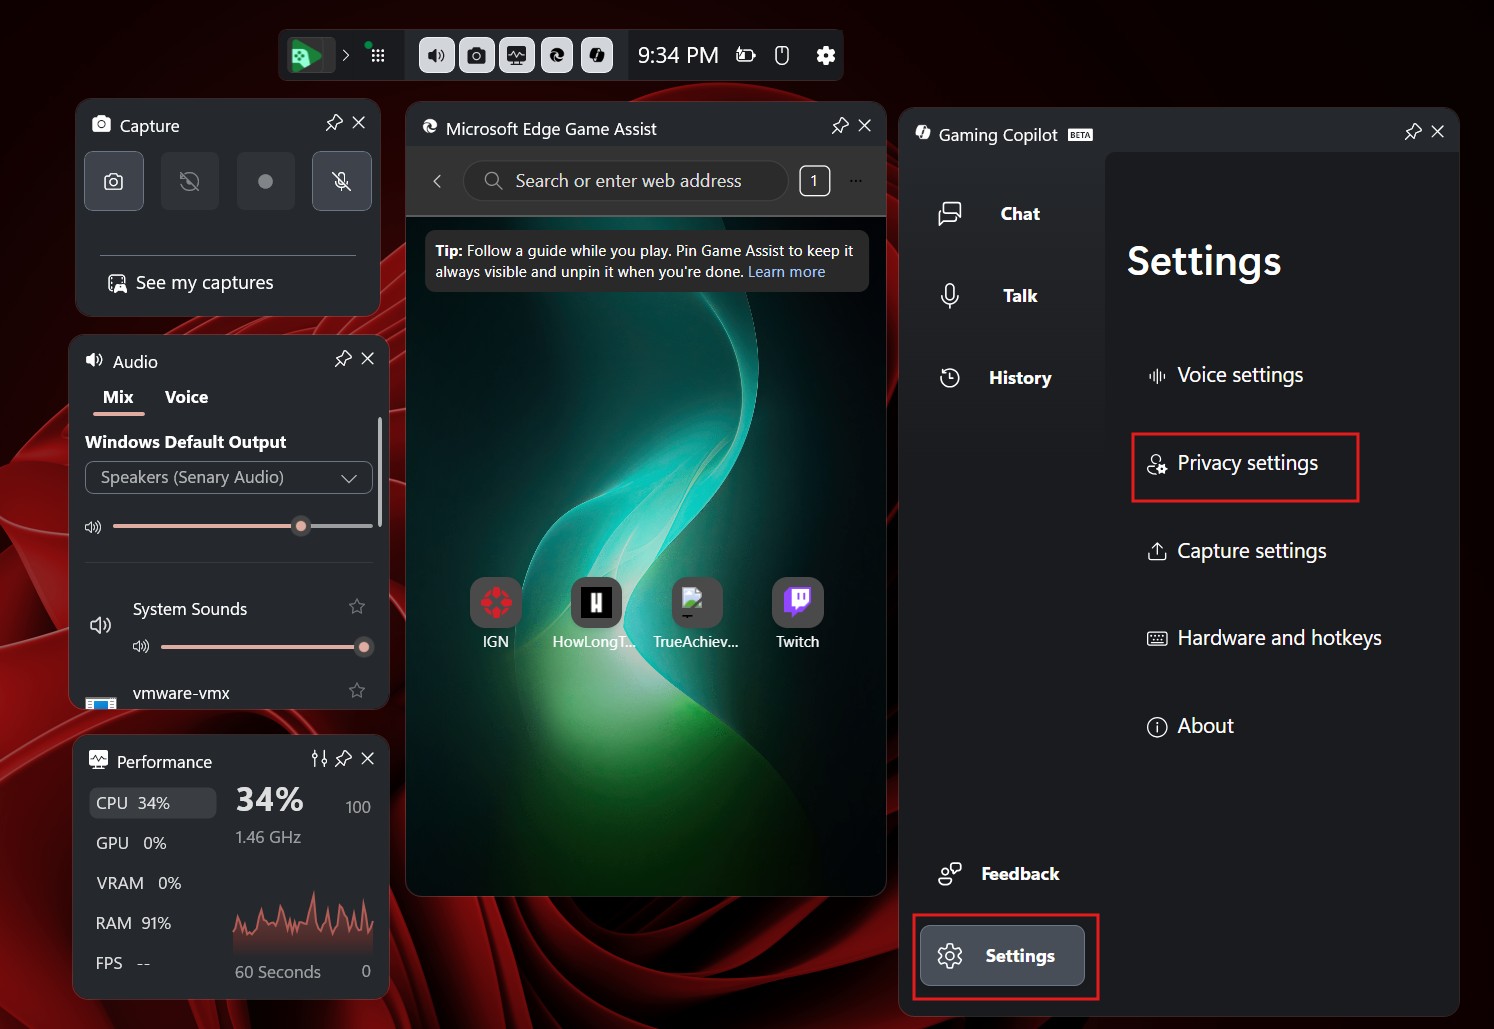
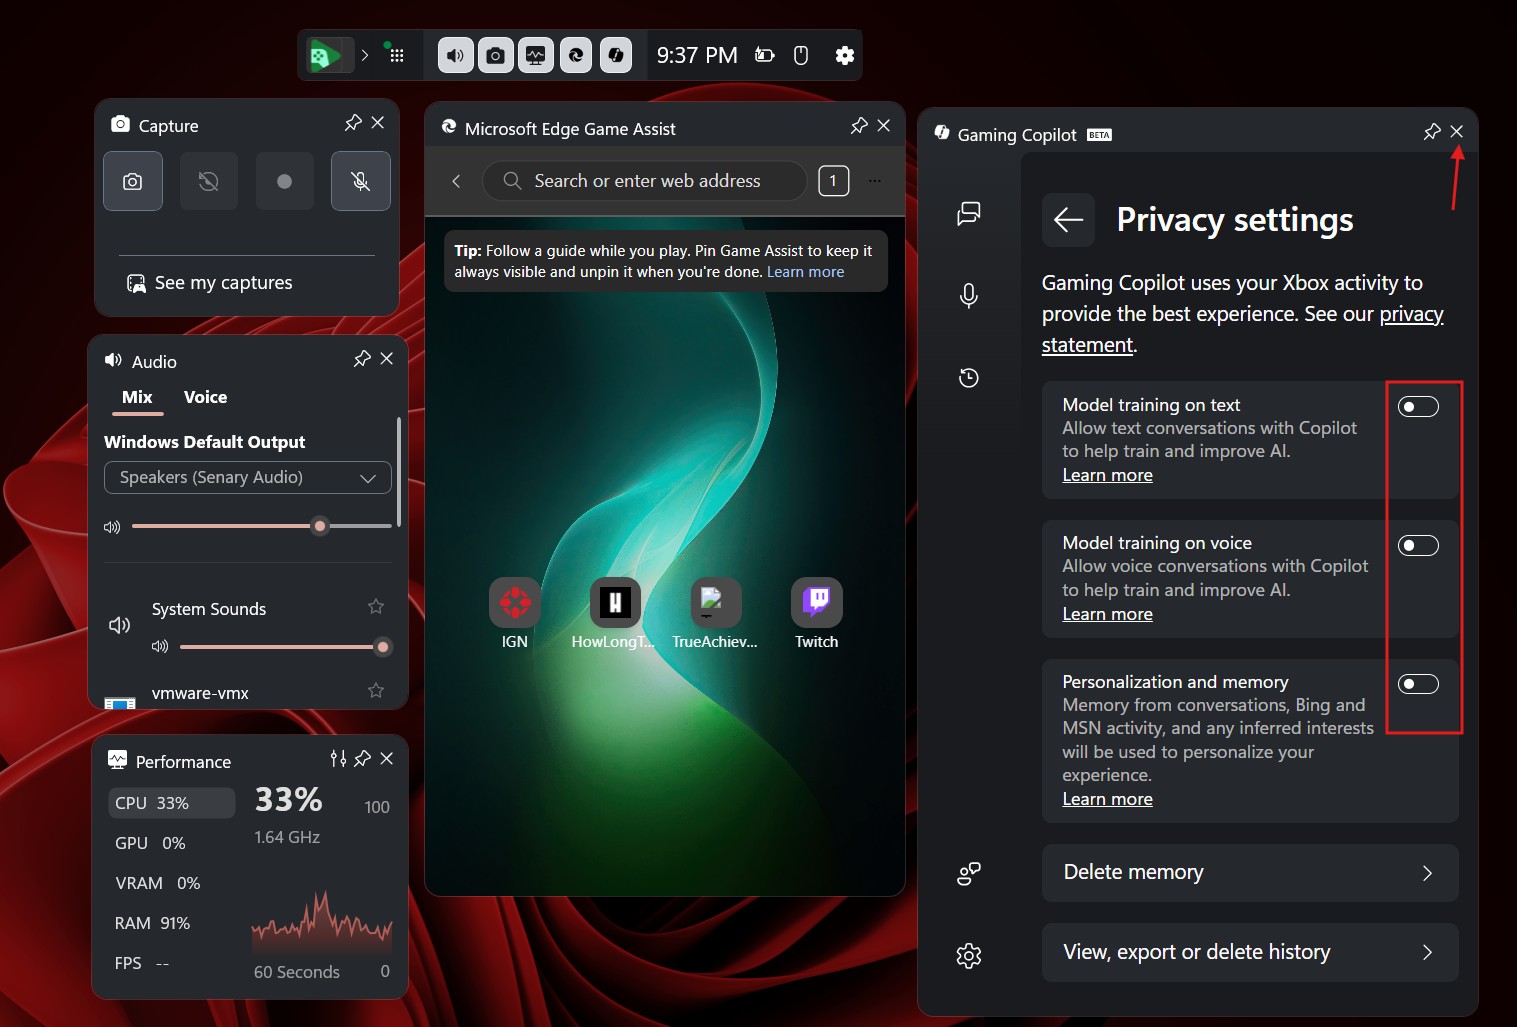
In Privacy settings, turn off all the toggles to prevent model training and data collection by Copilot while you game. You can also click the Close button in the Gaming Copilot widget.
Then, in the Game Bar panel, click the Settings icon, and select More settings.
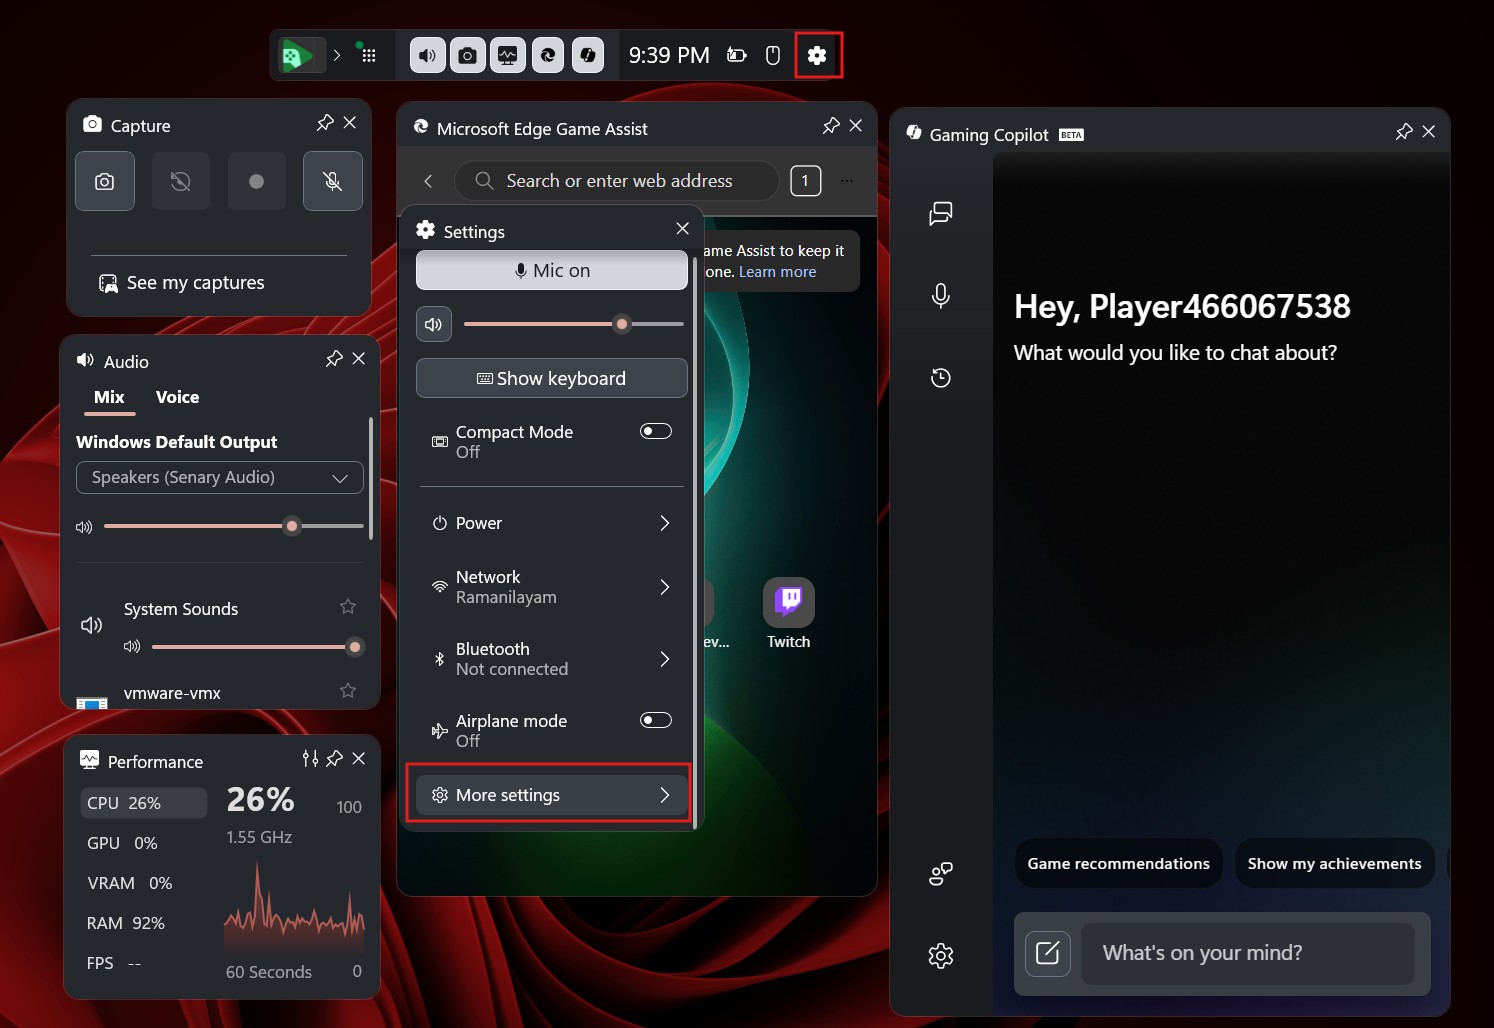
Click on Widgets.
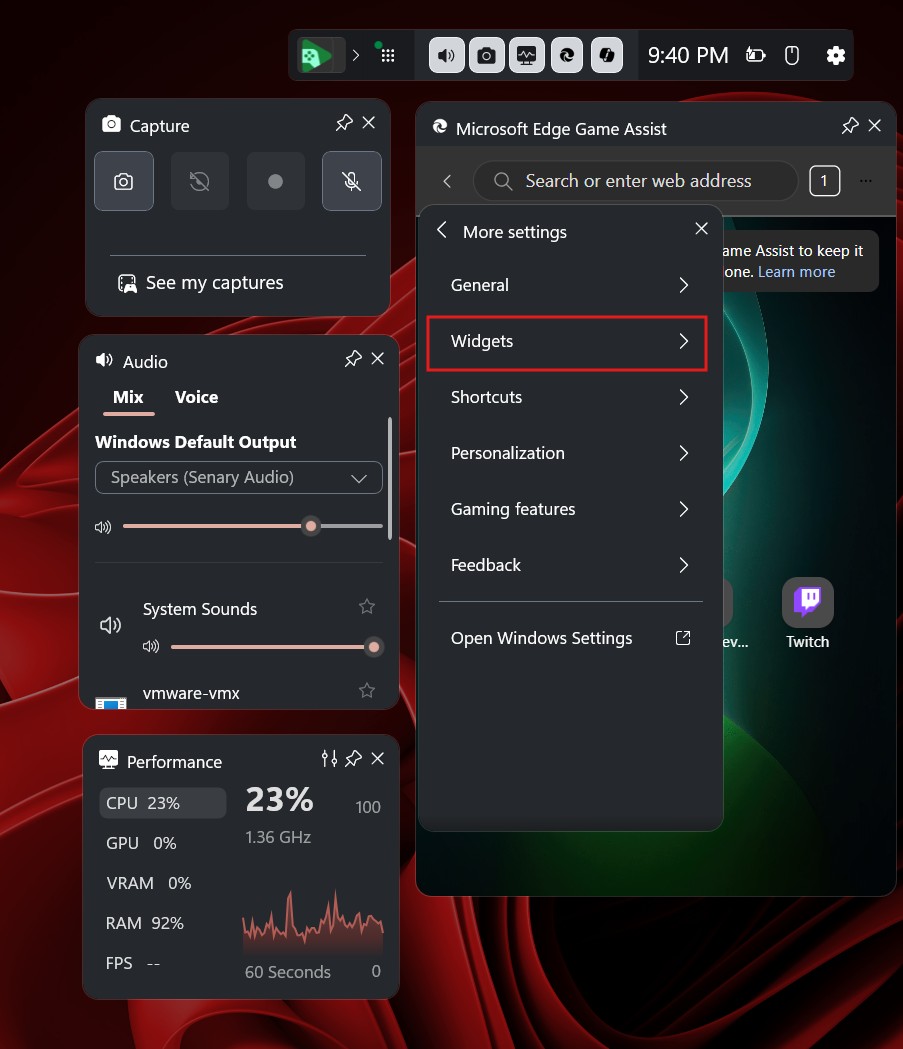
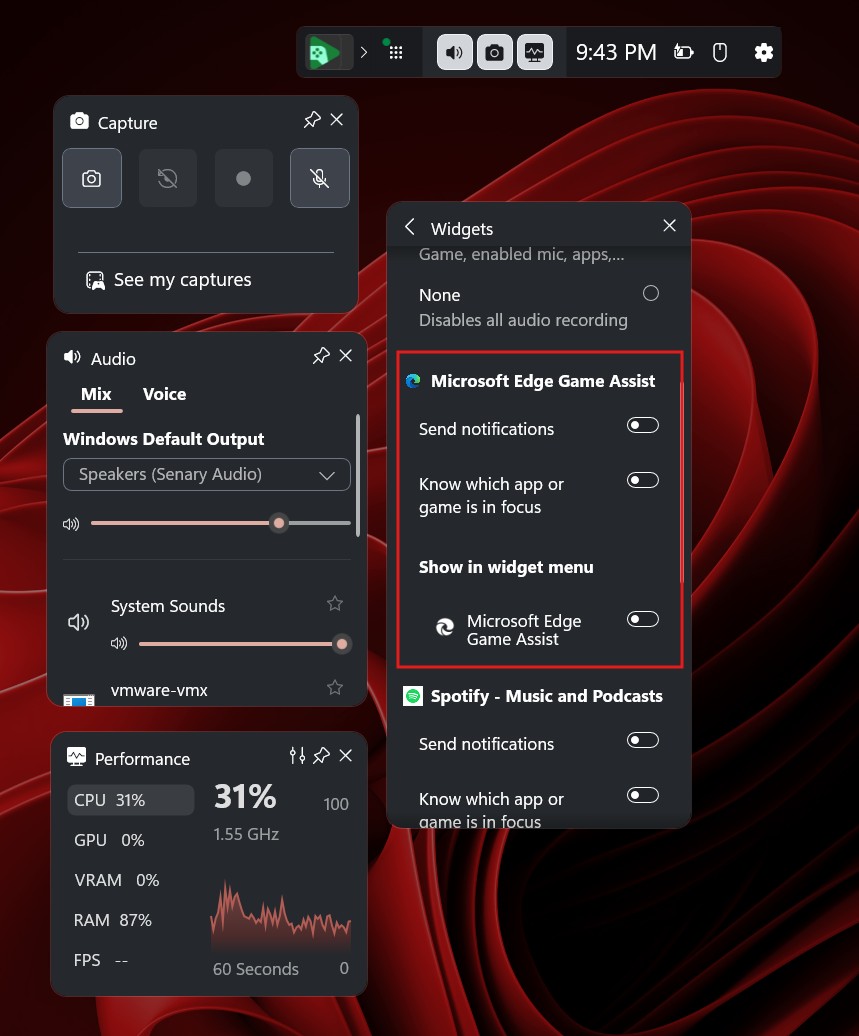
Scroll down until you see Show in widget menu. From there, turn off the toggle for Gaming Copilot. This will remove the Copilot logo from the Xbox Game Bar.
![]()
For good measure, we also recommend that you turn off Microsoft Edge Game Assist, because most people don’t want to browse while gaming.
#11 Disable Windows Studio Effects in Copilot+ PCs
Windows Studio Effects is an AI-powered suite of video and audio-enhancing features on select Windows 11 PCs with compatible NPUs. The effects include: Background Blur, Eye Contact, Auto Framing, Voice Focus, Portrait light, Creative filters, Eye contact Teleprompter.
If none of these interests you, you can remove Windows Studio Effects using the following steps:
- Open Settings.
- Click Bluetooth & devices, and from the right side, select Cameras.
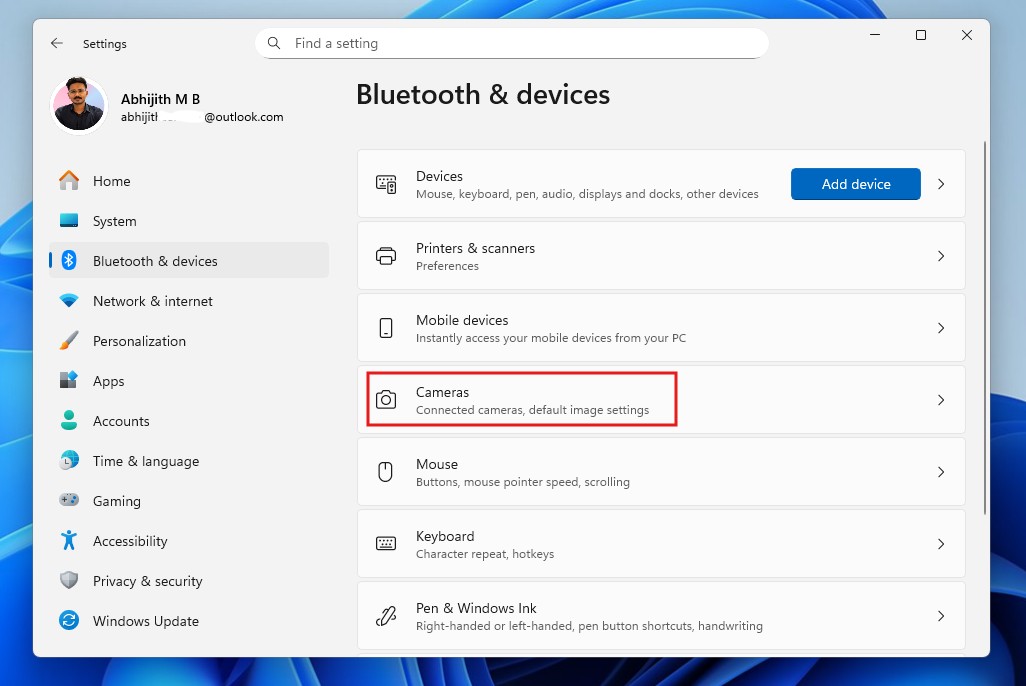
- In the Connected cameras sub-menu, you’ll see all the cameras currently attached. Select the one that you want to disable Studio Effects.
- Below the Basic setting, you’ll see Advanced camera options. Click Edit.
- Turn off the toggle for the option Use Windows Studio Effects. Then click Apply.
#12 How to disable and completely remove Windows Recall
Windows Recall is easily one of the most controversial AI features Microsoft has ever added to Windows. It continuously captures snapshots of what’s on your screen and uses on-device AI to make everything searchable later. In theory, it sounds useful. In practice, many users find the idea of their screen being recorded 24/7 unsettling, even if Microsoft insists everything stays local.
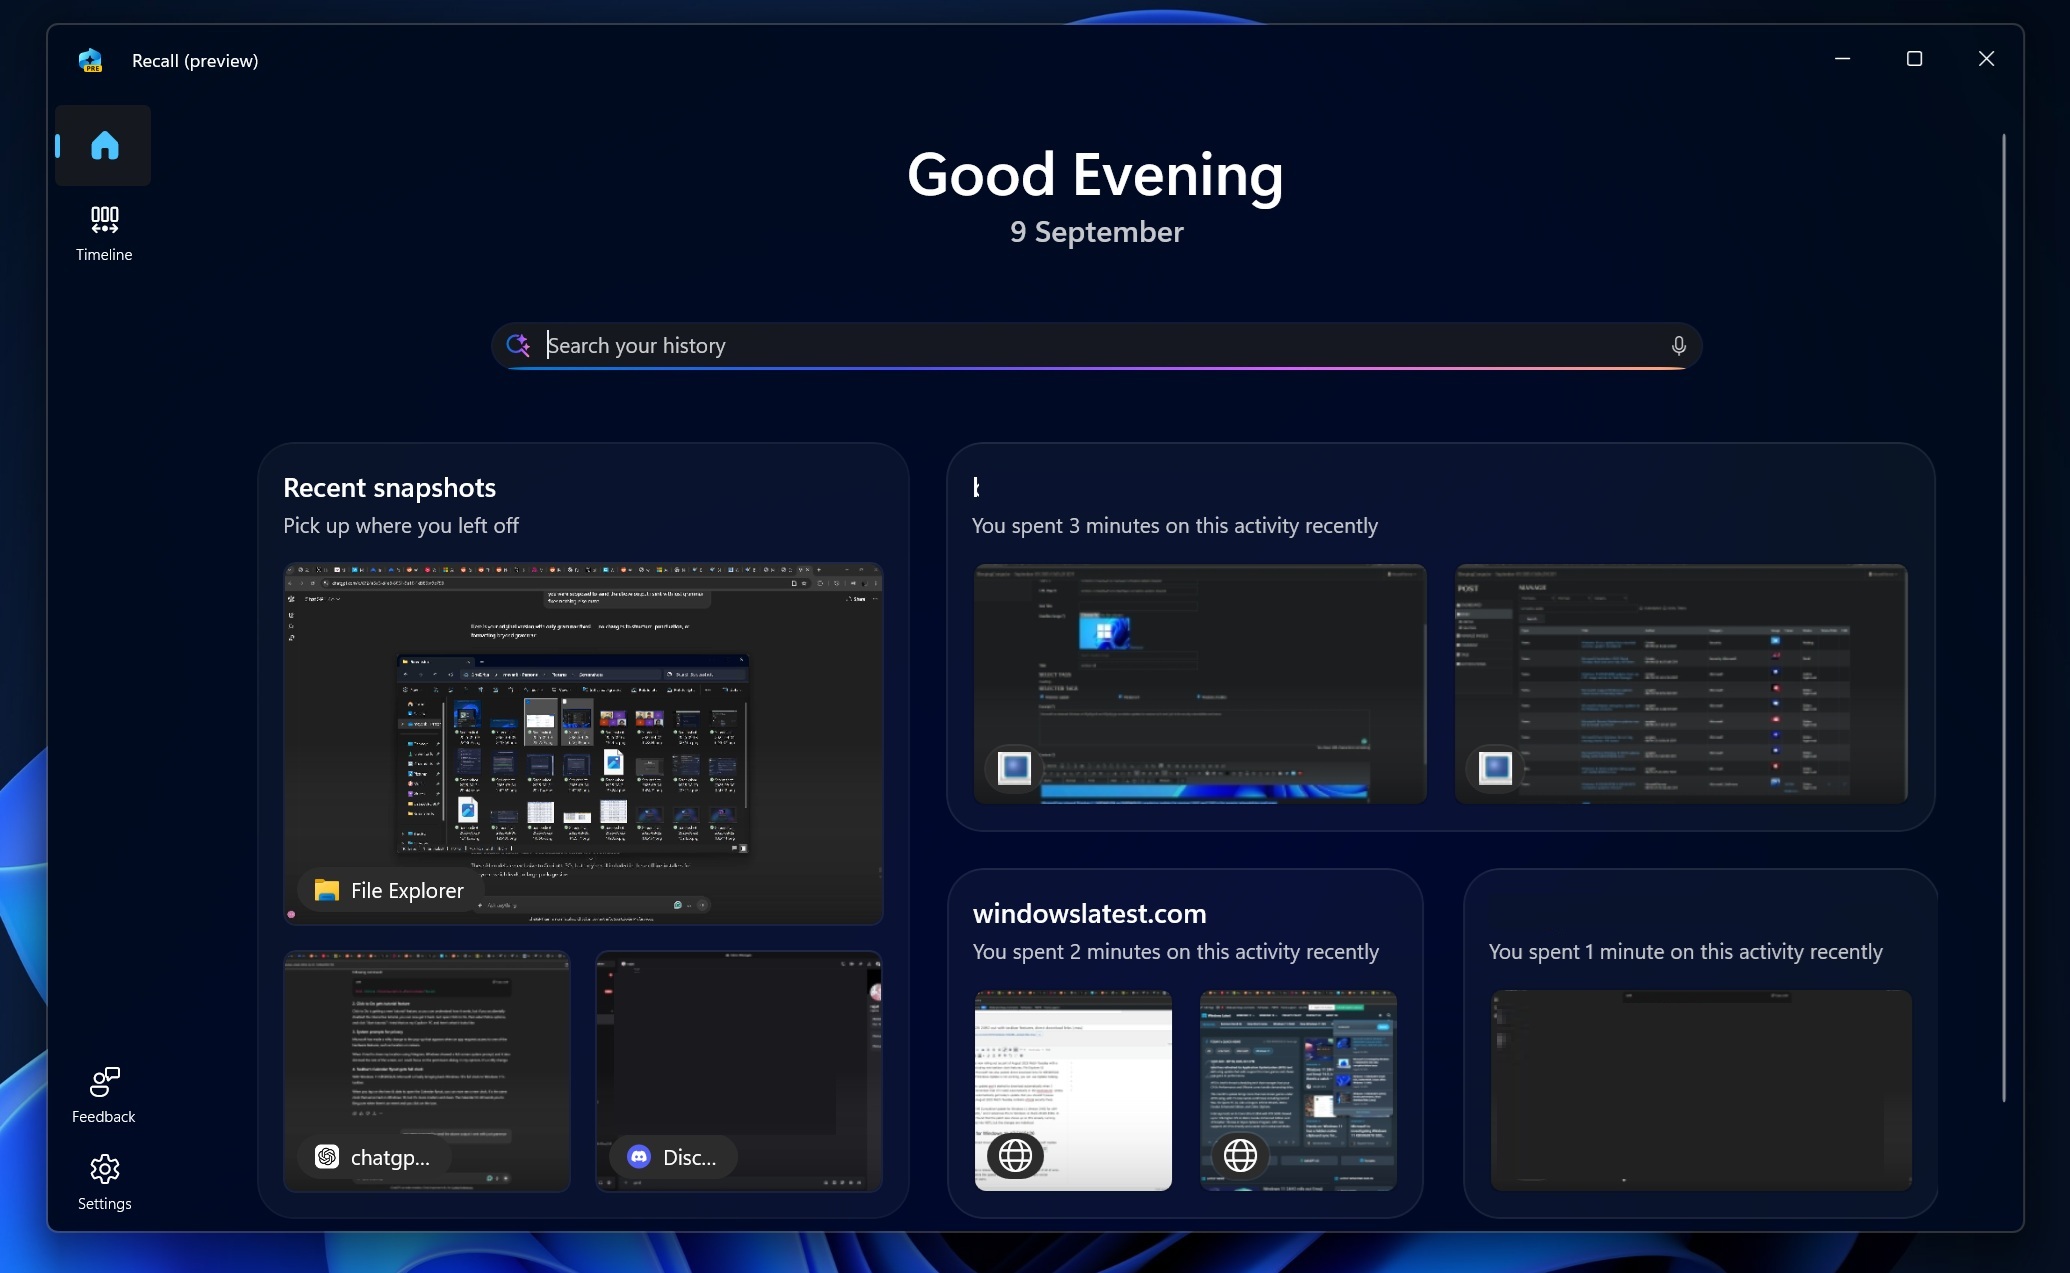
Recall is exclusive to Copilot+ PCs with NPUs and is disabled by default. But the feature and its components are still present on your system unless you remove them manually. The good news is that Microsoft now officially allows users to uninstall Recall completely, without registry hacks or unofficial tools.
Here are the supported ways to disable and remove Recall from Windows 11:
Uninstall Recall from Settings (recommended)
This is the easiest and safest method.
- Open Settings.
- Click System.
- Scroll down and select Optional features.
- Click More Windows features.
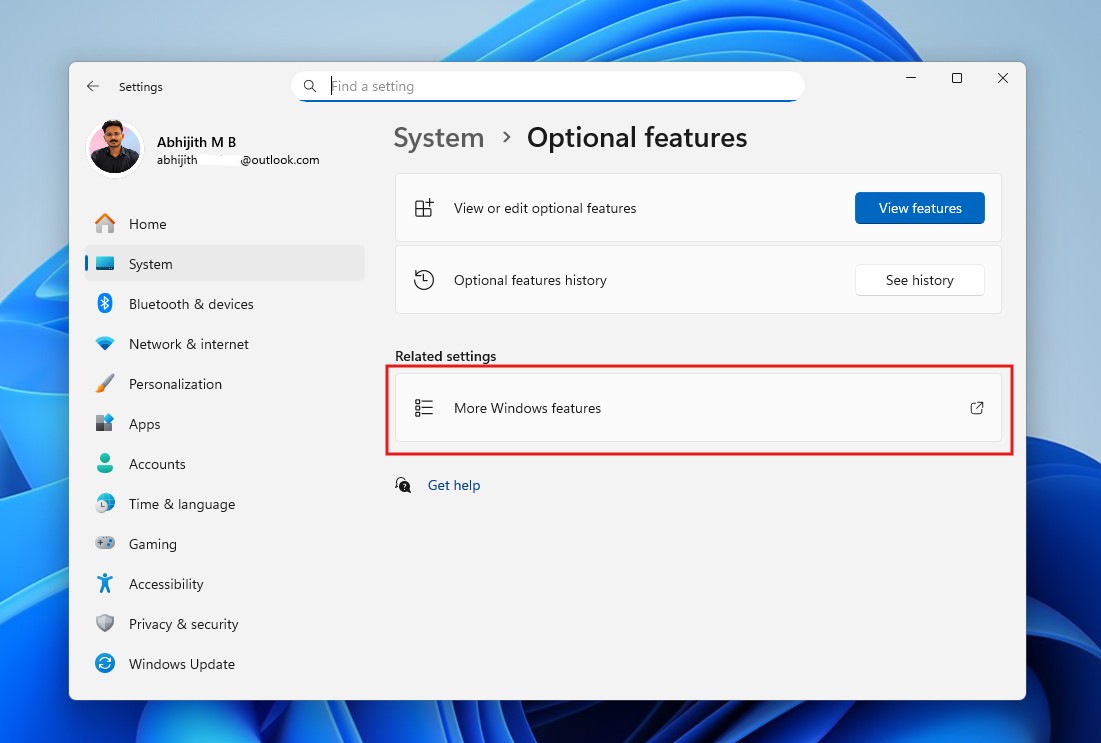
- Scroll till you find Recall in the list.
- Uncheck it.
- Click OK.
- Restart your PC.
Once you complete these steps, Windows will remove Recall and its related AI components from your system. You would still be able to reinstall Recall from the Windows Features page.
Remove Recall using PowerShell
If you prefer command-line tools, you can uninstall Recall using PowerShell.
- Open Start.
- Search for PowerShell.
- Right-click it and select Run as administrator.
- Run the following command: Disable-WindowsOptionalFeature -Online -FeatureName “Recall”
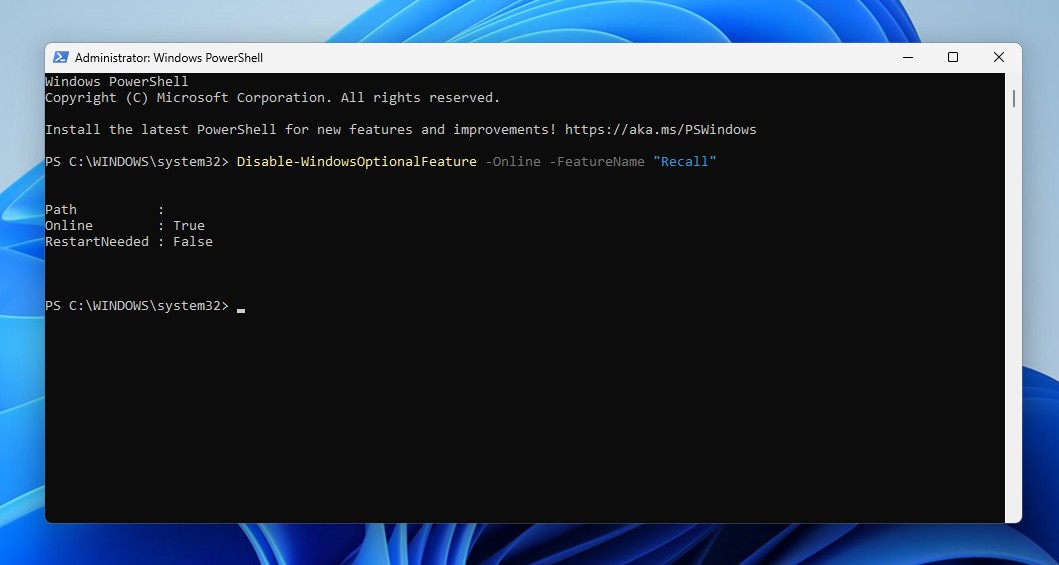
- Restart your PC when prompted.
Remove Recall using Command Prompt (DISM)
- Open Start.
- Search for Command Prompt.
- Right-click and choose Run as administrator.
- Type the following command and press Enter: Dism /online /Disable-Feature /FeatureName:”Recall”
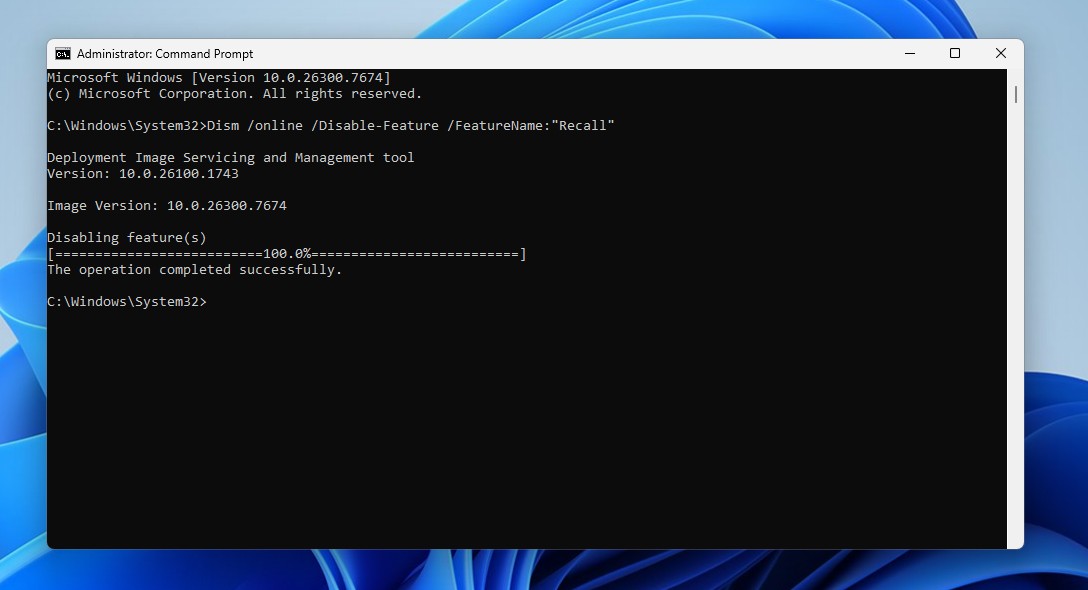
- Restart your PC.
#13 Disable Click to Do on Copilot+ PCs
On Copilot+ PCs, Microsoft has introduced a feature called Click to Do, which lets you right-click selected text, images, or screenshots and send them directly to Copilot for “AI actions”.
If you don’t want Windows to constantly bring up AI when you select something, you can turn this off.
Turn off Click to Do from Settings
- Open Settings.
- Click Privacy & security.
- Select Activity history or Windows permissions (may vary).
- Find Click to Do.
- Turn the toggle Off.
Once turned off, Windows will stop showing Copilot-powered actions when you select text, images, or screen content.
Disable Click to Do using Group Policy (Pro and higher)
If you’re on Windows 11 Pro, Enterprise, or Education, you can block it completely.
- Press Win + R and type gpedit.msc
- Navigate to: Computer Configuration > Administrative Templates > Windows Components > Windows AI
- Find Click to Do. Double-click it.
- Set it to Disabled.
- Click Apply and restart.
This removes the feature at the system level.
This article isn’t about us hating on AI. In fact, we use all AI platforms daily for different purposes (based on what each model is good at), even Copilot! The problem is not the AI. It is the way Microsoft chose to force it into every corner of Windows 11.
The goal of this guide is to help you take a step back from the intrusive AI features that Microsoft has been churning out over the past couple of years. That aggressive push has taken hatred towards Windows 11 to a whole new level, to the point where Microsoft has now publicly admitted it needs to fix Windows first and scale back unnecessary AI integrations.
That said, a quick safety note. We have tested all the methods mentioned in this guide on multiple systems, but some steps involve Registry and Group Policy edits. If you are not comfortable with system-level changes, take backups first and proceed carefully. A small mistake in these areas can cause unexpected issues.
Do you use any AI features in Windows 11?


")
")

 and it removes old modem drivers")
